1962 Bel Air Bubble Top 409 Project

CASHguzzler409

Well Known Member
Supporting Member 6
Hey blkblk63SS where are you getting your parts for so "CHEAP", mine are more like 1500, 2500
:roll, thanks for knowing how I feel. Its just another 10,000 ?, well maybe a little more to finish it. :scratch
 

CASHguzzler409

Well Known Member
Supporting Member 6
For those from California, that are not use to this kind of metal, here you go. Rust-liscious at it's best.100_1452.JPG100_1453.JPG100_1454.JPG
:bang:doh:oops
 

CASHguzzler409

Well Known Member
Supporting Member 6
An update on removing and installing rear tail pan and brace, its a big job. I myself don't have the knowledge to do it but my partner
and his friend Brain did. We had got lucky and bought the complete tail pan, the brace that is underneath it and about 6" of the rear
trunk floor, it was all in one piece, and after taking it to the sandman it looked like new. Drilling the spot welds out was one of the hard
things to do, but even harder was braking the spot welds with a chisel. I'll bet there are 50 or more across the back and inside the trunk to take
apart. They took a saws all and cut right across the seam, behind the tail lights and from the 1/4 panel to the well and down about 4" all the way to the other side and up again to the 1/4 panel. It really looked great. After cutting the back end off and just leaving the tub well hanging, the body sort of spread apart and the gaps were to large to fit the brace and tail pan pieces. At first it wasn't a bit funny, but then after thinking about it, it was ok. They had to get our car straps out and wrap them around the car, under the fenders, like a belt, to pull the fenders in, so the parts would fit tightly. After taking a closer look at the underside of the trunk well, I guess were going to have to replace the bottom well part, as under the metal brace that runs across the bottom has rusted out, from the underside. Im sure many of you have done this, and to some it was easy, but it does take some experience and guts to tackle it. Thanks goes out to Paul Stensland for the parts and help.
:doh
Here are some pic's
.100_1452.JPG100_1456.JPG100_1457.JPG100_1458.JPG100_1459.JPG100_1460.JPG100_1461.JPG100_1462.JPG100_1463.JPG
 

CASHguzzler409

Well Known Member
Supporting Member 6
Thanks guys for the encouragement, it does help. Our car is over at my partners house on the rotisserie, so I've been going over there almost
everyday to watch, lol, and help when I can. Yesterday I was given the task of grinding all of the spot welds down smooth, damn there's a lot
of those buggars. Well today when I arrived Barry had all ready cut out the bathtub part and his head was sticking up out of it when I pulled in.
A funny site to see. We spent most of the day tackling one side of the middle trunk area, and cutting out the boxed in frame mounts. It sure is nice
that they make those parts, almost to easy.... Yeah right. Also thought we might have some fun and decorate the inside of the trailer with car
pictures and stuff you hang on your walls in the garage. Trying to find some of the cars I owned to hang up. Here's some more pic's of our day. As you can see we bought a rotisserie this time, man is it a lot easier to work on things. 100_1464.JPG100_1465.JPG100_1466.JPG100_1467.JPG100_1468.JPG100_1469.JPG100_1472.JPG100_1474.JPG100_1475.JPG100_1476.JPG
 

wrench

Well Known Member
Supporting Member 15
Pictures taken during this type of resto are invaluable! Mine needs quite a lot to be restored as well. I hope you plan on making a complete photo album of the start to finish!
 

CASHguzzler409

Well Known Member
Supporting Member 6
Thanks Wrench, I got the idea from one of the members after they did video's of their restoration. As Im not the one with the knowledge I take
the pictures and tell how they do some of this, its quite interesting to watch them think and work. After yesterdays work and pictures, Barry
had cut out a portion of the wheel well that had not been fixed by the previous owners. First I should say when we bought this car, they had a
Professional put in a complete floor from the cowl, to the back seat, and replaced most of the underneath braces. They also replaced the drivers
side rear quarter panel, passenger lower quarter panel. He had fixed both doors, both fenders, the hood (3) of them were junk and we took them the metal junk yard. The car came with a 409 truck engine rebuilt, 4 spd tranny etc, these we did not buy. So back to the Body Work. My partner is very good at fixing metal and painting. He cannot understand how someone can start and not do the best possible job , even when it takes much
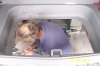
longer to complete, he's just that way. So fixing someone else's body work is quite a challenge. So today he cut the portion out of the wheel well lip.
It was probably 3/4 of the lip area long, 24" or so, and about 2 1/2 in wide, now this is a curved section. He had some light metal of a "FOREIGN" car.. lol sometimes its good to use light metal to shape things. He had cut a section out, and used it to pattern the new piece. I sat in my chair outside his garage, it was a nice day, and watch him work on the piece for maybe a good 2 hrs. I don't say anything to him, because he's in DEEP concentration. He laid it in and it was very close, till it had to make the turn down. This is a straight piece, so he cut a slice in it in two places about 4" apart and then it would bend and make the turn. How cool, was that to watch. He always uses Por 15 sealer on metal before welding another piece over it, thats to protect the rust from coming back..... Rust is NOT your friend. 100_1477.JPG 100_1478.JPG 100_1479.JPG 100_1483.JPG 100_1480.JPG 100_1481.JPG 100_1482.JPG
WEll enough BS for today, here's a few more pictures of our day.
 
Last edited:

wrench

Well Known Member
Supporting Member 15
I put my restoration on the back burner for two reasons. One was I had no place to do it. The old house had no garage and had a dirt driveway. The other was I bought a new (old) place that has a two car garage built onto the house and has a two car garage with a workshop in the back corner of the property, plus a full concrete driveway. That ate up part of the restoration funds.

I hope to get the car restored before my last day!

Love the photos! Keep up the good work!
 

CASHguzzler409

Well Known Member
Supporting Member 6
Back again will another story. Barry cut out the badly rusted area in the trunk, installed new metal boxes for the frame mounts, fixed the wheel well
rust problem, and today we got the metal from Car's to finish up the sides and tub portion. Today Barry and Brain started on the front cowl
replacement. I've never seen so many spot welds in my life, it was quite a job, and it took over 7 hrs for them to finish it. The cowl is made up of many
pieces, each have a huge amount of spot welds, you have to drill them out and then pry off the welds to get the part to come off. Then they had to do the same with the new part, lastly spot welding it all back together, when done grinding it will look like new. Well its done and Im glad for that. We did get lucky and bought the cowl section from Paul, it saved our ass again. The guys on this site have a wealth of knowledge and are gracious
enough to share it. Thanks...


100_1491.JPG 100_1492.JPG 100_1493.JPG 100_1494.JPG 100_1501.JPG 100_1437.JPG
 

CASHguzzler409

Well Known Member
Supporting Member 6
Getting closer to having it in (1) color. We've finished up the cowl, and the trunk, except we are waiting for the
drivers side rear upper panel, you know the drill, back ordered. lol We cut out the 4 speed hole and placed the
reinforcement panel in, almost makes you want to start shifting. Did a lot of grinding on spot welds and anything else that
needed cleaned up. We drilled out the spot welds for the brace holding the dome light, and cleaned that part of the roof
up so it won't rust any more. It really was in nice dry shape, it will also make easier to place insulation or heat material
in that place without the brace in the way. This is a 60's type commercial metal buffer, my partner is restoring it and we
will have our good friend Tommy, he use to work for Art Brass Plating in Seattle, 40 some years experience doing buffing.
He will straighten and polish all of all our aluminum parts.
Sandblasted the heater parts, and the brace today. Hope to have the body in Deltron Black Sealer soon. Wrench, one thing is for sure, if you keep the car, you'll getter done, sooner or later.

100_1488.JPG


100_1511.JPG 100_1517.JPG

100_1514.JPG

100_1516.JPG

100_1517.JPG

100_1520.JPG
 

CASHguzzler409

Well Known Member
Supporting Member 6
These are just some pictures to look at, my partner Barry is also restoring a 76 step side pickup truck while
doing our 62 Bubble top.


100_1468.JPG 100_1463.JPG 100_1464.JPG 100_1466.JPG 100_1474.JPG 100_1468.JPG 100_1469.JPG 100_1473.JPG
 

Attachments

  • 100_1465.JPG
    100_1465.JPG
    51.3 KB · Views: 21
  • 100_1467.JPG
    100_1467.JPG
    51.3 KB · Views: 22

DonSSDD

Well Known Member
Supporting Member 2
Thanks for the pics, makes my joints stiff looking at some of them. Good work.

Don
 

CASHguzzler409

Well Known Member
Supporting Member 6
Thanks DonSSDD, you would have laughed yesterday, watching me try to get up off the floor, lost my balance, or should I say I didn't have
enough muscel :laugh:rollin legs to get up...hahhaha Its not easy when your 250 and older than the trees around here.
 

CASHguzzler409

Well Known Member
Supporting Member 6
Another milestone, "ONE COLOR" again, this time DelStar Black Sealer, yippy I can see no rust anywhere.... Ya Baby....:cheers
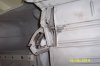
. Barry was more than happy to have the Rotisserie this time, it sure made it nice, and was easy on his back. I try my best to keep him in good shape, well, at least till the car is on the road.. lol
Our next step will be to do the body work, put in the seam sealer, where ever the factory had it. It's getting pretty warm for Seattle, in the high 80's and low 90's, so the Duraglass and
bondo sets up so fast, at the price its selling for, you sure don't wont to let any harden up on you.

100_1521.JPG


100_1522.JPG


100_1523.JPG


100_1524.JPG


100_1525.JPG


100_1526.JPG


100_1527.JPGWill have to install heat insulation then weld in brace.
 
Last edited:

jim_ss409

Well Known Member
Supporting Member 5
She's looking really slick now! :cool:
You're right about getting the car painted one color being a milestone. It looks great! :beer
 

CASHguzzler409

Well Known Member
Supporting Member 6
Thanks Jim, we've got a friend with a 55 gasser. I'll send a picture of it, its a 350 and turns 13.5 @ 104 mph. He's painted it and he's having a ball, 1st year out. 100_1449.JPG100_1450.JPG100_1451.JPG
 
Top