61 Impala restoration

Jhall

Well Known Member
I wanted to share some progress pics of a project my dad and I are working on. We have never done a frame off restoration before and are learning as we go. The car was built at the Van Nuys CA plant. Drive train consists of 400" small block and T-10 4spd. Factory Ermine White exterior & Red/White interior. We are going to stay with the factory colors.

The initial picture is the way we bought the car, complete & driveable.
 

Attachments

  • IMG_0134_1.JPG
    IMG_0134_1.JPG
    98.7 KB · Views: 285

Jhall

Well Known Member
Here are some pictures of the car stripped down to bare metal.
 

Attachments

  • IMG_0659_1.jpg
    IMG_0659_1.jpg
    49.7 KB · Views: 236
  • IMG_0672_1.jpg
    IMG_0672_1.jpg
    57.5 KB · Views: 311
  • IMG_0681_1.jpg
    IMG_0681_1.jpg
    45.3 KB · Views: 226
  • IMG_0682_1.jpg
    IMG_0682_1.jpg
    49.4 KB · Views: 232
  • IMG_0685_1.jpg
    IMG_0685_1.jpg
    63.2 KB · Views: 289

Jhall

Well Known Member
more pics of shiny metal.
 

Attachments

  • IMG_0684_1.jpg
    IMG_0684_1.jpg
    56.9 KB · Views: 203
  • IMG_0688_1.jpg
    IMG_0688_1.jpg
    62.9 KB · Views: 180
  • IMG_0790_1.jpg
    IMG_0790_1.jpg
    63.2 KB · Views: 199
  • IMG_0798_1.jpg
    IMG_0798_1.jpg
    70.4 KB · Views: 233

Jhall

Well Known Member
Pics of body work.
 

Attachments

  • IMG_0811_1.jpg
    IMG_0811_1.jpg
    53.7 KB · Views: 168
  • IMG_0812_1.JPG
    IMG_0812_1.JPG
    90.3 KB · Views: 172
  • IMG_0817_1.jpg
    IMG_0817_1.jpg
    53.3 KB · Views: 151
  • IMG_0819_1.jpg
    IMG_0819_1.jpg
    49.7 KB · Views: 152
  • IMG_0803_1.JPG
    IMG_0803_1.JPG
    93.2 KB · Views: 213

oldskydog

Well Known Member
Supporting Member 10
Very nice. Looks like you guys know what you're doing. Are you sure you don't want to reconsider the powerplant and go with a nice W engine?:deal
 

Jhall

Well Known Member
pics of body being removed from frame.
 

Attachments

  • IMG_0834_1.jpg
    IMG_0834_1.jpg
    62.8 KB · Views: 178
  • IMG_0835_1.jpg
    IMG_0835_1.jpg
    60.8 KB · Views: 147
  • IMG_0838_1.jpg
    IMG_0838_1.jpg
    56.9 KB · Views: 179

Jhall

Well Known Member
Body work continuing.
 

Attachments

  • IMG_0846_1.jpg
    IMG_0846_1.jpg
    53.7 KB · Views: 116
  • IMG_0847_1.jpg
    IMG_0847_1.jpg
    60.2 KB · Views: 125
  • IMG_0851_1.jpg
    IMG_0851_1.jpg
    46.5 KB · Views: 107
  • IMG_0852_1.jpg
    IMG_0852_1.jpg
    48.4 KB · Views: 110
  • IMG_0885_1.jpg
    IMG_0885_1.jpg
    47.7 KB · Views: 129

Jhall

Well Known Member
More body work.
 

Attachments

  • IMG_0890_1.jpg
    IMG_0890_1.jpg
    45.3 KB · Views: 114
  • IMG_0891_1.jpg
    IMG_0891_1.jpg
    51.3 KB · Views: 117
  • IMG_0878_1.JPG
    IMG_0878_1.JPG
    96.9 KB · Views: 130
  • IMG_0879_1.JPG
    IMG_0879_1.JPG
    87.2 KB · Views: 138
  • IMG_0881_1.JPG
    IMG_0881_1.JPG
    95.3 KB · Views: 110

Jhall

Well Known Member
We took the frame down to metal and have shot one coat of primer. We will be finishing it with a chassis black.
 

Attachments

  • IMG_0893_1.jpg
    IMG_0893_1.jpg
    65.4 KB · Views: 194
  • IMG_0894_1.jpg
    IMG_0894_1.jpg
    52.9 KB · Views: 176
  • IMG_0902_1.jpg
    IMG_0902_1.jpg
    95.2 KB · Views: 163
  • IMG_0906_1.jpg
    IMG_0906_1.jpg
    77.7 KB · Views: 265

Jhall

Well Known Member
My father and I are new to the impala scene. I've done a lot of research and from what I can tell most of the cars came with a red oxide belly. There was a very light coat of undercoating in certain areas that I have removed. Once the undercoating was removed I noticed that there is a blue type of primer on 90% of the belly (rockers/trans tunnel/above gas tank. I do see some signs of red oxide near the rear wheel wells but thats it. My dad and I are considering having the blue matched and re-done as it will be a nice contrast with the ermine white. I'm not into the 100 point car stuff, just a nice driver. I've attached some pics of the bottom side of the body.
 

Attachments

  • IMG_0915_1.jpg
    IMG_0915_1.jpg
    52 KB · Views: 183
  • IMG_0701_1.jpg
    IMG_0701_1.jpg
    66.8 KB · Views: 200
  • IMG_0702_1.jpg
    IMG_0702_1.jpg
    59.5 KB · Views: 165
  • IMG_0703_1.jpg
    IMG_0703_1.jpg
    57.9 KB · Views: 197

real61ss

Well Known Member
Supporting Member 8
"Once the undercoating was removed I noticed that there is a blue type of primer on 90% of the belly (rockers/trans tunnel/above gas tank. I do see some signs of red oxide near the rear wheel wells"

Some of the cars during these years were painted with gray primer on the underside, from the looks of the color above your gas tank this may have been the case with your car. However, if the car was gray primer it's strange that you are seeing some red oxide. I would think the same primer would have been throughout. '61 to '64 cars have been documented as being gray, red oxide or black on the underside
 

Jhall

Well Known Member
Thanks for the responses.

The car was stripped using the poly carbonate 8" stripping wheels. You use the edge and slowly go up and down the panels. Less heat build up but alittle time consuming. I was affraid to go the media blasting route for fear of blowing holes in some of the known problem areas with these cars. The car wasn't totally rust free. I had to put some metal in the lower front fenders behind the wheel wheels. I had to cut a few sections out of the front of the peaks in the fenders due to the bad design by GM allowing mud/dirt/etc to get up in this area. They should have encapsulated this area with the inner fender well. We had to cut out a portion of the passenger side quarter in front of the wheel well. Finally there was a few thin spots on the lower drivers door that was replaced. The floors/trunk were perfect.

What I have found that works really well with getting surface rust/paint off is the 3M roloc bristle disks (green). I'm truely amazed how well these work.

Getting back to the primers used. The whole interior was shot from the factory with red oxide, go figure ! Maybe a friday car....use what they had around ?
 

Tom Kochtanek

Well Known Member
Supporting Member 13
Excellent report!

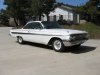
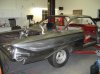
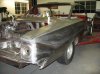
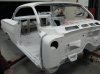
I have to say, I am very taken by your effort. To me, the 1961 full size Chevrolet was an excellent design in terms of styling, some of the best from the late fiftes in terms of lines, along with some new into-the-60s looks combined with those. Has to be something from Bill Mitchell of the GM Stlying Studios.

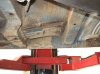
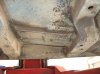
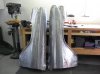
The thought and work you are putting into this project is awesome. Dismantling a vehicle into it's individual parts and reassembling them using the correct coatings and colors is a challenging task. We commend you on taking this approach! For most of us this would take the better part of the next years of our lives. So we know what you are going through. Seems you have it all planned out, have the space and resources to do the job correctly, that is really special :).

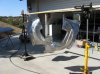
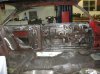
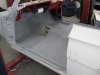
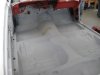
It sure is fun to take apart a Van Nuys car, isn't it? Everything spins off, nothing breaks or snaps, stuff cleans up fairly easily and can be reused. Doesn't get much better, eh?

I'm working on a '62 that spend much of it's life in Nebraska, want to come help out when you are done? All kidding aside, these projects become a life unto themselves, but eventually you get them done to your satisfaction, little steps at a time (celebrate when you do make progress!), and in the end, you get to enjoy them for what they are, and share them with enthusiasts like us. Thanks for doing that. Now I need to get out to the garage and put some hours on my project :).

Have fun!

TomK
 

Jhall

Well Known Member
Here is a photo of the undercarriage after removing some of the undercoating. Also a couple of pics of the interior floor prior to removing the primer. The black coating was a rust encapsulator that we put down prior to deciding we would strip it to metal.
 

Attachments

  • IMG_0748_2_1.jpg
    IMG_0748_2_1.jpg
    60.4 KB · Views: 183
  • IMG_0756_2_1.jpg
    IMG_0756_2_1.jpg
    55.5 KB · Views: 160
  • IMG_0759_2_1.jpg
    IMG_0759_2_1.jpg
    65.8 KB · Views: 173

Jhall

Well Known Member
A few more pics of the undercarriage in various stages. I ended up using a 1/2" wood chisle to remove the undercoating. It didn't gouge the metal at all. The undercoating came off in decent size chunks.
 

Attachments

  • IMG_0704_1.jpg
    IMG_0704_1.jpg
    63.3 KB · Views: 130
  • IMG_0705_1.jpg
    IMG_0705_1.jpg
    60.9 KB · Views: 116
  • IMG_0706_1.jpg
    IMG_0706_1.jpg
    60.3 KB · Views: 123
Top