1962 Bel Air Bubble Top 409 Project

CASHguzzler409

Well Known Member
Supporting Member 6
Got a new Avatar, we are reasembling the motor and have run into a couple small problems, one was when installing the passenger head we were missing 1 (one)
head bolt, so we installed all but that one. Put the rockers, push rods, and everything on, next day when putting in new head bolt we noticed something wrong,
it just wasn't going in all the way. So... we take off the head and find that this was the only one of the wholes that was striped and someone had put in a heli coil, and it had a burr on the thread, so we are replacing that.
:grumble
 
Last edited:

CASHguzzler409

Well Known Member
Supporting Member 6
:flag
New photo's for you picture guy's.
 

Attachments

  • 100_1630.JPG
    100_1630.JPG
    79.9 KB · Views: 203
  • 100_1631.JPG
    100_1631.JPG
    88.5 KB · Views: 213
  • 100_1632.JPG
    100_1632.JPG
    83.4 KB · Views: 206
  • 100_1633.JPG
    100_1633.JPG
    79.1 KB · Views: 207
  • 100_1634.JPG
    100_1634.JPG
    78.1 KB · Views: 200
  • 100_1636.JPG
    100_1636.JPG
    82.6 KB · Views: 185
Last edited:

CASHguzzler409

Well Known Member
Supporting Member 6
Well when things are going wrong, its like a freight train, just can't stop it. Our problem with the heli-coil turned into a real problem. We took the old one
out and replaced it, thinking that would be it, put the head back on, but this time started with the bad bolt, it did not match up with the heli coil, so we take
off the head again, to find after lining up all top four bolts, that the bolt is about a 1/4 " off , they drilled the hole at an angle, so the bolt will not come down through the head an line up. Yesterday went to the local machine shop, first thing I see on a stand is a pair of 348/409 heads.
How funny is that. The manager listen's to my story, ask about which bolt it is and where is it on the block, he goes into the work station, and comes back with a
tool kit, small box. Its called a BIG-SERT tool kit that has a drill, threading tap, and a tool for inserting the threaded new part, kind of like a heli-coil, but better.
Cost 75.00 to rent, about 115.00 to buy. Sure hope this works. He said "IF" you drill it straight and tap it the right way, it "should" work just fine. I found on the internet a company called Full-Torque that has a similar kit, but also they have made a tool you can bolt onto the block with a hole for another tool to sit in, to
guide the drill and tap, looks like that might give you a little more confidence, when taking the drill into your hands, for the one time operation. I might have to call in a Specialist, Head Bolt Doctor.
:tantrum:furious
 

CASHguzzler409

Well Known Member
Supporting Member 6
Got the Head Dr. in today, and wall ah, our bad, stripped hole is fixed. WOW... rented the BIG-SERT tool kit and it worked out fine. I can't say I had much to do
with it, but i did do the research on the kit. Now I can finish up installing all the goodies on the motor, install the tranny, put on the exhaust. Looking good,
might just have to decide on some tires for this bad boy. We start back on the body tomorrow, should be in primmer soon then paint.
:cheers:love
 
Last edited:

62impala409

 
Supporting Member 1
How did you keep the drill and tap 90 degrees to the deck surface? A fixture or drill guide? That is the same procedure they use to repair the GM NorthStar engines when the undersize head bolts pull out of the aluminum blocks. Leo
 

CASHguzzler409

Well Known Member
Supporting Member 6
Hi 62Impala409, I was not able to see the guys do this, but tomorrow I will try and take some pictures of how they did it. They used a carpenters triangle
to set the position of the drill and thread tap to make sure they were on the right angle. I am usually the one taking the pictures and they do the work,
nice huh..?
 

CASHguzzler409

Well Known Member
Supporting Member 6
62Impala409 I drew up a sketch of what they did and it shows the tri-angle they used, I believe its used in their roofing and carpentry jobs. This was a
2 person job. One would hold the triangle and a vacumm to suck up all the drilling bits. They took masking tape paper and covered the head they were working on, so no metal shavings would enter the piston holes. They had the 1 hole cut into the paper to drill through. and one other one for measuring the correct posture of the bolt, then using the triangle to make sure they were drilling and taping at the right angle. After slowly drilling and double checking the angle of the hole, they moved on to the taping of the hole for threads. He was very carefull not to go to fast, taking the tape down just 1 or 2 threads, then bringing the tape out, blowing off any metal shavings, then going another 1 or two turns, always double checking to make sure he was in the right angle. After
that I believe they also sent a tool, in the kit, to install the coil. Lastley he hooked up a straw to his vacumm and cleaned out all the holes, and all the water passages for particles of metal or rust. Hope these pictures help, please "do" laugh at my drawings, they are so bad.:roll


100_1643.JPG100_1644.JPG100_1645.JPG100_1642.JPG
 
Last edited:

blkblk63ss

Well Seasoned Member
Supporting Member 5
Just curious did you get the motor with the car when you bought it or did you buy motor separately???
 

CASHguzzler409

Well Known Member
Supporting Member 6
Hey 63 we did NOT get the motor with the car. We found most of our parts, motor, tranny, and some very hard parts to find from a well know supporting member on this forum. Its a 62 - 068, with 690 heads, all the right dates for our car. Without his help, and direction, we'd be lost. Thanks Paul.
:cheers:bow
 

CASHguzzler409

Well Known Member
Supporting Member 6
Just a note to all that could not make it to Great Bend, they invited one of the nicest racer's of all times to be Grand Marshall, Mr. Hayden Proffitt.
He was in the "Welcoming Tent", and was one of the best parts of this convention. He took the time to talk to you, answer all your questiong with a smile and laugh. Thanks Phil for bringing him along to make this # 2 convention a #1 in my book.
 

Attachments

  • 100_1750.JPG
    100_1750.JPG
    68.4 KB · Views: 48
Last edited:

CASHguzzler409

Well Known Member
Supporting Member 6
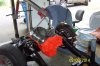
The last couple weeks have been full of good and bad things happening. After we set the value leash we were happy and ready to move on. All this time
we had rags laying in the valley, pre-caution for not dropping something down into the engine. I for some reason removed the rags to clean out the bolt
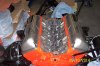
holes for the intake, .......Yep I did it.... dropped a bolt for the intake, it landed in the valley and then slid over and down, and then made a big sound, it had hit the bottom of the pan. We then had to take the engine out, put it on the engine stand on its side, then remove the pan, and there it was. Nice huh..?
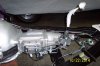
Put the engine back in and installed the manifold, it was kind of giving us problems too, so had to use some gasket sealer to hold the gasket on the block,
it seem to want to slide down a little, so the bolts hit the gasket a little, finnally got that fixed and on. Hooked up the flywheel, clucth, and tranny.
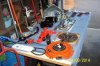
We now were thinking we might just start it up on the frame, so we tried pre-oiling it with a used cut off dist. It didn 't work out as we were using a
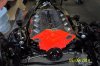
non-409 dist shaft without the holes in it for oiling purposes. In this process, we learned that the real distributor would not go all the way down into position. It was just not going, we called in a friend and he looked at it and said, there was a little burr, he could feel inside the block that was keeping it from droping down into position. We'd have to take off the intake, get his drummel and shave off the burr. It worked fine. I had bought our 881 manifold from a guy that had it power coated, not that great an idea. The oil filler tude would not go in, as the coating made the hole to big, drummel time again, and the water temp gauge too. Also had to peal off around the distributor hole, they said, it needed to be metal for a ground, out comes the chisle and drummel again. I had ordered a exhaust kit from Ecklers, 2 - 1/2 from the manifold and 2- 1/2 in from the mufflers back. I also ordered the original bracket
kit, but come to find out that the original kit is for 2 " from the mufflers back. Now I have to send it back and get the right kit, its not easy when you
are doing your first 409. One thing I did learn is in 62 they had 2 different types of exhaust manifolds for the 409's, one that dumps in the middle, and one that
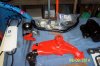
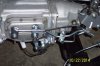
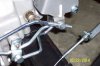
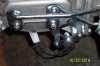
dumps in the rear, its important to get the right exhaust kit for the different manifolds. Next job was installing the BW T-10 Hurst shifter and linkage.
For some of you, that would be easy/queasy, but for me, there is a 1000 ways to put those rods on. Days later I was done. My partner said he could do it in 15 minutes. Right... He's still laughing. Were moving along on the body of the car, and have most of it in primer, it should move along quicker now. 100_1810.JPG100_1812.JPG100_1822.JPG100_1825.JPG100_1826.JPG100_1827.JPG100_1829.JPG100_1831.JPG100_1832.JPG
 
Last edited:

CASHguzzler409

Well Known Member
Supporting Member 6
Transmission Linkage pictures... please tell me if you think I have installed the rods right. I would have hated to do this job with the body on...hahaha I
thought I'd send you guys some dough nuts...... damn there good. Coffee anyone?
:lmao
 

Attachments

  • 100_1842.JPG
    100_1842.JPG
    63 KB · Views: 122
  • 100_1818.JPG
    100_1818.JPG
    66.2 KB · Views: 134
  • 100_1819.JPG
    100_1819.JPG
    68.3 KB · Views: 137
  • 100_1820.JPG
    100_1820.JPG
    66.2 KB · Views: 129
  • 100_1821.JPG
    100_1821.JPG
    61.5 KB · Views: 113

DonSSDD

Well Known Member
Supporting Member 2
Progress- that shifter is correct, if its shifts like it should................:burnout:burnout:D:D

Keep up the great work.

Don
 

CASHguzzler409

Well Known Member
Supporting Member 6
Thanks DonSSDD, sure hope to hear this 409 run some time soon. She's been real stubborn, its been a challenge, but we're about to tame the old girl.
Looks like your BT is done and on the road, must be nice.
:dance3
 

CASHguzzler409

Well Known Member
Supporting Member 6
It was a great time in Great Bend, and nice that we got to chat some. Your car is extra nice, hope to see it and you again in Wa. this time.
 

CASHguzzler409

Well Known Member
Supporting Member 6
The body of the 62 is now in final primer, waiting to set up and wet sand. We're waiting for the exhaust system to get here, then we thought we would try and start the motor. But before doing that I need some help with some technical issues. Our engine is a 62 QB block, rebuilt with .30 over Ross pistons , standard polished crank (0.10/010 on rods and mains) , the cam is a 62 -63 -solid lifter cam#3822930 .rebuilt 690 heads with new valves, original springs and rocker arm and nuts with solid lifters and 3/8 pushrods. Original 2x4 carbs AFB, 919 dist. original exhaust manifolds, with 2-1/2 in. to the mufflers, and then 2" from there to the back.
We did use a dist. shaft to pre-oil the engine. Have oil in filter canister.
:dunno

Our main concern is what to set the valve lash at ? with this cam?. We have them set at 12 - 20, cold, using the 8 point system.
Our 409 motor, and 4 spd transmission are in the frame, the drive line is not hooked up yet. We plan on installing the fan/with fan clutch, radiator, 4 core new, and radiator support with correct 409 fan shroud. A large fan in front of radiator for extra air flow.
Any ideas or things to check before trying to start it. Im not sure how to set it up to get gas to it yet, Im sure there are many that have done this before, so thanks for any idea's and help. CASH guzzler 409
 
Last edited:
Top