Transfer 61 bubble roof onto 62 impala cpe

62bubble

Well Known Member
Supporting Member 5
Work on the bubble top project has been a little slow this year due to other time consuming jobs, however, Jim and I did manage to get additional body work done on the car. Jim used the English wheel to fabricate a new patch panel for the lower right quarter panel, both behind the door and behind the rear wheel. Jim also had to make a new drop panel that drops down from the inside of the trunk to which the lower quarter panel attaches. All of the floors and floor braces have now been located in the correct locations and are set with self tapping screws. I used the 1963-64 seat tracks to set the location of the two forward floor braces , which match the holes in the new floor pans. I have also set the 62 seat tracks alongside of the 63 tracks to show the difference in the length of each track. The 62 being shorter than the 63.
 

Attachments

  • DSCN0690.JPG
    DSCN0690.JPG
    64.7 KB · Views: 324
  • DSCN0701.JPG
    DSCN0701.JPG
    60.6 KB · Views: 338
  • DSCN0708.JPG
    DSCN0708.JPG
    44.4 KB · Views: 334
  • DSCN0709.JPG
    DSCN0709.JPG
    51.6 KB · Views: 341
  • DSCN0714.JPG
    DSCN0714.JPG
    73.3 KB · Views: 338
  • DSCN0716.JPG
    DSCN0716.JPG
    36.2 KB · Views: 337
  • DSCN0717.JPG
    DSCN0717.JPG
    79.6 KB · Views: 336
  • DSCN0718.JPG
    DSCN0718.JPG
    76.3 KB · Views: 352
  • DSCN0719.JPG
    DSCN0719.JPG
    70.2 KB · Views: 340
  • DSCN0720.JPG
    DSCN0720.JPG
    64.6 KB · Views: 263

CASHguzzler409

Well Known Member
Supporting Member 6
Nice work, you'd never know that was fixed. Keep up the hard work, its sure nice to see some improvements to keep you motivated. Thanks for the pic's.:appl
 

Greg Reimer

Well Known Member
This is an outstanding project. The VIN gives away the body style, so there is no way to pass this off without falsifying the VIN,but you guys are not trying to do that. It's just a nice build. I like the fact that the reason for the whole project is just because you want to. Best wishes on an outstanding project as you get it to completion.
 

tripower

Well Known Member
Supporting Member 2
I hope you finished welding those panels in and did not do your body work over just the tack welds.
 

Jim Sullivan

Well Known Member
Supporting Member 10
I hope you finished welding those panels in and did not do your body work over just the tack welds.
Well I know all of the patches were welded up except the right rear quarter patch before it left my garage. Mike better have finished welding that right rear patch before he started with the filler and primer!:poke:)

Where are you Mike?:taunt
 

62bubble

Well Known Member
Supporting Member 5
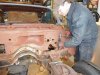
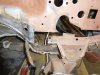
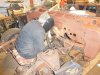
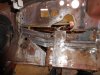
Hi guys, been away for a couple of days. So nice to know that you all are watching out for me , and guiding me through this last project..Yea, I know I forgot to take pictures of the patch panel of the right RR quarter panel, and Jim did such a great job on it too. Sorry about that. But have no fear, I did complete all of the rest of the welds prior to laying on the mud, and all of the new metal has a good coat of epoxy primer over it to put it to sleep over the winter. I have a lot going on here lately, so the mind is not working like it used to a few years ago. My wife and I were visiting our families, and on the drive home, we asked the question, how did we get to be 75 years old so fast... Greg, I have no intensions of passing off this impala as a true Bel Air Bubble Top, it is something that I just wanted to do as a project, and to enjoy driving, just as I enjoyed putting a 409 into a 62 Impala SS convertible. And without Jims help, none of this would never have been possible, so thank you Jim, a true friend....
 

62bubble

Well Known Member
Supporting Member 5
Still on light duty, so I thought I should finish the upholstery for the interior of the bubble top. Buffed out the stainless molding for the door panels and the upper rear arm rest panels and installed them onto the door panels. Also pulled apart the rear arm rest metal, and wire brushed the rust spots that had formed over the past 53 years, and rust proofed all of those spots.. I also primed the back of each stainless molding to keep them from rusting . After the moldings were installed onto the door panels, I put a spot of seam sealer over each of the metal pointed tabs , to protect them from rusting also. They should be good for the next 53 years or longer , as the factory did not protect any of the raw metal on these molding, and the tabs would rust away. I was lucky, all of my tabs were in good shape. I just had to put a photo of my daily visitor to the back yard in here...
 

Attachments

  • DSCN0752.JPG
    DSCN0752.JPG
    78 KB · Views: 157
  • DSCN0753.JPG
    DSCN0753.JPG
    59 KB · Views: 159
  • DSCN0754.JPG
    DSCN0754.JPG
    30.4 KB · Views: 153
  • DSCN0755.JPG
    DSCN0755.JPG
    47.4 KB · Views: 156
  • DSCN0756.JPG
    DSCN0756.JPG
    52.2 KB · Views: 149
  • DSCN0757.JPG
    DSCN0757.JPG
    62 KB · Views: 156
  • DSCN0758.JPG
    DSCN0758.JPG
    70.2 KB · Views: 150
  • DSCN0759.JPG
    DSCN0759.JPG
    47.1 KB · Views: 116

Jim Sullivan

Well Known Member
Supporting Member 10
Looks great Mike. Are you going to be around Saturday? I just have to run to Mount Cobb early for a yard sale then I'll be in the shop.
 

62bubble

Well Known Member
Supporting Member 5
The door panels won't , but a broadhead from the crossbow would. Naw, I better not...
 

62bubble

Well Known Member
Supporting Member 5
Jim, I have a funeral service to go to Sat morning , I don't know when I will be back, I'll stop over if it is not too late..
 

62bubble

Well Known Member
Supporting Member 5
After some warmer weather took over, Jim and I decided to do some work on my 62 bubble top. The firewall needed a lot of repair, so over to Jims garage went the car. We had to cut out all of the rusted metal out of the firewall, including a portion of the heavy brace that ran the lower part of the firewall. Jim did an outstanding job on duplicating that heavy brace, as well as the additional patches that he had to make. Once we got the firewall welded in place, we fit the floor pans to the toe boards and the rocker panels and welded them in. A lot of time and a lot of welding to finish this part of the project, but it is now a very solid car again...
 

Attachments

  • DSCN0827.JPG
    DSCN0827.JPG
    85.9 KB · Views: 208
  • DSCN0829.JPG
    DSCN0829.JPG
    80.5 KB · Views: 211
  • DSCN0830.JPG
    DSCN0830.JPG
    91.2 KB · Views: 218
  • DSCN0831.JPG
    DSCN0831.JPG
    86.9 KB · Views: 219
  • DSCN0832.JPG
    DSCN0832.JPG
    85.2 KB · Views: 223
  • DSCN0834.JPG
    DSCN0834.JPG
    85.1 KB · Views: 211
  • DSCN0844.JPG
    DSCN0844.JPG
    55.3 KB · Views: 209
  • DSCN0846.JPG
    DSCN0846.JPG
    86.2 KB · Views: 214
  • DSCN0847.JPG
    DSCN0847.JPG
    84.9 KB · Views: 172

CASHguzzler409

Well Known Member
Supporting Member 6
Boy that brings back memories, we had to do somewhat the same on the other side, NICE job. Especially glad to see
that Jim took the time to do it the right way, break spot welds is a lot of work, as there are so many of them.
Your door panels are looking good. Just shows how much I look at things, mine were installed and very nice, but I
noticed a couple days ago, they had no stainless on the back 1/4 arm rest panel. Well now Im look for those 2
straight pieces of stainless, its hell getting old. You must be quite happy to have some of the hard welding done.
Keep it up. stan:appl
 

62bubble

Well Known Member
Supporting Member 5
Jim, the loading worked out great, your father-I-Law hooked me up and on she went. Nelda worked the wench when I unloaded , got it all covered up... Hey Stan, that is why I have Jim to double check all of my work, just to keep me straight so I don't forget something. It is easy to do at our age, measure twice-cut once...
 
Top