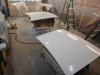
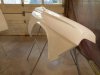
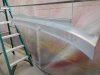
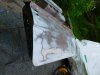
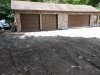
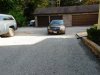
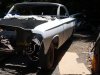
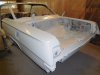
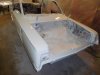
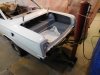
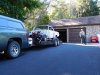
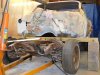
Have been doing some work on the bubble top but have not put any updates onto the site for awhile so here is the progress that Jim and I have made so far. Finished repairs to the left bottom quarter panel, repaired both doors, and have now applied primer filler to the body , doors, and fenders . Jim came over and we lined up the doors and fenders until we were able to get our desired gaps. I will be doing some block sanding in the next few weeks to get the body ready for color. We hope to paint the dash and all of the interior moldings this weekend. After 30 years , I had to redo my drive-way, so all of the old asphalt had to be removed and the ground reshaped for proper water run off. The new paving was installed this past Friday. No burn outs Jim.....

You are using an out of date browser. It may not display this or other websites correctly.
You should upgrade or use an alternative browser.
You should upgrade or use an alternative browser.
Transfer 61 bubble roof onto 62 impala cpe
- Thread starter 62bubble
- Start date

Lookin good !
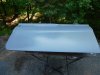
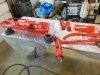
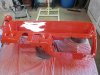
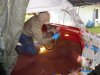
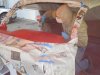
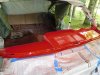
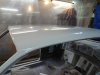
Some additional progress on the bubble was completed over this past weekend. Took the car over to Jim's Outdoor paint booth where the interior moldings and the dash in the car were painted in Roman Red. Jim worked his magic with the paint gun. I have been spending many hours block sanding the body, fenders, doors, hood and trunk lid, and all are ready for the Ermine White color to be applied. Jim and I hope to have the car painted by the end of Sept. , and onto the finished frame. This will be a long awaited result after years of hard work putting this project together. Here are a few pics from this past weekend...
Attachments

Nice work..........look'n good............
Took the car over to Jim's Outdoor paint booth where the interior moldings and the dash in the car were painted in Roman Red.
I had a friend in central Kansas who used to restore cars as a hobby. He would roll the cars outside his shop after it had rained the night before. Said it completely cleaned the air and he always got a beautiful paint job. Must have been pretty good.........he sold 2 cars to Reggie Jackson!!!!

")
No burn outs Jim.....
The burnouts shall be done elsewhere

I'm still in awe you pulled off a roof swap
 The bodywork looks great! Never seen a bubbletop with six taillights this oughta be good
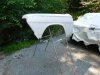
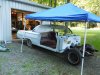
Just getting the "spray booth" ready for the weekend. Hopefully I'll be painting air cleaners in the next bay between clear coats on the bubble top. Going to be a busy weekend. 
Last edited:
The body and doors are painted and the doors hung back on the car. I'll post a picture while Mike is waiting to get his computer up and running.
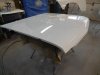
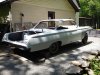
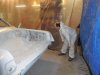
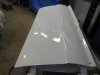
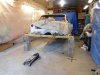
Finally got my computer fixed, and ready to go. Jim and I have been busy the last to weeks getting the bubble top ready for paint. Two weeks ago I had completed the block sanding on the primer getting it ready for the Ermine White paint. Last Saturday, Sept 18 I moved the car into Jim's paint booth for the finish paint job. Jim went to work with the paint gun, while I held the air hose from touching the fresh paint being applied to the car. We made a great team. Three coats of base and three coats of clear were applied to the car. Both doors were also painted at this time. After three long years working on the car, I was so great to finally see some color on the car. Now let the color sanding begin.....
Attachments

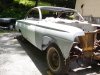
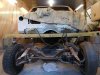
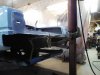
This past Sat., it was time to pull out the old frame from under the car, and set the car onto the completed frame. We did this in Jim's garage, and several cinder blocks, some wooden blocks, an engine lift and a floor jack, we lifted the car off the the old frame, and rolled the new frame under. When the new frame was set onto the new rubber mounts, measurements were taken and the body mount bolts were secured and torqued down. From start to finish, it took us 2 hrs and ten minutes to jack the car off of the old frame, remove it, and roll the new frame under the car , set it down on the new rubber mounts , measure and tighten all of the bolts. Done.....
Attachments

Hope the rest of the pics show up here.
Attachments
-
 DSCN1116.JPG59.5 KB · Views: 125
 -
 DSCN1117.JPG64.9 KB · Views: 134
 -
 DSCN1118.JPG80.9 KB · Views: 129
 -
 DSCN1119.JPG69 KB · Views: 129
 -
 DSCN1120.JPG92.5 KB · Views: 139
 -
 DSCN1121.JPG104.3 KB · Views: 149
 -
 DSCN1123.JPG102.2 KB · Views: 141
 -
 DSCN1114.JPG86.3 KB · Views: 138
 -
 DSCN1116.JPG59.5 KB · Views: 126
 -
 DSCN1118.JPG80.9 KB · Views: 103
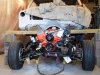
Sweet!! Great choice of wheels, they're perfect for that car
Thanks Kevin and Skip, yes those wheels are original American Racing Wheels from the 60's. I was lucky enough to be in the right place at the right time to get my hands on them. I will also be sand blasting the steel wheels sometime in the future, and painting them white, as I have a nice set of dog dish caps for them, if I want to switch wheels now and again...
Thanks Kevin and Skip, yes those wheels are original American Racing Wheels from the 60's. I was lucky enough to be in the right place at the right time to get my hands on them. I will also be sand blasting the steel wheels sometime in the future, and painting them white, as I have a nice set of dog dish caps for them, if I want to switch wheels now and again...
That way the cops wont know who left those marks on the road

Steve
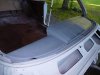
Yesterday was the day Jim and I have been long waiting for. The day we finished painting this project 62 Bubble Top. This was Jim's very first paint job that he used a Base Coat-Clear Coat. We both learned a few things as we went, but when all was said and done, it turned out pretty darn nice. When all of the color sanding and buffing is completed it should look better than factory....Can't wait to get started. I need a little help before installing the headliner. Can anyone help me choosing the correct inside roof insulation to be used . I had to remove all of the factory insulation, as it was hanging down in most places. I believe the factory insulation was about 1/8 inch thick. Is that about right. So I would need the new replacement insulation to be close to that or a little less to make the headliner fit properly. I was looking through Hubbards Cat., and I see that they have a peel and stick , that is marked NEW, but it does not say how thick it is. Any help and input would be greatly appreciated.