You better take him and his family out to dinner!!! You saved a lot of money ......Ok, great news.
Spoke on the phone this evening. He has the parts in a storage unit, he said he will go there and inventory the parts and get them into one spot ready for pick up.
He said I can HAVE all the parts except for the grill. Said he will need a little money for the grill.
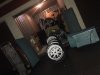
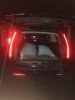
When he bought the car he said the front and rear seats were covered with clear plastic covers. He said the whole interior was mint and looked brand new when he took the covers off. Says the door panels are like new too.

You are using an out of date browser. It may not display this or other websites correctly.
You should upgrade or use an alternative browser.
You should upgrade or use an alternative browser.
63 Biscayne junior stock drag car build
- Thread starter Tom Miller
- Start date
Tom Miller
Well Known Member
I know, what a huge step forward to get the interior stuff back.You better take him and his family out to dinner!!! You saved a lot of money ......
Tom Miller
Well Known Member
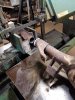
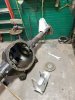
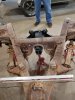
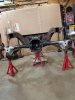
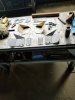
Last couple weeks I have been figuring out how to go about putting this 8.5" 10 bolt into the car.
Finally came up with a solution to get the original lower control arm brackets onto the new rear.
Once I get them tacked in place, I will be able to install it in my frame section(fab jig) and start making the upper control arms and brackets to finish the triangulated 4 link.
Finally some progress.
Finally came up with a solution to get the original lower control arm brackets onto the new rear.
Once I get them tacked in place, I will be able to install it in my frame section(fab jig) and start making the upper control arms and brackets to finish the triangulated 4 link.
Finally some progress.
Attachments


Tom Miller
Well Known Member

Explain please. I've had a couple.
Tom Miller
Well Known Member
Sorry, the guy that used to own my car finally made it to his storage unit to retrieve the back seat and the front and rear door panels.Explain please. I've had a couple.
Tom Miller
Well Known Member
Tom Miller
Well Known Member
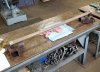
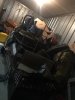
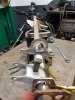
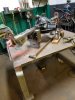
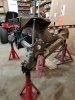
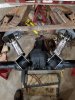
Rough mock up.
Got the remnants of the old brackets ground off smooth tonight.
Tomorrow during work I'll get it all set up level and into position, put some tack welds on it, then take it back home.
Once I get it hung in my frame section and get the pinion angle roughly set, I will make the front upper brackets and fabricate some upper control arms with adjustable HD heim joints.
...stay tuned...
Attachments

Tom Miller
Well Known Member
Tom Miller
Well Known Member
Nice work. 
Do you have an alignment bar to keep the housing straight when you weld the brackets on?
Do you have an alignment bar to keep the housing straight when you weld the brackets on?
Tom Miller
Well Known Member
I'll come up with something.Nice work.
Do you have an alignment bar to keep the housing straight when you weld the brackets on?
Tom Miller
Well Known Member
Tom Miller
Well Known Member
Tom Miller
Well Known Member
Happy Thanksgiving.
Just got a text from the previous owner, he said why don't we meet up Sunday morning so you can get this interior and grill.
Just got a text from the previous owner, he said why don't we meet up Sunday morning so you can get this interior and grill.
Thats awesome you’re getting your interior back!! Right where it belongs, that stuff is not easy to find. Why it was ever removed from the car in the first place is beyond me. Looks like you'll make that 10 bolt work out pretty good
Tom Miller
Well Known Member
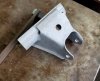
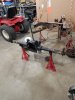
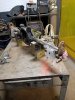
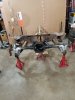
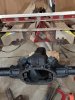
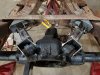
I got it.
Modified my upper arm angles and brackets, bolted it together.
Heims run nice and smooth from top of travel to the bottom.
Next step is finish weld everything and reassemble the rear and get ready to put it in the car.
Modified my upper arm angles and brackets, bolted it together.
Heims run nice and smooth from top of travel to the bottom.
Next step is finish weld everything and reassemble the rear and get ready to put it in the car.
Attachments
Tom Miller
Well Known Member
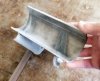
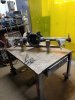
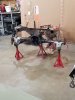
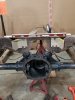
Keeping this old rear frame section was a game changer.
I can't even begin to imagine how much more difficult and time consuming this would have been laying on my back on a concrete floor under the car.
Would not have been fun, that's for sure.
Going to make support brackets that go on the front of the crossmember down to the frame using the upper arm bracket bolts.
Also have to make plates to weld onto the upper arms to tie everything together.
What do you have for articulation of the rear end housing, like up on the right and down on the left?