How much work to install the Chevelle 12 bolt in an X-frame car

425/409ER

Well Known Member
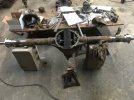
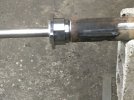
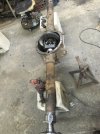
Well, here's an update on my rear axle swap, so far the 12 bolt is in the car but now I'm at a stand still as it's too frickin cold out to work on it right now. The current problem is still the carrier spacing is still wrong on the setup as one axle is our too far and the other is in too far, so the carrier pin is offset which is a problem. When it warms up I am pulling the other 12 bolt out and am going to do a depth setting of the pinions on the 2 rear ends. I suspect this is where the problem is. I am pretty sure the person may have put the wrong pinion bearing race in the 12 bolt so it may be sitting to low. I did open up the 3.31 12 bolt and everything is right in there, so I figure I have a good starting place to go from. Mother nature needs to co-operate so I can go outside to play meckinic again.
 

425/409ER

Well Known Member
Yea, today was nice enough for me to pull the 4.10 112 bolt out and get some depth settings between the 2 12 bolts. Pulled the covers off, got out the veneer caliper and check both pinions, I do know the 3.31 is right and here's what I found. The 4.10 12 bolt has a depth from the end face of the pinion at .488 and the 3.31 has a depth of .477 now to me the 4.10 gear is placed to high in the case as that .100 off me thinks, so it then pushes the carrier more over to one side. I took both the 4.88 pinion that was in the rear end, and the 3.08 I was trying to use and set a straight edge across the tops of the pinion bearings and they are the same. I suspect that this 12 bolt has the wrong race in the back side of the case, so I'll have to knock it out of there to check and see what it is. Boy this work is so much fun, but it still beats fixing the stupid computer I had to get going this week. That required some nitrous brain power.:laughing:roll:lol:
 

425/409ER

Well Known Member
Well, if luck would have it I got this sucker fixed. Turns out it was the wrong carriers all along, all 3 of them dang. So today I took a measurement off a know good GM carrier and came up with .900 which some articles said was a 2 series carrier WRONG. I also checked all of the other 3, the one that the 12 bolt came with and 2 new ones that were supposed to be 3 series. Those 3 were way wider so they were either 4 series or Truck posi's, either way they all were wrong causing the differential offset problem. I put the 3.08's in and it was spot on with close to that same amount of shim on both sides with around a .007 backlash which is fine for GM 3.08's IMO. I have this posi apart to clean it up and get all the old gunk out of it, and the clutch plates look pretty good. The 12 bolt will get some paint, a trick rear cover and some new brakes and brake lines, we'll be good to go. Glad this is done. Next up will be a test of my turbo 400's that I rebuilt to see how one of them works on the street. Wish me luck, I'm gonna need it at this rate.:laugh4
 

425/409ER

Well Known Member
Is the Chevelle rear end the same width as the original 63 rear end?
It's like an 1 1/4" wider on each side, so no biggie to make it work. Just waiting for some warmer weather to start this project and move some cars around. Except for the upper control arm bushings and rear brakes the 12 bolt is ready to go.
 

409EL

Member
I've got a few pics of my journey, 1. turning down center bushings, 2. checking clearances, 3. tooling ready, 4. sizing backing plates, 5. end cuts, 6. fabbed center line gauge and mock up, 7. ready to weld, 8. completed and test fit.
 

Attachments

  • IMG_1004.JPG
    IMG_1004.JPG
    34.6 KB · Views: 21
  • IMG_1005.JPG
    IMG_1005.JPG
    49.8 KB · Views: 17
  • IMG_1008.JPG
    IMG_1008.JPG
    70 KB · Views: 18
  • IMG_1009.JPG
    IMG_1009.JPG
    75.5 KB · Views: 16
  • IMG_1015.JPG
    IMG_1015.JPG
    86.5 KB · Views: 17
  • IMG_1022.JPG
    IMG_1022.JPG
    83.9 KB · Views: 19
  • IMG_1027.JPG
    IMG_1027.JPG
    67.2 KB · Views: 19
  • IMG_1033.JPG
    IMG_1033.JPG
    90.4 KB · Views: 23

425/409ER

Well Known Member
I've got a few pics of my journey, 1. turning down center bushings, 2. checking clearances, 3. tooling ready, 4. sizing backing plates, 5. end cuts, 6. fabbed center line gauge and mock up, 7. ready to weld, 8. completed and test fit.
Nice work :good
 
Top