Skip FIx
Well Known Member
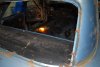
I've looked on you tube and a bad set of videos on removing chrome trim to remove rear window and windshield trim so I thought I would post some things I've found. Some of you may know these but some may not like me. I've pulled trim off later second gen Camros Firebirds and even my 65 GTO but the Impalas is different in how the clips are in. It also did not help how much sealant/putty there was in trying to get the clips to release. We often had to dig that or even the window rubber around the clips to try and get them to release. The good thing is all that sealant crap did it's job and there was surprisingly no rust in the channels-unlike A bodies like my GTO and Chevelles. Pulling the package tray off and the paint was as shiny as 1964! From looking at these I bet neither glass was ever removed.
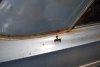
So do do the rear glass first you need to remove the trim that goes around the sail panel. There is a speed nut on a stud in the trim but also the two clips one at the front near the quarter window that is under some black tape in a hole inside(pictured) and one in the trunk. Since the clip at the front was not releasing that would have made it easier. The lower rear window trim has a clip in it's channel that clips in a clip under the window gasket. So a clip in a clip on the lower section,these were also just half in the bottom clip to one side. Sides and top section trim just use the single clips but are a pain when there is so much putty sealant it almost fills the chrome trim!
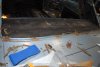
Windshield-what freaking engineer designed this sequence!! To pull off the side windshield trim there are two screws one top and one at the bottom UNDER the window weatherstrip channel. So the weatherstrip channel has to be removed to get to the top one , on the passenger side to get to both. And if the weatherstrip as been glued in the channel good luck not tearing it. So how did they do that at the dealerships to replace a cracked windshield?
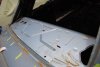
Good and bad news I was planning on leaving the original paint with it's patina look but having to remove so much of the trim it is darned near ready to prep for new paint!
So do do the rear glass first you need to remove the trim that goes around the sail panel. There is a speed nut on a stud in the trim but also the two clips one at the front near the quarter window that is under some black tape in a hole inside(pictured) and one in the trunk. Since the clip at the front was not releasing that would have made it easier. The lower rear window trim has a clip in it's channel that clips in a clip under the window gasket. So a clip in a clip on the lower section,these were also just half in the bottom clip to one side. Sides and top section trim just use the single clips but are a pain when there is so much putty sealant it almost fills the chrome trim!
Windshield-what freaking engineer designed this sequence!! To pull off the side windshield trim there are two screws one top and one at the bottom UNDER the window weatherstrip channel. So the weatherstrip channel has to be removed to get to the top one , on the passenger side to get to both. And if the weatherstrip as been glued in the channel good luck not tearing it. So how did they do that at the dealerships to replace a cracked windshield?
Good and bad news I was planning on leaving the original paint with it's patina look but having to remove so much of the trim it is darned near ready to prep for new paint!