
You are using an out of date browser. It may not display this or other websites correctly.
You should upgrade or use an alternative browser.
You should upgrade or use an alternative browser.
64 Coupe driver's window frames available?
- Thread starter Skip FIx
- Start date
I just did my Nova door glass, all new edge chrome and new bottom channel and track chrome. I used the proper window setting tape and folded it over the glass edge. I then took a rag with kerosene on it and wiped the window setting tape before installing the channel with a rubber mallet. After setting I trimmed off the excess and placed the windows in the sun to dry the Kerosene. The Kerosene aids in putting the chrome on and causes the tape to become tacky which makes it stick to the chrome, it is important that you use the right thickness setting tape. A buddy of mine who's dad owned an auto body and glass shop back in the 60's and 70's told me about the Kerosene.
Skip FIx
Well Known Member
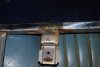
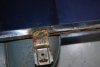
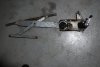
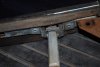
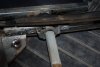
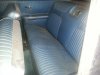
Here are the bottom tabs that were brazed on, and regulator. Pretty hard to snake it out of the door.
How do you get the outer window felt/trim off the door? Don't see any screw like the vent window front piece. And felt/fuzzy for the front and rerar channels? How is that replaced. All my second gen F bodies never had a channel for the windows.
The rollers in the regulator just pop off?
How do you get the outer window felt/trim off the door? Don't see any screw like the vent window front piece. And felt/fuzzy for the front and rerar channels? How is that replaced. All my second gen F bodies never had a channel for the windows.
The rollers in the regulator just pop off?
Attachments
There is no manual on how to do the windows, a/c, instrument cluster, and other similar items.
I have learned by doing all three of the ones you mentioned on 62’s ( which are similar to 61’s, 63’s and 64’s) by doing the work at least 5 times on frame off restorations.
Paul
I have learned by doing all three of the ones you mentioned on 62’s ( which are similar to 61’s, 63’s and 64’s) by doing the work at least 5 times on frame off restorations.
Paul
Skip FIx
Well Known Member
The shop manual for my 78 Pontiac is fairly detailed on all the chassis stuff, and the body manual is detailed on most of the body parts like windows etc.
Paul your instructions have been quite helpful thanks. I'm leaving one side intact before I tackle it so I can see how it goes back together even though I'm taking lots of pictures.
Trying to get the factory A/C box out and it is kind of confusing at least there is more room under the dash than on my Trans Ams and Camaro!!
This 64 I am leaving the patina original paint but interior will be new and windows need to seal. Frame will probabaly come off to blast paint or powder coat and add the 9" and get ready for the 409.
On your window questions.
Brazing of the factory lower window channels to repair them is fairly common. I have had or do have about 10 sets of door glass, about a third of them had been repaired by brazing them( vs buying a new channel) which is the correct way and doing the new chrome channel removal by dirlling out the spot welds as I noted above. If you don't remove that lower track the window controls cannot be installed in the doors and then install the new glass with new lower tracks.
Replacement of the vent window seals ( comes as a set of 4), requires removing the vertical division bar felt channels ( that normally need replacement) by drilling out the rivets that hold the vertical channels and replacing the rivets with flat head screws, nuts and washers. You also normally need new vent window assembly stops at the top of the vent window assemblies (held in place with philips screws to the pot metal outer window frames. More on the vent window restoration later.
Paul
Brazing of the factory lower window channels to repair them is fairly common. I have had or do have about 10 sets of door glass, about a third of them had been repaired by brazing them( vs buying a new channel) which is the correct way and doing the new chrome channel removal by dirlling out the spot welds as I noted above. If you don't remove that lower track the window controls cannot be installed in the doors and then install the new glass with new lower tracks.
- The door window controls go back in the car after the vent window assembly’s are removed and replaced. The two sliding tracks are installed after the window controls are installed.
- The short track horizontal track (with one adjustable hex nut (in a vertical slot) is the first one installed with the window controls for reassembly. This track is used to adjust the windows after reinstalling them
- The longer sliding track is one that goes in after the door glass is in place ( tilt the vent frame assembly to the front of the car to be able to install by sliding the door glass down into both tracks). - then the door glass frame is screwed to the new modified lower door glass track with the two attachments (like the original brazed pieces) with new fine thread screws & nuts with star washers( replacing the factory threaded mounting tabs that used fine thread screws with fixed washers)
- grease the plastic rollers and/or these 2 horizontal tracks before reinstalling them (with white grease )
- The stainless steel ( the correct name- reveal molding trim ) is held on the door frame buy 2 or 3 small Phillips screws in small slots or round holes in the stainless. One screw next to the vent window vertical track, one at the rear by the door lock knob and possibly one in the center of the trim. Sometimes these screws are hard to remove( rusty) - do not round out the Phillips heads trying to remove them -spray with rust treatment/hit the philps screwdriver with a hammer -to break loose the rust .
- The rear 1/4 stainless reveal molding trim is also held in place by small Philips screws - again two of them.
- When installing the stainless reveal moldings with new rubber seals the installation re-uses these factory Philips screw holes in the sheet metal. The rubber seals are factory stapled to the stainless trim - replace the rubbers using new staples, drilling out the factory staple holes slightly larger to match the new staples them installing the new staples and bending them like the factory staples.
- The rubber seals ( that are factory stapled to the stainless) are called “side glass window felt kits“ ( they only come in 8 pieces - you only need 4 pieces unless you are replacing your door panels and rear 1/4 panel pieces.
- Buy only RePops brand only for this 8 piece kit......Cars sells Repops brand -over $ 100. The cheap seals are not worth it to buy them. RePops brand- https://carsinc.com/catalogsearch/result/?q=4132a
- The remaining 4 chrome beaded seals go to ( or come from) your interior company( Cars or Ciadella) along with your cleaned “original metal top rails” for your door panels and rear 1/4 metal top rails
- ( DO NOT use Reproduction metal top rails For your new assembled door and rear 1/4 side panels set.................!!!)
- You should also replace the felt strips on the rear door glass tracks (just as the vent assembly vertical tracks. This material comes in a 1 & 3/4 inch wide roll of material that is glued into the track with 3M adhesive. You have to scrape out the original worn out felt with a sharp tool -screw driver even works that has sharp edges on it.
- For 1961-1964 convertibles the curved rear 1/4 window tracks have felt strips to replace(great fun removing these original felt strips.... -these new felt strips are 2 & 3/4 inches wide and can be purchased new and glued in with folded edges in the ribbed rear 1961 to 1964 convertible only with 3M spray adhesive
Replacement of the vent window seals ( comes as a set of 4), requires removing the vertical division bar felt channels ( that normally need replacement) by drilling out the rivets that hold the vertical channels and replacing the rivets with flat head screws, nuts and washers. You also normally need new vent window assembly stops at the top of the vent window assemblies (held in place with philips screws to the pot metal outer window frames. More on the vent window restoration later.
Paul
Is there a Body Manual that tells how to pull out the windows and things like the A/C evap box, instrument cluster. I have the assembly manual and it is not that much help.
Actually I have been asked to write a restoration book for 1961 to 1964 Chevy's by a large publishing company, after Vern Frantz forwarded my name to them. I have not decided what to do on this request. They want lots of pictures and descriptions on every area of the cars.
Since I had my body work/paint done by professionals and motor work done by friends and local machine shops -with my supervision - I might not have enough pictures and full information.....
Paul
When rebuilding your door seals and fuzzies don't overlook those nylon wheels as they usually have flat spots and or wobble on the axle rivet. New ones are available and easy to put on and will make a world of difference when rolling your windows up and down. To set the rivets properly you will need a rivet set, they run around $20.00 and are worth every penny.
Skip FIx
Well Known Member
Thanks guys as usual. I will look harder for the screws for the door molding. I looked but did not see them. The good news on the passenger side on the vent window frame the screw that was seized on the driver's side is totally missing just a hole!
Vent window it self looks like you rotate it so the tabs on the bottom line up with slots and it goes up, but mine does not go up enough to come out.
Paul I print out your comments and have them in a 1 gal. ziplock to protect from moisture and look at them at the shop as I work! Since rainig her today no pasture mowing just hot rod work! Going to try and fire the Pontiac powered Camaro after adding a vacuum pump to the motor and work on the 64 Interior.
post a picture of the current vent window mounts ( upper and lower) - you may have to turn the vent window assembly away from the door frame to clear the vent controls( the vent controls can prevent removal).
i sold my last 63/64 vent assembly with mounting screws, studs, so I need to see one again.
i sold my last 63/64 vent assembly with mounting screws, studs, so I need to see one again.
Skip FIx
Well Known Member
Found the door trim screw tight but not seized, heads were just under the rubber hard to see. AC box had one stud with double speed nuts last one under the sealant so it is out. The center dash vert sure has a weird design to retain it.
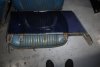
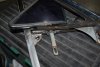
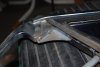
Here are some shots of the vent you can see the tabs on the window then if you rotate it all the way they fit in the slot but it only goes up maybe a 1/2". Then there are two attaching screw but I do not see what they detach if removed,
Here are some shots of the vent you can see the tabs on the window then if you rotate it all the way they fit in the slot but it only goes up maybe a 1/2". Then there are two attaching screw but I do not see what they detach if removed,
Attachments
I found my 63 vent windows I did not sell them - I sold the stainless off them and the mounting hardware for the vent assemblies.
To remove the vent window rubber, you have to remove the vertical track that the door glass rolls up in.
There is one philips screw at the top (in the vent window stop rubber -it comes off ). Then you have to drill out all the rivets holding the vertical track to the chrome frame around the vent glass frame. There are a pair of two of them and at least 2 or 3 single rivets spaced out to the bottom of the track. These rivets will be replaced by flat head zinc plated screws lock washers and nuts.
After the vertical track is removed -In picture number # 4 the two large philips screws they hold the vent window rubber to the pot metal chrome frame. The rubber is held to the angled part of the outside frame by 3 push in clips attached to the rubber inside the groove in the outside frame.
The bottom of the vent window rubber(horizontial section) above the vent controls is inserted into a C shaped slot in the frame .
pry both out with a long screw driver saving the 3 sharp edged clips attached to the vent rubber strips , remember how the rubber is installed -it goes back in the same location matching the top edge of the rubber with the chrome frame.
vent rubber for 63 and 64
https://www.steelerubber.com/vent-window-kit-90-0429-90
not sure this is correct - I can't remember if 63 and 64s had chrome beaded vertical tracks for the door glass to roll up along the vent windows
https://www.lategreatchevy.com/full...frame-vertical-window-channels-1963-1964.html
There are chrome stainless strips on the top of the vertical channels can be removed and polished on a buffer (4 stainless pieces) and reinstalled after polishing on a buffer.
the pictures below attached are for 62 impala HT and convertible but the items i mention above still apply.
the rivets have been removed and part of them replaced with screws and nuts (the screws and nuts in a group used are one of the pictures) + some of the screws and nuts are installed on the chrome beaded fuzzy track(picture # 3 and # 5.
note the special clips in the first two pictures. Some guys have not salvaged these clips and glued the vent weather strip in the slot.
I save the clips and install them on the new weatherstrip -a very very difficult process without breaking the 4 bendable tabs -the clip on the table has 2 missing tabs on it.
Paul
Skip FIx
Well Known Member
Thanks Paul! You obviously do a great job restoring these cars!.
I'm kind of torn-I am a REALLY picky SOB and want things done right but want just a good driver with perfect drivetrain and a nice interior not a compete restoration. To keep the interior nice the windows have to seal. So not even painting the car when I've pulled all the trim off is going to be hard. Tha paint is mildly patina all the trim in decent shape but my perfectionist personality just wants to do the whole thing.
I'm kind of torn-I am a REALLY picky SOB and want things done right but want just a good driver with perfect drivetrain and a nice interior not a compete restoration. To keep the interior nice the windows have to seal. So not even painting the car when I've pulled all the trim off is going to be hard. Tha paint is mildly patina all the trim in decent shape but my perfectionist personality just wants to do the whole thing.
Skip FIx
Well Known Member
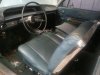
Getting there Phil! Dash is getting changed from blue to black. Interior I have form Ciadella silver with black carpet. Need to wire brush and prime floor then get windows and interior installed.
Camaro race car ready for the track but no track to go to so Impala work!
Camaro race car ready for the track but no track to go to so Impala work!
Attachments

Last edited:
to my knowledge no one makes the parts for vent window mounting on any 61 to 64 Chevys.
you have find used vent window assemblies with those parts still on them( those parts seem to go missing)
I sold the mounting parts off my 63 Vent assemblies - I think a few of the 63 parts are the same as 61/62 parts and I have plenty of them. I had pictures of the 63 to mount the vent assemblies, not sure if I still have them
there are 2 adjustments - the upper one just below the vent window tilts the top of the vent frame in and out. The bottom one on the vertcal felt track will also move the track in and out ( not as much as the top adjustment)


