64 Impala build

64impaladropcm

New Member
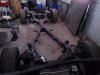
Hey guys!!! I've recently purchased a 64 Impala convertible and am doing a frame-off resto-mod. Mostly keeping it stock as possible with suspension, drivetrain, and brake upgrades. So heres my question. I have recently purchased this rear crossmember from a junkyard and it doesn't have the same holes as the one currently on my vehicle. I was wondering 1.what are the holes used for? and 2. Will the "new" one work without drilling any holes? Drilling the holes would not be a problem but I am curious to know if I should take it back and let them know that it is the wrong piece. Thanks for your help and I will be updating more as I continue the build.
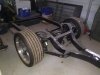
DSC_7992.JPG
 

jim_ss409

Well Known Member
Supporting Member 5
Let me be the first to welcome you to the site. :beer

Apparently the frames for these cars were built at a few different locations and they weren't all exactly the same.
I notice that your new chunk of frame has the boxed in side rails all the way to the back. Most frames didn't have that and were more like your convertible frame with the open "C" shape at the back.
I don't think the holes in the back cross member are for anything in particular, I think they're just small differences in the way two different places manufactured the frames. If it were me I'd go ahead and use the new frame section and wouldn't give it a second thought.
 

64impaladropcm

New Member
Awesome!!! thanks for the quick reply! And thanks for the welcoming. I have been browsing this sight since I found it and have found soo much useful information. I am glad to be able to join the forums.
 

Jim Sullivan

Well Known Member
Supporting Member 10
:welcome I would use the new boxed section of frame. You will just have to fabricate the rest of the pieces to complete the boxing of the rear rails. Keep us posted with pictures on the progress of the restoration.
 

tripower

Well Known Member
Supporting Member 2
Welcome aboard. As Jim said the holes in the back section have no significance. Use the back section and be done with it. Keep us posted on your progress.
 

64impaladropcm

New Member
Hey guys thanks for all the knowledge. Thought I would give you guys a little update of whats been going on with the 64. I was able to get the rear crossmember off fairly easily.. and just need to clean up the new one to weld it up to the frame. I also have a new (used) but new to me front passenger side frame horn. I've been working to get the old one off and the new one cleaned up to be welded. I sanded blasted the frame and coated it with Rust Bullet, and will shoot it again with the silver and then give it a couple coats of black top coating. I'm also working on installing a Global West Pan Hard Bar relocation kit along with adding the Dual upper control arm braces, and I am also installing the second control arm. The only weak link I have right now is my rear end, which is a P-case 8.2 10 bolt, but I am working with Aubrey and he's going to supply me with the stuff I need to run the stock rear end. Here are some pictures of what I am working with/on right now. Thanks for all the welcomes and info guys I really appreciate it. This is a learning experience for me so I appreciate all the help and opinions I get.DSC_7994.JPGDSC_7996.JPGDSC_7997.JPGDSC_7998.JPGDSC_7999.JPGDSC_8000.JPG
 

nate64

Well Known Member
Supporting Member 1
Looking good! I have two boxed frames that came stick on my 64 impala ss and on my 64 bel air. The refer to those frames as Canadian frames, my understanding is thats where they were made. Here is a pic of my rolling chassis. Dusty, but mh body is almost ready to go on
 

Attachments

  • IMG_206602499101168.jpeg
    IMG_206602499101168.jpeg
    55.7 KB · Views: 50
  • IMG_206643807908541.jpeg
    IMG_206643807908541.jpeg
    55.5 KB · Views: 51
  • IMG_206634802079684.jpeg
    IMG_206634802079684.jpeg
    46.8 KB · Views: 42

64impaladropcm

New Member
hey guys finally got some stuff done on the frame... I had to correct the angle of my rear crossmember to add the second upper control arm, ( i had to square the pick up points to each other so that my rear end would stay as centered as possible) the previous owner had pulled the cross member out of alignment. After I got that taken care of I started to put the front frame horn back on and after a few hours and a couple tries, tack welding then grinding them off, I finally got the front frame horn as perfect as I could get it and welded it on. I still need to do some welding to it but at least its back on and Im making progress. I got the rear end sand blasted and I am adding the bracket for the second upper control arm on it and then sending it to get powder coated. :) I've ordered bearing cap girdles, Axles, and the side gear conversion kit from Aubrey and am anxiously awaiting their arrival. I have also decided to strengthen the frame by welding the seams closed.. Here are some pics.P6030233.JPGP6030238.JPGP6030240.JPGP6030241.JPG
 

skipxt4

Well Seasoned Member
Supporting Member 18
impaladropcm; Nice job.:clap 
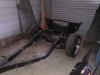
I have some info I'd like to share, concerning your right frame horn. Find a place on the passenger side frame, (front of the upper control arm) and measure diagonally to the radiator shroud mounting hole. Get the same measurement, before you weld the passenger frame horn, permanently. Probably wouldn't hurt, to temporarily, mount the front bumper, to be sure the bumper brackets are tight to the frame horns. I found out, the hard way.:doh Good luck. This is time consuming work.
 
Top