Don's gone Crazy Stroker, 1966 C-10

plumcrazy

Well Known Member
Supporting Member 6
FYI, this is the same as the general section post about a leak. I put it there too because some folks might not follow this thread...


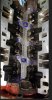
So I've been chasing a pesky oil leak. I jack up the truck, look all around and see a little oil at the bottom of the bell housing. Slowly moving north to see the source, i came to the oil filter and thought it was coming from above it, either the oil pressure copper connection, or, valve covers dist etc. I took the day to take off the valve cover on the drivers side thinking it was that and re-attached. No love so jacked up the truck, turned it on and went under.

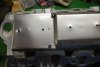
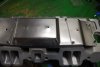
The video shows the leak, at the pan/oil filter. At first I thought it might be the pan, but turns out (thanks to Don) to be the gasket in the photo under the filter.... HA!

Sharing this for the next fella that might be chasing a pesky leak...


Attachments

  • 20190404_162114.jpg
    20190404_162114.jpg
    48 KB · Views: 9

plumcrazy

Well Known Member
Supporting Member 6
Well, we had a GREAT weekend!! Had the truck out and did over 100 miles and just felt great. Still a few little things to iron out, timing may need to be pulled back a couple degrees at low end. Noticed a ping when i'm around 2,500 and stab it. Nothing at higher rpms, just hold on! Ill post a video we took, just trying to figure out how to edit it down a bit... Leaks seem to be coming to a close, still having to tighten the header bolts and valve covers, so might go to some blue locker...

Wens we have an appointment at the tranny shop so will let y'all know how we do....

Today was rainy and decided to hit Betsys intake swap. Got to pulling her intake off and took some pics. To me the cam, rollers all looked good to me but adding the pics to hear from the pros! Tomorrow I can do all the gasket stripping and cleaning up the carbs...(me and the kids got a little heavy handed with the mega-=black last time, ha, this time well be a little more suttle)

Waiting for the new ARP bolt kit and a fail-safe 160 thermostat...
 

Attachments

  • 20190408_181328.jpg
    20190408_181328.jpg
    48.2 KB · Views: 35
  • 20190408_180830.jpg
    20190408_180830.jpg
    54.1 KB · Views: 38
  • 20190408_180250.jpg
    20190408_180250.jpg
    52.6 KB · Views: 36
  • 20190408_180246.jpg
    20190408_180246.jpg
    41.3 KB · Views: 36
  • 20190408_180241.jpg
    20190408_180241.jpg
    52.5 KB · Views: 35
  • 20190408_180236.jpg
    20190408_180236.jpg
    49.3 KB · Views: 35
  • 20190408_180147.jpg
    20190408_180147.jpg
    75.1 KB · Views: 38
  • 20190408_180136.jpg
    20190408_180136.jpg
    62.2 KB · Views: 38
  • 20190408_174317.jpg
    20190408_174317.jpg
    50.9 KB · Views: 35

plumcrazy

Well Known Member
Supporting Member 6
Quick question about installing a splash shield properly, river and overlap....

The eddy intake has two shields, one smaller already installed and a red one for the larger section. In the pic pointing to my finger, i removed that rivet and wanted to know if you mount the splash shield so it holds down both of the shields, or, do i take the bottom one completely off and use the larger of the two? The 881 i took off had just the larger shield..

Also, to the left of my finger, the second hole does not line up for a place to install a rivet. Do you leave it without? Notice that the red shield holes do not line up to allow both bottom rivets. I can make a new hole, but its in the "deeper impression" of the metal and moving it will mess up the alignment of the rest of the shield..Or, do i use the 881 shield if she fits?


On overlap, the shield overlaps on the intake, which means it wont allow for a flush fit against the head. The gasket takes that up some so wanted to ask if that means liberal amounts of mega-black to insure no leaks?


Scary, i noticed that the original 881 has a rivit missing, eeeekkkkk...
 

Attachments

  • 20190412_105158.jpg
    20190412_105158.jpg
    46.2 KB · Views: 34
  • 20190412_105151.jpg
    20190412_105151.jpg
    41.8 KB · Views: 34
  • 20190413_081455.jpg
    20190413_081455.jpg
    37.7 KB · Views: 32
  • 20190413_081356.jpg
    20190413_081356.jpg
    40.5 KB · Views: 34
  • 20190413_081348.jpg
    20190413_081348.jpg
    64.9 KB · Views: 33
Last edited:

La Hot Rods

Well Seasoned Member
Supporting Member 15
It looks like the short one would work, but one of the things this shield will do is stop the oil from splashing on the bottom of the intake.
This does two things, one keep the oil from heating up the intake, and two it keep from baking the oil on the bottom of intake from the exhaust crossover.
 

plumcrazy

Well Known Member
Supporting Member 6
Well, talking to Don and had a "Well your already there" conversation :>), here's the results, valve train shrapnel screens with magnets.

Found a perfectly innocent box of goodies to use as a template and began cutting and taping the general idea. Used some cutters, files, and over time came up with the single piece design you can see in the final pics. Had a good screen and sprayed out the template.

The final pic has circles, this is where i will use a puddle of JB weld, place the magnet on the locations and weld the screen down...

I found a site that talked about this method and had the spec of the magnets to use. Their designed and rated for this heat and attaced them below. Also added that site, in case anyone is interested.. He has a really simple 3 piece screen...

http://garage.grumpysperformance.com/index.php?threads/valve-train-shrapnel-screens.1458/

Hey, with this much time money and effort keeping these baby's purring, little added protection seems like cheap insurance...
 

Attachments

  • shield10.jpg
    shield10.jpg
    58.1 KB · Views: 35
  • shield0.jpg
    shield0.jpg
    52.4 KB · Views: 35
  • shield1.jpg
    shield1.jpg
    45.9 KB · Views: 33
  • shield3.jpg
    shield3.jpg
    57.3 KB · Views: 31
  • shield5.jpg
    shield5.jpg
    52.9 KB · Views: 32
  • shield8.jpg
    shield8.jpg
    85.5 KB · Views: 32
  • shield9.jpg
    shield9.jpg
    53.1 KB · Views: 36
  • s2.JPG
    s2.JPG
    56.9 KB · Views: 38
  • M1.JPG
    M1.JPG
    62.2 KB · Views: 36
  • s3.JPG
    s3.JPG
    70.7 KB · Views: 32
Last edited:

plumcrazy

Well Known Member
Supporting Member 6
Got to a little "fiddle" work done yesterday, prepping for the magnets to arrive.. The shield, I had it all ready to use the rivets with a drop of red locker but when i put the first one in the holes were too loose, so used another kind of rivet to send them home.... The carb studs, i used a drip of blue on each one and also the new lock down for the dizzy... Mocked up the top, added a new fuel filter and gauge...

Today will be cleaning up some of the bay and hopefully, tomorrow, we have magnets and can begin the assembly...

Too loose and just dropped in....


20190416_142958.jpg

20190416_171108.jpg

20190416_171112.jpg


20190416_171606.jpg

20190416_175413.jpg


20190416_175419 (1).jpg

20190416_181108 (1).jpg

20190416_181111.jpg
 
Last edited:

plumcrazy

Well Known Member
Supporting Member 6
Wow thats sweet, never have to.worry, ever.

Love watching YouTube videos seeing guys using master techniques like that, assembling big rotary engines. Seeing the assembly or restoration of the Merlin, unreal.. If Jeanne let me I'd do one I'd have it on a retailer and fire that baby constantly, ha!
 

plumcrazy

Well Known Member
Supporting Member 6
Well, we had a great Easter and hope y'all did too!

Made some progress with Betsy yesterday, took our time and got it all back together minus a fuel line feed. It hit me that before i went to the high flow mechanical pump, our inlet and outlet sizes on the previous were 5/16, not 3/8ths like the new one so could have been an issue before?? Anyway, on the way to the store at 8am to see if i can get a new fitting

In truth, it didnt all go so smooth. We did a dry run, mounted the intake, seemed to fit, and also threaded in a couple bolts about half way. Felt good so we buttered up everything with Ronnie's favorite, mega-black and started to lock it down to only find out it didnt fit! The splatter shield pushed up the back a bit too much and the bolts only made it half way before you felt like they wanted to crossthread!!

Without going any further, we pulled it off, cleaned up all the mega-black, threw away our first set of gaskets, trimmed the splash shield and chased every hole with a tap. The holes were all gunked up with our previous build and needed to be cleaned, so anyone listening, as much as you think they may just go, you could end up like us wasting good gaskets not chasing first..

Second go (still one time less than normal for us) went better. We re-lathered everything up with mega-black, used our back-up set of gaskets Ray gave us (thanks again Ray!!) and cinched it all down to 30ft lbs....

After finishing up I noticed a sign from the heavens, our Knuckleheads speedo was at 409!!! HA!, imagine that, so went for a ride... If your interested in seeing what its like, check out the link below...


20190420_152231.jpg

20190420_152242.jpg

20190421_102622.jpg


20190421_102651.jpg

20190421_154043 (1).jpg


20190421_184149.jpg

20190421_181715 (1).jpg


Attachments

  • 20190421_154033.jpg
    20190421_154033.jpg
    69.2 KB · Views: 7

plumcrazy

Well Known Member
Supporting Member 6
Looks like you could hold back on the sealer.

Thanks LA, glad you mentioned it.. We were a little worried about making sure it sealed since it sat a little wonkey before we cinched it down.. I knew we went overboard when i put the priming tool in to line up the dizzy and came out with it on it...
 
Top