Some assembly required

Tom Kochtanek

Well Known Member
Supporting Member 13
I started back on the '62SS project after too much travel and too much work. Talk, about work, lining panels up really takes a lot of finesse, and a lot of time!

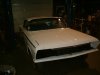
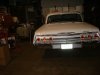
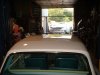
First we worked the doors to make sure they line up correctly. They were painted spearately, then hung in the "general direction". The passenger door, not surprisingly, refused to line up no matter what we did. It just has too much in terms of needed repair, and we hammered and dollied as best we could without using a lot of filler. It just needs more time, and a better pair of hands :(. I think a replacement door may be in my future...

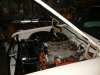
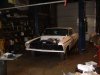
After the doors, we fit up the passenger side fender, then slid the completed (stapled rubber and all) wheel housings in place and lighlty bolted everything together. The driver's side took more time, but it eventually fell into place. OK, we tweaked and tweaked for a few hours until it was just right :).

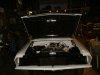
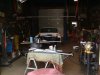
When it came to the hood, I had taken the hinges apart and cleaned them up and used a siver cad on them, which is not the correct coloring. I went with the Yellow Cad kit from Eastwood, and had trouble getting a good mist on it. I had to strip it twice and almost ran out of material, but finally got it right (or as good as it going to get). Then I gave up and spent the weekend working on my son's house.

Tonight, maybe tomorrow, I go back and try to fit the hood onto those new hinges, and see how that goes. Still polishing lots of aluminum pieces, and used ZoopSeal on the finished products.

Here are some pics of the project:

Enjoy!

TomK
 

Attachments

  • front fenders roughed in A.jpg
    front fenders roughed in A.jpg
    47.5 KB · Views: 105
  • front fenders roughed in B.jpg
    front fenders roughed in B.jpg
    48.7 KB · Views: 89
  • from the outside.jpg
    from the outside.jpg
    61.5 KB · Views: 89
  • over the top.jpg
    over the top.jpg
    57.8 KB · Views: 88

bobs409

 
Administrator
Lookin' really good Tom! :brow 
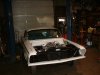
Paint looks nice and s-m-o-o-t-h!

Those panels can be tricky but patience will win in the long run.

I have to ask, what is Zoopseal? :?
 

Ronnie Russell

Well Known Member
Supporting Member 2
TomK, Your description brings back bad memories. I have gone through the process 3 or 4 times in the past. I have yet to hang a freshly painted door without scratching one or both. Hours and hours of trying to be careful and still fail. I bet we have some "paint and body pros" who do that kind of work often. Im sure they have -tricks of the trade- that make it easy for them. Each time , I swear, "never again". Your car is gonna be (already is) a class act. Lots of time and trouble, but it will soon be worthwhile. Congratulations on a job well done.
 

Fathead Racing

Well Known Member
Supporting Member 7
Getting there is half the fun??????????

Tom, Took me the better part of two years to get the 60 on the road. Spent a lot of late nights in the garage on week days and paid dearly for it the next day. After the W was dropped between the fenders I had a shot of enthusiasm. Are you going to race with us when you are through?? :brow
 

real61ss

Well Known Member
Supporting Member 8
Tom,
Look'n good!!!! Fatride's right, when you get to this stage, you get another shot of energy. I wish my 61 was that far along, I just put the frame on the rotisserie this morning. When you're at the stage that I am, you keep think'n, "man I ain't never gonna finish this thing"
 

Tom Kochtanek

Well Known Member
Supporting Member 13
Zoopseal

Bob, ZoopSeal is a product that goes on metal (such as aluminum) and it seals the pores for about 2 years. I used it over the aluminum side trim pieces after stipping the anodization, then sanding and polishing about seven grit stages. After the final polish on the wheel, I then sealed the pieces using the two part (A/B) mixture. Then after that seals the pores they (the Zoop folks) have a final polish that really brings the shine out (assuming you did a good job of polishing).

This is my first time using it, and if the pieces were a lot better (or my metal tapping methods were better) I wouuld have had them re-anodized. This should do the trick for now.

Best,
TomK
 

Tom Kochtanek

Well Known Member
Supporting Member 13
Ongoing process

NowI'm trying to get the springs back on the hood hinges without scratching the nice paint I just put on it :).

Any suggestions for expanding the spring so I can slip it over the hinge hooks?

The time it takes for reassembly it really fun, as things start to disappear off the shelves, which makes it feel like progress. Wait until I get to the interior, that ought to go pretty quick.

When I get her done, I plan to drive it around a bit and maybe try my hand at running her down the quarter mile. We are trying to get this assembled by September 11th 2005. It was just a year ago that we were all excited in anticipation of attending the first annual 348-409 Convention :). Thought I would have it done by then :). Whew! If I were doing this for pay, I woluld be making like 27 cents per hour (that might be a little high!) :).

Cheers,
TomK
 

droptop62

 
Supporting Member 1
Tom,
if you still have the hinges off of the car, then bolt a chain to the base of your engine hoist, and hook another chain on the hook of the hoist arm. Put the hinge spring in both chains and pump up you hoist spreading the spring apart. then slowly let the pressure out on the hydraulics and ease the spring back onto the hinge making sure the chain link is on the open side of the hinge spring hook so you can remove the chain. Easy and you will not scratch your freshly restored hinges. ;)
 

jim_ss409

Well Known Member
Supporting Member 5
That's a good way to spread the springs. :cheers I did it much the same way except I used a floor jack. If anybody has springs that are too week to hold the hood up you can usually add enough tension to them by pulling the spring off and shortening the overall length of the spring by crushing the hooks on both ends. If you're not worried about scratches you can usually pop them on and off with a big screwdriver.
 

bobs409

 
Administrator
I did the R&R of the hood springs on my work bench on a few sets. I used a C clamp to fasten the hinge to the bench (flat) I then hooked a chain on the end of the spring and with the chain hanging off the edge of the bench, I inserted a large screwdriver through one of the links and used the protruding part of the screwdriver as a lever on the edge of the bench.

I have heard of using an old fan belt but haven't tried that myself.
 

Tic's60

Well Known Member
Supporting Member 3
Looking good!!!
My shot of gogo came the weekend when I fired the 60's new BBC up after months of work.
Of course at 1am in the morning I guess I should had the mufflers on :brow
 

Rockfish39

 
Supporting Member 1
When you going to post some pics???

real61ss said:
I just put the frame on the rotisserie this morning. When you're at the stage that I am, you keep think'n, "man I ain't never gonna finish this thing"

Tommy, How you making out these days???

If you can, please post a photo or two of the frame on the rotiserie...

BTW, Saw Ben Schooler the other day, he was askin' about you.

Keep on wrenching !!!

Rock :cool:
 

Nuts

Well Known Member
Supporting Member 10
Hood Hinge Springs

I built a tool to remove the springs. Used a threaded "J" hook, 1/2" square tube, and some nuts and washers. Cost about $3 and hour time to build and works to remove or replace. Got the design from "ToOldForThis" from the ChevyTalk formum. :brow
 

Tom Kochtanek

Well Known Member
Supporting Member 13
Recent pics

Attached are a few more pics taken today. Got the hood pretty much lined up, still need to adjust the right front fender before we snug everything up for good.

Switched over to work on the rear for a bit. Kinda jumping around, need to stick to one section and "get 'er done" :). Tomorrow I hope to get to work on the left side door, which needs everything assembled and gasketed. At least the stainless is polished for those parts.

Long way to go, thought you might want to see some progress :).

Cheers!
TomK
 

Attachments

  • 8.24. 2005 1962 chevy 001.jpg
    8.24. 2005 1962 chevy 001.jpg
    76 KB · Views: 34
  • 8.24. 2005 1962 chevy 002.jpg
    8.24. 2005 1962 chevy 002.jpg
    89 KB · Views: 41
  • 8.24. 2005 1962 chevy 008.jpg
    8.24. 2005 1962 chevy 008.jpg
    61.5 KB · Views: 32
  • 8.24. 2005 1962 chevy 009.jpg
    8.24. 2005 1962 chevy 009.jpg
    71.5 KB · Views: 39
Top