Transfer 61 bubble roof onto 62 impala cpe

sycsteve

Well Known Member
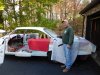
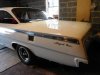
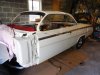
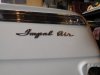
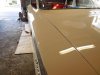
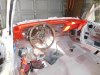
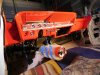
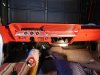
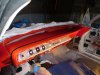
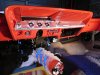
Yesterday was the day Jim and I have been long waiting for. The day we finished painting this project 62 Bubble Top. This was Jim's very first paint job that he used a Base Coat-Clear Coat. We both learned a few things as we went, but when all was said and done, it turned out pretty darn nice. When all of the color sanding and buffing is completed it should look better than factory....Can't wait to get started. I need a little help before installing the headliner. Can anyone help me choosing the correct inside roof insulation to be used . I had to remove all of the factory insulation, as it was hanging down in most places. I believe the factory insulation was about 1/8 inch thick. Is that about right. So I would need the new replacement insulation to be close to that or a little less to make the headliner fit properly. I was looking through Hubbards Cat., and I see that they have a peel and stick , that is marked NEW, but it does not say how thick it is. Any help and input would be greatly appreciated.

I have been looking for insolation myself. I have been looking at Fat Mat or Dyna Mat for my floors. Looked at Lizard Skin but its pricey.
Found this stuff that may work well for the roof. I sent it back before I thought of using it for the roof. No adhesive backing and has thick bubble wrap between the foil layers. It's about 1/4 thick.
http://www.ebay.com/itm/161878165008?_trksid=p2060778.m2748.l2649&ssPageName=STRK:MEBIDX:IT

Think this would be good for the floors for me.
http://www.ebay.com/itm/190736901235?_trksid=p2060778.m1438.l2649&ssPageName=STRK:MEBIDX:IT
 

62bubble

Well Known Member
Supporting Member 5
Thanks for the info on the insulation. I will call to find out the thickness as it can only be 1/8 " thick...Mike
 

62bubble

Well Known Member
Supporting Member 5
Have been block sanding and buffing and have completed the roof, trunk lid and the left side of the car. Hard work , but looking good so far. Had a glass man from a local glass shop come to the house yesterday and both of us installed the rear glass in the car. Sure is a BIG hunk of glass. Now I know why they call it a Bubble Top.. I had to use aftermarket molding clips for the rear window, but I don't care for those clips as the top of the clips do not have enough inward curve to allow the edge of the molding to snap onto the clip. I did not install the moldings as of yet, but it looks as though I am going to have a hard time getting the molding between the clip and the body. Any thoughts on this problem would help a lot ...
 

Attachments

  • DSCN1148.JPG
    DSCN1148.JPG
    108.1 KB · Views: 199
  • DSCN1149.JPG
    DSCN1149.JPG
    55.9 KB · Views: 192
  • DSCN1150.JPG
    DSCN1150.JPG
    46 KB · Views: 181
  • DSCN1151.JPG
    DSCN1151.JPG
    72.7 KB · Views: 181
  • DSCN1152.JPG
    DSCN1152.JPG
    39.2 KB · Views: 179
  • DSCN1153.JPG
    DSCN1153.JPG
    63.7 KB · Views: 176
  • DSCN1154.JPG
    DSCN1154.JPG
    84 KB · Views: 164

62bubble

Well Known Member
Supporting Member 5
It has been awhile since I have gotten around to working a bit on the project, as the weather has been pretty cold , and with no heat in the garage it is not much fun. However, Jim and I did manage to install the side glass on the left side of the car. The Quarter window turned out to be a bear to install, so it took the two of us to get er done.... Got the under dash wire harness in place, and installed all of the instrument connections , hopefully into the correct sockets. Yesterday I installed the instrument panel portion onto the rest of the dash board, but still have a few wire connections to complete under the dash for everything to light up...Hope the weather gets a little warmer pretty soon, so I can install the roof insulation, and to get the right side of the car wet sanded and buffed , and the side windows installed. Here are a few more pics of the progress...
 

Attachments

  • DSCN1223.JPG
    DSCN1223.JPG
    84.3 KB · Views: 76
  • DSCN1224.JPG
    DSCN1224.JPG
    72.1 KB · Views: 78
  • DSCN1225.JPG
    DSCN1225.JPG
    78.6 KB · Views: 71
  • DSCN1226.JPG
    DSCN1226.JPG
    80.8 KB · Views: 73
  • DSCN1228.JPG
    DSCN1228.JPG
    52.9 KB · Views: 73

62bubble

Well Known Member
Supporting Member 5
DSCN1257.JPG DSCN1258.JPG DSCN1259.JPG DSCN1261.JPG DSCN1264.JPG DSCN1267.JPG Have been busy with the bubble top the last few weeks. Here is the progress so far. Installed the fuel tank, headliner, all of the side glass and front windshield. Now that all of the glass was installed, the rear carpet and rear seats have also been installed. The entire back end of the car is now completed, ie. bumper, all of the tail lights, and moldings, also the right side of the quarter panel has been block sanded and buffed out, and the quarter molding installed.. I should have the interior completed this weekend, and then on to the front fenders and hood. Should have it on the road for a test drive in about three weeks.??????
 
Top