Beautiful...........

You are using an out of date browser. It may not display this or other websites correctly.
You should upgrade or use an alternative browser.
You should upgrade or use an alternative browser.
1962 Bel Air Bubble Top 409 Project
- Thread starter CASHguzzler409
- Start date
Thanks guys for your support and help through this build, this site has so many great guys that are willing to share there
expertise and knowledge. I can't wait to travel to some of the places where these cars are featured.

Today Im heading out to SIR raceway to watch my friend run his 55 chevy gasser, not a 409, but its a fun day to watch.
expertise and knowledge. I can't wait to travel to some of the places where these cars are featured.
Today Im heading out to SIR raceway to watch my friend run his 55 chevy gasser, not a 409, but its a fun day to watch.
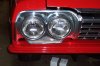
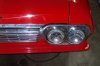
Cash, please don"t think I am picking your car, but,,,,,,,,,as you said the headlight bezel"s don"t seem to fit properly on fender on top.( why am I alway"s the bad guy to point those thing"s out) may be some guy"s would not notice this and some guy"s might. Are those reproduced bezel"s or what. Do you have old one"s to test the fit.could it be the bucket"s that are the problem???? Your car is very ,very, nice and the only thing that i see not quite correct .That gap would bother me to no end!!!! Please feel free to tell me your thought"s on this!!!!
Last edited:
Great Bend was fun Phil, great to meet new people, and to see all the great cars, and races. Thanks Lonnie. BlkBlk63ss thanks for the post, I have no problem with someone responding to my car, its just the total stranger at a meet or convention that comes up and has to show his great knowledge, I find that a little rude, like the owner doesn't know where every little mark is. When I bought this car, I did not know a thing about 62's. The car came all apart, which made it even harder to restore, for us anyway.
The headlight buckets, and all parts are original's, I have two sets, and these were the better of the two, they also fit better when you installed them onto the buckets, off the car. I have learned thru this process the importance of setting the car back together,
that way you could line up the gaps, make sure each part fits. The hard part is if like us, we had to get a different fender, didn't have a hood, best if one can find a great car to start with. Im not complaining, its been great fun, (?) and a tremendous amount
of satisfaction, especially hearing from other 409'ers. I guess Im going to put it together the best I can for now, and readjust
things when I learn more, or see other cars to compare with. Next...... the bumper.... oh yea... chrome baby, I'll post pictures soon. cash over and out.... or is it... out of cash..... ? Might just as well spend it on my car.... the kids would just go to Hawaii or something else.
Cash,you did have a puzzle on your hand's  . Even though mine was in one piece except no motor ,i took it apart and after 6 year's you forget thing's also.I am sure you will get that ironed out.Maybe some 62 guy's can give you some tip's.I don't think it's a fender issue ,but in the headlight bucket bezel area. Any way car look's great keep the picture's rolling!!!!!!
. Even though mine was in one piece except no motor ,i took it apart and after 6 year's you forget thing's also.I am sure you will get that ironed out.Maybe some 62 guy's can give you some tip's.I don't think it's a fender issue ,but in the headlight bucket bezel area. Any way car look's great keep the picture's rolling!!!!!!
Last edited:
Cash,
Your 62 looks beautiful ! You are doing a fantastic job.
Your 62 looks beautiful ! You are doing a fantastic job.
Well, Im at that point !
 , Iv'e heard that if you keep doing some thing the same way, you'll get the same results.
Soooooooo ...... 2 Questions ! 1. Does the high beem bulb go on the inside next to the grill.?
2. Does the Aluminum headlight bezel fit on the inside lip of the fender or rest on the outside of it.
Im just having so much trouble getting the headlight aluminum on, the bulbs do not seem to set up to the holes so you can adjust them.
 Any suggestions would really be nice or pictures of the headlight area so I can see how they fit. thanks cash.
, Iv'e heard that if you keep doing some thing the same way, you'll get the same results.Soooooooo ...... 2 Questions ! 1. Does the high beem bulb go on the inside next to the grill.?
2. Does the Aluminum headlight bezel fit on the inside lip of the fender or rest on the outside of it.
Im just having so much trouble getting the headlight aluminum on, the bulbs do not seem to set up to the holes so you can adjust them.
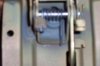
Any suggestions would really be nice or pictures of the headlight area so I can see how they fit. thanks cash.Cash ,the high beam on my 63 are on the inside. I checked my 90 chevy pickup and the same way so i would say next to grill on 62 too.here is a picture to show how bezwl fit's. wish i were there to help you. Your headlight bulb will have tit's on back to fit the bucket's with cutout's where the tit's lay in. Then you put your retainer chrome ring on there and line up screw to bucket behind headlight. the bucket's will have a open slot on the side where the adjuster's slip in and then the spring snap's in hole to hold bucket in place. Hope this make's sense. Also you don't happen to have the outside finish bezel's switched from side to side do you?????? Can't see your bezel that good in your picture. The headlight 's will be adjusted with bezel's off in order to get to adjuster screw's.
Your headlight bulb will have tit's on back to fit the bucket's with cutout's where the tit's lay in. Then you put your retainer chrome ring on there and line up screw to bucket behind headlight. the bucket's will have a open slot on the side where the adjuster's slip in and then the spring snap's in hole to hold bucket in place. Hope this make's sense. Also you don't happen to have the outside finish bezel's switched from side to side do you?????? Can't see your bezel that good in your picture. The headlight 's will be adjusted with bezel's off in order to get to adjuster screw's.
Last edited:

I think I just figured it out, I believe I had the wrong bucket for the headlight to go into. They are marked R1R2 L1L2 and I had those, but one of the bulbs would not fit into the bucket, luckily I had a few extra ones, and one of them worked.
Sure hope it does, anymore opinions on where the high beam bulb goes? I've never had a dual headlight car. thanks for the help.
I did hook them up and all of them work, kind of a miracle in its self.
Sure hope it does, anymore opinions on where the high beam bulb goes? I've never had a dual headlight car. thanks for the help.
I did hook them up and all of them work, kind of a miracle in its self.
High beams inside near the grille. Low beams outside towards the fenders.
Dang it cash didn't"t you read my post ,bright"s go inside, inside, inside!,,!!!!!! Show us some picture"s when you get them in . Glad you figured it out.I think I just figured it out, I believe I had the wrong bucket for the headlight to go into. They are marked R1R2 L1L2 and I had those, but one of the bulbs would not fit into the bucket, luckily I had a few extra ones, and one of them worked.
Sure hope it does, anymore opinions on where the high beam bulb goes? I've never had a dual headlight car. thanks for the help.
I did hook them up and all of them work, kind of a miracle in its self.
I did read it, honest, i did, just double checking before I finished up the passenger side.
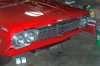
Im slow, but fun to watch. Here's some pictures, still not to happy with the lines, but have to move on for now.
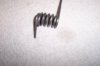
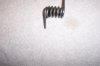
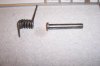
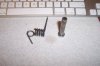
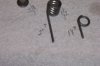
When installing the hood latch I noticed we have a broken large spring, anyone have an idea's ? I could cut the end off the
sleeve get a spring and use a long bolt and nut to re-attach it. Anyone have one for sale?..
Im slow, but fun to watch.
Here's some pictures, still not to happy with the lines, but have to move on for now.When installing the hood latch I noticed we have a broken large spring, anyone have an idea's ? I could cut the end off the
sleeve get a spring and use a long bolt and nut to re-attach it. Anyone have one for sale?..
Attachments
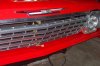
Dumb question, as I am not totally familiar with 62's, can the headlight bezels swapped left to right ?
I would assume not but they do look sort of symmetrical.
I would assume not but they do look sort of symmetrical.
That look's a lot better Cash. Driver side great improvement, i would give that a pass.. Passenger side has a small gap ,but i think it is the fender area. That probably could have been filled in a little as thing's were fitted before paint and everything test fitted,but still a great improvement.Don't think that would be noticed that much. Get the hood snapped down and on to the next area.!!!!!!!!!!!!!!!!Of course keep the picture's coming.
Passenger side has a small gap ,but i think it is the fender area. That probably could have been filled in a little as thing's were fitted before paint and everything test fitted,but still a great improvement.Don't think that would be noticed that much. Get the hood snapped down and on to the next area.!!!!!!!!!!!!!!!!Of course keep the picture's coming.The headlight bezels are left & right only. I might say that for the beginner restorer it would be good to know that you can
massage these aluminum parts by hand, very carefully though. Its not a one step project, fit and check, many times.
Now onto fixing the hood latch spring and installing the bumper, finally. Great question Grub, they do look the same at first look.
I thin that is a good point to make, be sure to really look at parts, it is sometimes the solution to problems.
Hi Don, my fenders are originals. Here's some pictures of what I need. Just trying to figure out who sells them in the Seattle area, or Tacoma or Everett.