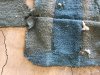
Starting this thread to record the strip of the car before it goes to the body shop. Got most of the interior out. Still need to do the dash then comes the windows. The body shop wants the top left on for alignment purposes since the car will be getting a whole new 1 piece floor pan. Current floor pan has multiple patch panels in it, but they never touched the bottom braces and inner rockers so those are pretty well rotted out. The center console preserved the original color of the carpet, look at how sun faded it was.

You are using an out of date browser. It may not display this or other websites correctly.
You should upgrade or use an alternative browser.
You should upgrade or use an alternative browser.
1963 Impala SS Convertible strip Post
- Thread starter Deadwolf
- Start date

I posted a long list of items to do and what you have to transfer from the old floor pan to the new one --"take measurements or keep the old floor until you are done........................
We finished last year a 1962 Chevy Impala SS convertible full floor pan.
The reproduction floor pans do not have all the factory items on them for the floor pan.
I can't find the post I made.
Also the factory sill plate mounting screw locations can be saved assuming you are not replacing the top of the rockers
All off this full floor pan replacement was done by our local body shop guy who restores classic cars. He is still doing cars today and into the future.
Paul
We finished last year a 1962 Chevy Impala SS convertible full floor pan.
The reproduction floor pans do not have all the factory items on them for the floor pan.
I can't find the post I made.
- Buy only the quality full floor pan made on a Jig with the braces -do not buy the overseas floor pan -you want one that fits the best. Our floor pan came from Cars Inc. in Michigan (only $ 145 shipping by truck) . When we finished the floor I have a hard time telling that that the floor pan was replaced (with the items we did that I noted below) as compared to the original floor pan in my 62 SS Impala convertible that I did a frame off restoration that I am finishing this month....
- I have a number of pictures of the installation of a full floor pan with braces in a 1962 SS Convertible. Its the same floor pan as your 63 except the bucket seats brackets are slightly different (that you transfer)
- A full floor pan with braces is the best to do when compared it to adding braces to 2 - 1/2 floor pan pieces that come without braces.
- transfer the center SS 1963 console brackets
- transfer the gas pedal studs and small brace
- transfer the SS bucket seat bracket -use the bucket seats to make sure they are welded in the right place.....
- Transfer your 4 speed and power glide tunnel cover (painted black) to the new floor and I assume you want to cut the rectangular hole in the floor under the tunnel cover like the factory did.
- the new floor pan has 63 style front seat belt mounting nuts on the bottom of the floor(on 61 and 62's you have to transfer the mounting plates to the new floor). Assuming that you want front seat belts make sure the floor pan is drilled to use these welded nuts to mount the seat belts
- There are "6 factory dimples" in the "original rear floor pan" under the back seat for where you drill holes for back seat seat belts. I do not think the new floor pans come with these dimples. If you want back seat seat belts measure and document or drill the holes for 2 or 3 seat belts....
- all factory floor pans for bench seat or SS cars have a rectangular bench seat braces under bucket seat brackets on the bottom of the floor pan -if you want the bottom of the floor pan to be correct you have to transfer these rectangular brackets from the old floor pan to the new one...
- The convertible braces that are welded to the floor pan and that hold the convertible top and top cylinders have to be removed to install the full floor pan. I see them in your pictures. See my bold post on the flange on the new floor pan shown below
- You don't have any convertible top cylinder brackets to transfer to the new floor(1961 and 1962's do.....) -they have 4 nuts(per cylinder) on the bottom of the floor pan that the top cylinder brackets bolt through the floor from the to
- back seat mounting brackets (4 brackets -I see them in your pictures) have to be transferred (use your convertible only back seat springs to make sure they are welded in the right place on the new floor pan
- The new floor pan does not come with the drain holes cut out (6 of them). I insist that these 6 drain holes are cut out so the floor pan looks original from the bottom of the car. I pick out cars all the time that are for sale that had partial or full floor pan replacements all the time because the drain holes are not cut out. I reuse the drain hole covers (or buy the new correct ones) and zinc plate the original mounting screws and drill new mounting holes for the drain hole covers in the new floor pan - they only mount one way on all 6 drain holes.
- Mark you convertible top rack mounting brackets locations on the top supports so when you do have to remove the top rack it can be mounted back in the same place (this assumes that the support braces (2 of them go back on the floor and wheel well in the same place they are now). The two braces that support the convertible floor to the interior side panel have to be removed and replaced to get the full floor pan installed (the new full floor pan flange has to be bent up on one or both sides to get the floor pan installed on the top of the rockers)
- drill out spot welds on the old floor pan -all 4 sides for the new floor pan to sit over and weld in like the old floor pan. The front flange on the new floor pan fits on the old floor pan in the same place
- The only place we had trouble in fit of the full floor pan was over the center hump on the front of the floor pan
- The upper back seat brace for the back seat springs does not have to be removed.
- The floor pan goes in from the bottom (takes 4 or more guys to lift it...)
Also the factory sill plate mounting screw locations can be saved assuming you are not replacing the top of the rockers
All off this full floor pan replacement was done by our local body shop guy who restores classic cars. He is still doing cars today and into the future.
Paul
I posted a long list of items to do and what you have to transfer from the old floor pan to the new one --"take measurements or keep the old floor until you are done........................
We finished last year a 1962 Chevy Impala SS convertible full floor pan.
The reproduction floor pans do not have all the factory items on them for the floor pan.
I can't find the post I made.
Items you transfer to the new floor (items not on the new floor pan)and other comments...
- Buy only the quality full floor pan made on a Jig with the braces -do not buy the overseas floor pan -you want one that fits the best. Our floor pan came from Cars Inc. in Michigan (only $ 145 shipping by truck) . When we finished the floor I have a hard time telling that that the floor pan was replaced (with the items we did that I noted below) as compared to the original floor pan in my 62 SS Impala convertible that I did a frame off restoration that I am finishing this month....
- I have a number of pictures of the installation of a full floor pan with braces in a 1962 SS Convertible. Its the same floor pan as your 63 except the bucket seats brackets are slightly different (that you transfer)
- A full floor pan with braces is the best to do when compared it to adding braces to 2 - 1/2 floor pan pieces that come without braces.
Save your plastic wiring covers by both doors and reuse them. You do not have to cover the mounting holes in the floor pan by the rockers to mount the plastic covers when you replace the floor pan.
- transfer the center SS 1963 console brackets
- transfer the gas pedal studs and small brace
- transfer the SS bucket seat bracket -use the bucket seats to make sure they are welded in the right place.....
- Transfer your 4 speed and power glide tunnel cover (painted black) to the new floor and I assume you want to cut the rectangular hole in the floor under the tunnel cover like the factory did.
- the new floor pan has 63 style front seat belt mounting nuts on the bottom of the floor(on 61 and 62's you have to transfer the mounting plates to the new floor). Assuming that you want front seat belts make sure the floor pan is drilled to use these welded nuts to mount the seat belts
- There are "6 factory dimples" in the "original rear floor pan" under the back seat for where you drill holes for back seat seat belts. I do not think the new floor pans come with these dimples. If you want back seat seat belts measure and document or drill the holes for 2 or 3 seat belts....
- all factory floor pans for bench seat or SS cars have a rectangular bench seat braces under bucket seat brackets on the bottom of the floor pan -if you want the bottom of the floor pan to be correct you have to transfer these rectangular brackets from the old floor pan to the new one...
- The convertible braces that are welded to the floor pan and that hold the convertible top and top cylinders have to be removed to install the full floor pan. I see them in your pictures. See my bold post on the flange on the new floor pan shown below
- You don't have any convertible top cylinder brackets to transfer to the new floor(1961 and 1962's do.....) -they have 4 nuts(per cylinder) on the bottom of the floor pan that the top cylinder brackets bolt through the floor from the to
- back seat mounting brackets (4 brackets -I see them in your pictures) have to be transferred (use your convertible only back seat springs to make sure they are welded in the right place on the new floor pan
- The new floor pan does not come with the drain holes cut out (6 of them). I insist that these 6 drain holes are cut out so the floor pan looks original from the bottom of the car. I pick out cars all the time that are for sale that had partial or full floor pan replacements all the time because the drain holes are not cut out. I reuse the drain hole covers (or buy the new correct ones) and zinc plate the original mounting screws and drill new mounting holes for the drain hole covers in the new floor pan - they only mount one way on all 6 drain holes.
- Mark you convertible top rack mounting brackets locations on the top supports so when you do have to remove the top rack it can be mounted back in the same place (this assumes that the support braces (2 of them go back on the floor and wheel well in the same place they are now). The two braces that support the convertible floor to the interior side panel have to be removed and replaced to get the full floor pan installed (the new full floor pan flange has to be bent up on one or both sides to get the floor pan installed on the top of the rockers)
- drill out spot welds on the old floor pan -all 4 sides for the new floor pan to sit over and weld in like the old floor pan. The front flange on the new floor pan fits on the old floor pan in the same place
- The only place we had trouble in fit of the full floor pan was over the center hump on the front of the floor pan
- The upper back seat brace for the back seat springs does not have to be removed.
- The floor pan goes in from the bottom (takes 4 or more guys to lift it...)
Also the factory sill plate mounting screw locations can be saved assuming you are not replacing the top of the rockers
All off this full floor pan replacement was done by our local body shop guy who restores classic cars. He is still doing cars today and into the future.
Paul
All great info. I'll make sure I print this out and take it to the restoration shop doing my body work with me and show them. I can't say they have done a 63 Impala Convertible floor pan for sure, but just during my 1st visit I saw at least 5 convertibles in their shop in different stages of the restoration including a basket case Plymouth Cuda Convertible that came to them rotted into 2 pieces. Apparently the Cuda is a factory Hemi car and they have the original engine block for it still. They have a special jig they mount the cars to along with welding interior braces when they do this work. I'm under no illusion to the cost of having it done right, but I am trying to save some money by doing all the stripping my self and then I will also do all the nuts and bolts re-assembly. I'm actually going to have them take the whole body to bare metal so we can fix everything and make sure I'm starting rust free.
here is one picture of the floor pan before it was installed showing the transfer of the items I noted.
there are 2 braces laying on the front floor pans in the picture -that I forgot to mention. They go on the bottom of the two front floor pans(they do not come on the new full floor pan...
I have 40 + pictures of the work including removal pictures and installation work
Paul
there are 2 braces laying on the front floor pans in the picture -that I forgot to mention. They go on the bottom of the two front floor pans(they do not come on the new full floor pan...
I have 40 + pictures of the work including removal pictures and installation work
Paul
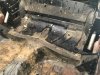
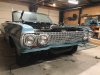
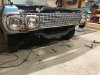
Had a couple more hours this weekend to work on the car. I broke the 2 bolts that attach the passenger fender to the main body. Now I'm dreading the evil not so easy out method of extraction.
Attachments
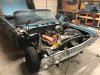
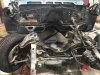
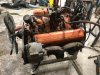
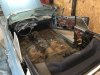
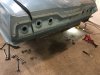
Front end, engine, transmission, electrical wiring, and dash all out of the car. Now I just need to remove the windshield, wiper transmission, and the convertible top hydraulics and she will be ready to go to the body shop.