Front end rebuilding

huug

Member
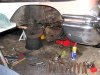
Just want to inform you that I have started rebuilding my front end of my 58 Belair. Because the APK (European obligated yearly safety check) showed some wear in the lower ball joints.

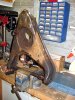
And it was hard! Control arms or ball joints had never left the vehicle in 46 years, so still riveted in (pfew!), rusty, lots of old grease and very hard to get everything loose. Did cost me one whole sunday just to remove one lower control arm. Did it for the first time, so I accept some learning time.

Tomorrow I'm gonna press the bushings out at the local garage. But the guy warned me that I have to bring my own tools & fixtures. So I have to see if I can make them myself. The shop manual shows a lot of complex rings and tubes, and I wonder if they are all needed. Any hints for these?

Still three control arms to go, and I should have it ready in two weeks! Because we plan to drive to the Cote d'Azur again.

Huug

http://drive.to/belair

attachment.php
attachment.php
 

Attachments

  • greasenrust.jpg
    greasenrust.jpg
    43.5 KB · Views: 166
  • inthebench.jpg
    inthebench.jpg
    46.9 KB · Views: 177

JimKwiatkowski

Well Known Member
Supporting Member 5
No Special tools required

huug,you don't need a press or special tools to remove and install control arm bushings.

Removing bushings.Take the bolts and washers off your control arm shafts take your control arm outside with a torch and start the rubber on fire until the fire goes out.Dig out the burned rubber and start them on fire again and repeat until all the rubber is gone.Next clamp the control arm and clamp in a vice take a air chisel or hammer and chisel and remove the steel part of the bushing.

Installing bushings.Get a piece of pipe the same size of the steel part of the bushing to use as a driver.Lightly coat the bushing with grease and drive into control arm when you have one bushing installed install shaft don't foget to mark your shaft how it came out remove the steel sleeve thats on the shaft from the old bushing.With the shaft installed install other bushing.
 

64ss409

Well Known Member
Supporting Member 9
huug

One more tip to finish your bushing installation. Do not tighten the bushing bolts with the car in the air and the suspension hanging. Tighten after the wheels are on and the car back on the ground with the full weight of the car on the suspension. This centers the rubber so it flexes about 50% up and 50% down and will give it many more years of life.

Any rubber mounted bushing should be tightened in this manner, approximately centered in its travel.

Ron
 

impalaragpat

Well Known Member
hugg
Before tightening bushing bolt, bounce the front end couple times as if checking shocks, then tighten. I have found that it helps to freeze the bushings before install. In the Netherlands just put it outside night before install. :D
Pat
 

Russ

Active Member
I've done this job twice on our two 59s and I'm not a mechanic, but was able to do it without too much frustration.

I would encourage using a flat blade on an air chisel. Once you get the edge/lip bent on the bushing, the flat blade chisel should easily pop out the bushing. Just work the chisel around the edges. I've also used a cold chisel to remove them, but that's a lot of work.

I would caution against burning the rubber out - burnt rubber (with the exception of peeling out in first gear! :brow ) has some gnarly toxins. Tires are made of oil and petroleum, so I wouldn't want to breathe any of those fumes.

The air chisel should work fine.

For installing them, try some of your larger metric sockets (32mm?) that fit near the outer diameter of the bushing. You should be able to pound them in. If you have a press, I think you should be able to use the larger sockets to press them in. Be sure to install the shafts before you put the last bushing on!!!!! :doh

Have fun cruising the Cote d'Azur in your 58!!!!

Russ
 

huug

Member
I did manage to create some nice fixtures from several pipes to support the control arm while pressing. Brought them to the shop yesterday, but they didn't find the time yet to do the pressing. I hope for today they do.

At this point I had started to remove the upper control arm. But: no clearance.
Hmmmm. So I read this:

bowtieollie said:
Hi Brad,
No sweat,
Get a 6pt socket and a 24" ratchet extention.
Place the socket on the bolt head and twist it.
It will dislodge the splines and the bolt will come right out.
Upon reinstalling the bolt, just place it in the hole, and give it a slight tap with a hammer. It will stay in place, and the splines will prevent it from turning.
No need to touch any steering or engine parts.

Have tried that yesterday, but it did not come out. I'll look for a longer extension and the right socket and try again. But I was wondering if I can reuse those bolts?
Will those splines still be in that shoulder?

Huug

PS: nothing else on my mind for 78 hours now than this job. I almost forget how wonderfull it is to get black beyond my elbows! :)
 

60convert

Well Known Member
bolts

i am not sure how much room is in there with a w in there but if there is room you can put a nut on the threads to keep from damaging them then tap it out from the engine side. but like i said i am not sure how much room you have.
Jesse
 
Top