Just started 62 SS Project

mabeauchamp

 
Supporting Member 1
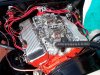
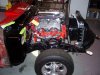
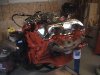
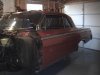
I just started tearing my SS down to repaint back to original Tuxedo Black and replace the floor pans. Thought I'd share some pics and hopefully get some much needed words of encouragement. It seems the farther I get down, the more rust I find. Typical East Coast car.

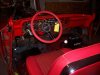
Two questions for the experts. Do the center brackets for the buckets look factory or homemade? Second, is there replacement panel produced for the upper trunk wall (as seen in the attached image)?

I appreciate any words of encouragement or wisdom that you can share. It seems that most of you have been down this road.
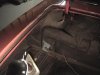
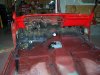
 

Attachments

  • DSC00095.JPG
    DSC00095.JPG
    46.9 KB · Views: 241
  • DSC00096.JPG
    DSC00096.JPG
    34.7 KB · Views: 244
  • DSC00120.JPG
    DSC00120.JPG
    36.6 KB · Views: 236
  • DSC00127.JPG
    DSC00127.JPG
    32.9 KB · Views: 252

Impalaguru

Well Known Member
Supporting Member 1
You've got one helluva car there!! Good things take time. Just keep thinking about the HUGE smile on your face when you're polishing up that tuxedo black paint job for your first drive behind the wheel of a 409 powered 62 SS!!!!

You can buy the upper trunk panel. I am guessing that those box braces over the rear axle have blown out. The panel actaully takes care of the whole upper trunk area and the area that ALWAYS rusts out behind the rear box braces. I know its available from classic industries. Best of luck!!

Ross
 

fourspeed409

Well Known Member
Floor Pans

I recomend the full length floor pans, but there are some fit issues with a 62. I think they are designed for a 63-64. They are different at the front of the trans tunnel and over buy the dimmer switch. I just did the pans in my 62 biscayne 2 door but I dont have a digtal camera so I can't get pics. don't seperate your trans tunnel from your firewall at the seam. Cut the tunnel off back further and keep the factory seam between the firewall and tunnel. I can go into greater detail if you like about the process.
Shane
 

gearhead409

Well Known Member
Mabeauchamp

the bucket seat brackets are correct for a 62. they look home made but that's the way they looked in the 62's.you have the long ones that extend into the rear seat floor pan.some 62's don't have the long pc. at the rear pan. as nice as your car looks, i wouldn't use any more of a new floor pan than you need. some guys cut the whole pan out and before they know it they have a mess on their hands.the new full lenght pans do not fit will and trying to remove your bucket seat brackets and getting them back in the right place is a job from hell! TRUST ME I DO THIS FOR A LIVING.
 

mabeauchamp

 
Supporting Member 1
Thanks to all for the info. The pictures do not really do justice to the floor pans. Both fronts have been cut out and replace with a flat piece of sheet metal. From the top side they look good, but the bottom they stick out like a sore thumb. Been driving me crazy. However, I just got the new ones in to replace. I'm pretty pumped about that. For the rear, I think I'm going to just treat with POR-15. From what I hear and read on this site, this stuff works pretty good.

Appreciate the info on the brackets. I thought they look to perfect to be homemade. Both appeared to be exact size shape etc.

I'll keep you all posted on the progress. Not sure if you read my earlier post about a cracked 409 block. I was able to find a machine shop in the area who was not afraid to take a look at it. Still waiting to here back with the results of the magnaflux. Hopefully, they'll be able to fix it. Thanks again.
 

Tom Kochtanek

Well Known Member
Supporting Member 13
Looking good!

You are in for a real treat when you start cutting away corroded parts of the car :). It really takes a lot of time and a bit of fitting and fabrication to get these parts back on correctly, so have patience. I'd be interested to know if you find out where to get those curved corners pieces that rise up from the trunk on each side, covering a rear body mounting bracket. This is a real common rust area, as is the bracket behind the piece. I have to put in new brackets on one of mine, but had trouble making the curved piece you speak of. I bet I made 3-4 pieces out of flat metal with a hammer and a bag of sand, each one got worse as I progressed :(. Threw 'em all in the corner and started over... Jesse James I am not!

Good luck with the project and keep us posted. We can give you lots of moral support that you may find lacking locally (unless your wife is different than mine :)).

Best,
TomK
 

mabeauchamp

 
Supporting Member 1
not giving me a warm and fuzzy feeling

TomK,

I just received the front floor pans and now I completely understand what you're talking about. I thought that it would be a simple cut and replace job. Doesn't appear to be the case. Hey, thats what makes it all worth it in the end. I'll let you know if I'm able to find the pieces. Right now my options are the whole upper trunk pan for ~$375 or to cut them out of my parts car (going to break my heart on that one.) I was hoping that I'd be able to make them from flat stock. Sounds like you've gone through the same thing.

I got good news today. Not sure if you all saw my previous post about my 409 QG cracked block. Had it magnafluxed and it has a total of 10 cracks. The shop swears they can fix them though. Good news.
 

mabeauchamp

 
Supporting Member 1
Update

Just wanted to give everyone an update on my project and thought it be easier to use some of the webspace I'm paying for with my earthlink account. Check out the following.

http://home.earthlink.net/~mabeauchamp/62ImpalaSS/Main.html

I hope to keep adding to this as time goes own. I want to also add my lessons learned from a newbie perspective. It may help others.

Thanks again for all the help you all keep given. Look forward to any suggestions/comments you may have.
 

Tom Kochtanek

Well Known Member
Supporting Member 13
Progress!

Nice set of pictures along with the progress report!

I converted my '62SS over from a PG to a four speed just about 2 months ago, and if you have any questions, I would suggest reading Trailbum's text first, then asking us questions. I'm sure we'll be able to help you out!

If you saw pics of my '62 BA sport coupe, you'd think your car was rust free :).

Cheers!
TomK
 

walkerheaders

Well Known Member
Supporting Member 6
i really like your sense of humor and your plan of attack. your project is so familier to me!!!!!
when i was going thru that with my red 63, white 63 and 56 cadillac, the best i could do to keep from getting depressed was to pick a small area and focus on that. try not to be overwhelmed by looking at the big picture.
When my family and friends were at the beach or picnics or parties, i was in the shop sandblasting, scraping, welding, cutting, painting etc.........i now have something to show for my time. they dont. use DP74 (epoxy primer) on the inside of the body and DP90 on the underside. when you get to reassemble the body to the frame and driveline stuff, it will start to be fun.

now the good news...........i have a stainless tubing table i made to hold the body upside down and it has wheels on it, if you want to ride over to frederick Md. with your pickup, you can borrow it until done. you would'nt believe the advantage of having the car upside down for a while. the repair of the rockers and lower quarters, floor braces and floor are much simpler when there waist level and no dirt is falling in your face. my table has attachments to roll the body back over by yourself.
 

jim_ss409

Well Known Member
Supporting Member 5
That car's really coming along. :clap 
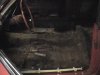
I'd highly recomend borowing Bobs rolling table. I was having a heck of a time working under my car untill I finally broke down and built a rotiserie. It's just a whole lot easier.
 

mabeauchamp

 
Supporting Member 1
Thanks to everyone for the words of encouragement. Bob, I may take you up on your offer. By the pic, it seems most of the weight on the front is supported on the frame. I'm not sure that will work now that my body is off. What do you think?

About dirt, rust and other assorted junk falling in your eyes. For the past two months, I have been chipping away at the undercoating with a torch and putty knife. THIS STUFF WAS ON THICK. For those of you that have gone through this, you have my utmost respect. :bow What a pain in @#$ but boy is it paying off.

Tom, Thanks for the offer. I will definitely be hitting you up for info on the conversion.
 

wrench

Well Known Member
Supporting Member 15
nuther offer

If Earthlink becomes unmanagable financially or for any reason you need a place for your pics, I'll host the restoration photos on my site for free.

I've wanted a 62 restoration pictorial for a long time.

Tom
 

mabeauchamp

 
Supporting Member 1
wrench, i may take you up on that offer. earthlink only gives me 6mb. i've had to step the quality of the pics done a pic to save space.

bob, if you have any pics that would be great. my upper trunks floors are flapping the breeze right now. as soon as I firm them up I may be paying you a visit.

picked up my rebuilt 4-speed yesterday. who ever new freshly sand blasted aluminum could look so SWEET.
 

raymar58409

Well Known Member
Supporting Member 2
I'm sure all you guys know this but I'd like to menton Impala Bobs in Mesa Az. They have a couple yards and sell used parts. being located in Arizona you might be able to get a complete floor pan cut out so everything else fits. I'm not affiliated in any way with them, but stopped by there on vacation a week ago. they got some fair ($180 pr. for rust free 66 impala front inner fenders) and maybe not so fair ($265 for the trunk trim, although it was a really really nice original used one).
Their site is www.impalas.com
Ray
 

Tom Kochtanek

Well Known Member
Supporting Member 13
Nice pics

Nice set of pics and personal commentary! I know what you mean about escalating costs. Try not to focus on costs and have fun doing the work :). Easy to say, hard to do. Especially if you are trying to do it right. The joy is in re-assembling everything after you've worked so hard to get it apart and cleaned up/repaired.

The horror is adding up the project costs -- and the time!

What's priceless is we get to enjoy them for years to come. Now I know why it would be tough to make a living doing this!

Cheers!
TomK
 

mabeauchamp

 
Supporting Member 1
TomK, Thanks for the words of encouragement. More pics and hopefully less commentary about expenses to come.
 

mabeauchamp

 
Supporting Member 1
Life Happens

Well, it's been a while since I've posted or updated my webspace. Thought I'd just share my progress with a few pics. Body is back on and car is running. THAT MAKES IT ALL WORTH IT. Conversion to 4 speed went great; thanks for all the help. I'm putting the dash back together, and have started the exterior stripping. I've still got a lot of work left ahead but am starting to see some of the improvements.
 

Attachments

  • image001.jpg
    image001.jpg
    57.5 KB · Views: 93
  • image002.jpg
    image002.jpg
    82.4 KB · Views: 91
  • image003.jpg
    image003.jpg
    76.8 KB · Views: 94
  • image004.jpg
    image004.jpg
    67.3 KB · Views: 98
Top