I need to start planning out an attack on this large undertaking. I probably won't get to it this year but might as well start thinking about it.
I have new pans and just ordered all the floor brackets. I have new inner & outer rockers plus new inner reinforcements.
Body is bolted down on the frame sitting on new mounts/cushions.
So what's the best way of attacking this? :? I don't want the car to fold up by cutting too much support out from the middle. :eek:
My best guess is to do one rocker first. Cut away the floor from behind the rocker area. Replace that side, then do the same on other side. Once they are done, that should be enough to hold the car together to do the floor pan & braces. Does this sound right?
The nearest body mounts are at the firewall and over the rear tires so nothing supports the center of the car. :eyebrow
Thanks,
Bob
P.S. I put the trunk lid on and alignment is VERY GOOD all around so I started welding the passenger side quarter on. Either I'm really good or really lucky! The plan is to finish the quarters up this year. The whole back of the car will be done then. It was a big job but alot of fun once I got past the shock of disecting my car!:eek:
I have new pans and just ordered all the floor brackets. I have new inner & outer rockers plus new inner reinforcements.
Body is bolted down on the frame sitting on new mounts/cushions.
So what's the best way of attacking this? :? I don't want the car to fold up by cutting too much support out from the middle. :eek:
My best guess is to do one rocker first. Cut away the floor from behind the rocker area. Replace that side, then do the same on other side. Once they are done, that should be enough to hold the car together to do the floor pan & braces. Does this sound right?
The nearest body mounts are at the firewall and over the rear tires so nothing supports the center of the car. :eyebrow
Thanks,
Bob
P.S. I put the trunk lid on and alignment is VERY GOOD all around so I started welding the passenger side quarter on. Either I'm really good or really lucky!
The plan is to finish the quarters up this year. The whole back of the car will be done then. It was a big job but alot of fun once I got past the shock of disecting my car!:eek:
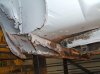
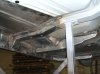
 bang One side at a time and if you can take as many ref measurements as possible to get the right depth for the floor pans and such. I did my 58 and not sure how dif the 63 is but it can be a real bugger getting the inner rockers out an lining up the new ones. I don't know how bad yours is but mine was really rotted out Here's a couple of pics hope it helps.
 ")