
You are using an out of date browser. It may not display this or other websites correctly.
You should upgrade or use an alternative browser.
You should upgrade or use an alternative browser.
Seam sealer, where and how?
- Thread starter bobs409
- Start date
Bob,
I believe it was mostly gun applied in a bead, but if there was any brush-on used it seems like it was mostly on vertical surfaces like the firewall and verticle lap joints in the rear seat/trunk divider panels and vertical panel joints in the trunk. Some firewall joints I've observed seemed to have some brush marks in some areas so it may have been just a touch -up.
Here's an excerpt from an article written by John Hinckley who worked in GM assembly plants in the 60's and 70's. It is specific to the Camaro, but the assembly plant process was similar to most cars.
http://www.camaros.org/assemblyprocess.shtml
"Sealing: The primed and baked body passed through a long series of platforms where vinyl plastisol sealer was applied to all joints; floor pan drain hole plugs were installed and sealed, and the sealers were manually dressed in exposed areas. Floor pan deadener pads were then installed, which "melted" into place later in the color reflow oven. The body then went through a sealer oven to "set" the sealers on its way to the color booth. "
Thanks Cecil.
I need to find out if all brackets got this treatment. I'm mostly wondering about all the brackets under the upper trunk floor and the main floor itself.
I can't tell from my originals as my car had a heavy undercoat applied to everything.
I'm getting ready to prime and paint my upper floor before I install so would like to know if I should put seal around all those brackets or not.
I sure wish there was an original untouched 63 Chevy sitting nearby I could look at. Trying to figure out correct shades and this/that for a resto is tough. :?
I need to find out if all brackets got this treatment. I'm mostly wondering about all the brackets under the upper trunk floor and the main floor itself.
I can't tell from my originals as my car had a heavy undercoat applied to everything.
I'm getting ready to prime and paint my upper floor before I install so would like to know if I should put seal around all those brackets or not.
I sure wish there was an original untouched 63 Chevy sitting nearby I could look at.
Trying to figure out correct shades and this/that for a resto is tough. :?Thanks Cecil.
I need to find out if all brackets got this treatment. I'm mostly wondering about all the brackets under the upper trunk floor and the main floor itself.
I can't tell from my originals as my car had a heavy undercoat applied to everything.
I'm getting ready to prime and paint my upper floor before I install so would like to know if I should put seal around all those brackets or not.
I sure wish there was an original untouched 63 Chevy sitting nearby I could look at.
Bob: Let me know if you get down my way as I can probably make that happen for you. Hope you don't mind if it is a 409 s/s?
robert
Bob,
I don't remember seeing any sealer around inside brackets like the trunk hinge brackets, or floor supports etc. unless they were over a joint. The sealer would normally only be used on overlapping panel joints where there might be a chance of dirt or moisture entering from the outside.
If in doubt, seal it.
You want pictures I suppose?
robert
Yep, but you can hold the fries.

Well I decided not to seam seal any of the brackets. The only thing I seam sealed is the seam running through the wheel wells and around the gas filler part inside the wheel house. I got the rear and some of the panels painted. Frame is in primer and will be painted next.
I used the SEM semi gloss chassis paint and it turned out nice. It looks like the correct gloss to me. The nice thing is this will be more durable than rattle can paint. The prep work was murder on all these parts but worth it in the long run. I hope to start assembling some of the panels later this week.
I used the SEM semi gloss chassis paint and it turned out nice. It looks like the correct gloss to me.
The nice thing is this will be more durable than rattle can paint. The prep work was murder on all these parts but worth it in the long run. I hope to start assembling some of the panels later this week. Attachments
An update...
Finally got some sheetmetal going on.
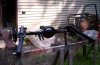
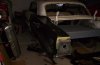
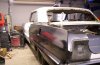
As can be seen in the first 2 pics, I have her out for a spin. I put it on the lift to install the new fuel line. The rear is back in and everything is painted/detailed.
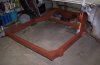
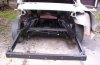
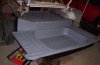
Picture 3 shows the trunk panel all done. Alot of work went into this by welding the brackets on and the center pan in.
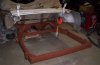
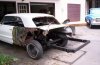
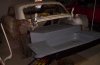
Picture 4 shows a mock up. The upper trunk floor is fully installed, the rest is just setting on for an initial fit. (and to show me what my car looks like with a back end on!)
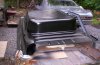
Picture 5 shows what it looks like with the new trunk floor area setting in place.
I'm now in the process of fitting the left wheel house in and next is a test fit of the new quarter panel.
More pics to follow...
Finally got some sheetmetal going on.
As can be seen in the first 2 pics, I have her out for a spin. I put it on the lift to install the new fuel line. The rear is back in and everything is painted/detailed.
Picture 3 shows the trunk panel all done. Alot of work went into this by welding the brackets on and the center pan in.
Picture 4 shows a mock up. The upper trunk floor is fully installed, the rest is just setting on for an initial fit. (and to show me what my car looks like with a back end on!)
Picture 5 shows what it looks like with the new trunk floor area setting in place.
I'm now in the process of fitting the left wheel house in and next is a test fit of the new quarter panel.
More pics to follow...
Attachments
Thanks skip. Taking my time and enjoying every bit of it. I'm going all out on this one, money & time is no object. LOL.
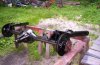
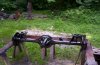
My garage stays quite cool with the doors and windows shut. I just keep a fan blowing on me and all is good. Today at the junkyards was a different story. That sun was a killer.
My garage stays quite cool with the doors and windows shut. I just keep a fan blowing on me and all is good. Today at the junkyards was a different story. That sun was a killer.
Test fitting went well
Wow, these dynacorn panels are awesome! They fit just as good as they look. I had a good scare on the first fit as the gas filler door hole was not lining up with the hole in the wheel house. It was off by at least 1/2 inch but on the second attempt, it lined up PERFECTLY!
A little fudging around is going to be needed with any new panel. Probably the most time consuming piece so far was installing the new tail light panel into the quarter. That battle took alot of time but I eventually won.
The wheel house is now ready to be welded in place and the rear trunk floor is going in after that. Tomorrow I am going to sand blast the trunk gutters and prime, scuff and prime the inside of the quarter panel and when the body schutz I ordered gets here, I'll spray that on and it's time to install the quarter!
I almost forgot, the 220 volt spot welder I got from Harbor Freight is one fine tool! I use that wherever I can. It really does the job fast and just like factory. I hope I don't jinx anything but had to mention how it's working. If you were thinking of trying one, go for it. I don't know about the 110 volt version but the 220 works great.
Here's 2 pics. Sorry the last one has poor lighting.
Attachments
Bob, you are an animal!  bang
bang
bangBob, you are an animal!
Thank guys. I never thought I'd be doing this much work but the 63 deserves it.I can just see her now... straight as an arrow, rust free and wearing a shiny coat of Ermine white.

Another update. The trunk and driver quarter are installed. A few welds to finish up when I get it over on the lift but basically done.
Fit was fantastic! The only problem I found is a gap at the back of the quarter where it meets the tail light panel. Not sure if the problem is with the quarter or the tail light panel but a small piece of metal welded in will fix that. This was the ONLY problem, that's not bad!
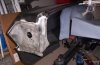
For the sound deadner, I gave 3-M's High coverage body Schutz a try. This is the paintable type so the spatter paint will cover later in the trunk area. It's a neat setup, the gun never gets dirty so no clean up. A bit pricey but what isn't? I used a whole can on the one quarter and probably could have used more. (maybe I'll spray in some more later) Not as thick as the factory but better than nothing.
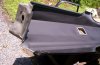
Picture #1 shows the sound deadener just applied. It's black but paintable. I first scuffed and sprayed back of panel with gray primer/sealer and left dry 24 hours.
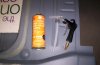
Picture #2 shows the body schutz and gun.
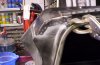
Picture #3 shows some of the handy dandy spot welds done with the Harbor freight tool. About 6 seconds for each one! This tool was a life saver or should that be time saver. I wanted a factory look in as many areas as possible. Lower quarter, around wheel well to name a few. With this tool, those all important "dimples" will be present after paint.")
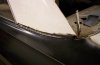
Picture #4 shows the sail panel area. I have to plug weld in this area. I cut off a bit of the lower roof line due to small rot holes so that's what's missing yet. I'll be welding in a used piece I bought from a fellow member.
Picture #5 shows the quarter & trunk installed. It's looking like a '63 again! Go ahead, show me some rust, I dare you! LOL Panel install was a dream! This is the first full quarter panel I've ever done and I'm already starting on the other side.
Fit was fantastic! The only problem I found is a gap at the back of the quarter where it meets the tail light panel. Not sure if the problem is with the quarter or the tail light panel but a small piece of metal welded in will fix that. This was the ONLY problem, that's not bad!
For the sound deadner, I gave 3-M's High coverage body Schutz a try. This is the paintable type so the spatter paint will cover later in the trunk area. It's a neat setup, the gun never gets dirty so no clean up. A bit pricey but what isn't? I used a whole can on the one quarter and probably could have used more. (maybe I'll spray in some more later) Not as thick as the factory but better than nothing.
Picture #1 shows the sound deadener just applied. It's black but paintable. I first scuffed and sprayed back of panel with gray primer/sealer and left dry 24 hours.
Picture #2 shows the body schutz and gun.
Picture #3 shows some of the handy dandy spot welds done with the Harbor freight tool. About 6 seconds for each one! This tool was a life saver or should that be time saver. I wanted a factory look in as many areas as possible. Lower quarter, around wheel well to name a few. With this tool, those all important "dimples" will be present after paint.
Picture #4 shows the sail panel area. I have to plug weld in this area. I cut off a bit of the lower roof line due to small rot holes so that's what's missing yet. I'll be welding in a used piece I bought from a fellow member.
Picture #5 shows the quarter & trunk installed. It's looking like a '63 again! Go ahead, show me some rust, I dare you! LOL
Panel install was a dream! This is the first full quarter panel I've ever done and I'm already starting on the other side. Attachments
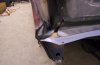
Lookin good Bob Just make sure that your quarter panel with that gap is in the the correct position. The bumper might help in the assesment. Just see if it fits around the quarters with the right gaps. On another note off subject I sent you somthing via paypal and was just wondering if you got it. Thanks, Ken
gearhead409
Well Known Member
Bob, your work looks really good but you are making me a little nervous. it looks like you are not using your best alignment tool THE DECKLED