1962 Bel Air Bubble Top 409 Project

Shake-N-Bake

Well Known Member
The pre-punched holes in our '61 new floors did not line up with the existing bolt locations either. In our case, I left the original floor braces in place since they were in good shape. I positioned the new floor in place and marked the holes from underneath and then drilled out the pans to match. None of the holes were in the correct spot. I had to drill 4 new holes per side that were closer together. In this photo you can see that I bolted down the floor first and then welded it into place.

If your braces were also changed out then you should be able to mark and drill new holes where you want them. If you are going with the stock size steering wheel and column then you won't want to be any further forward than original because it will be hard to get in the car. If you are going with an aftermarket wheel and column then you could have room for some adjustment depending on your needs.


04 braces prepped.JPG 05 RH pan fitted.JPG 01 drilled.JPG
 

blkblk63ss

Well Seasoned Member
Supporting Member 5
Just a tip..."I had welded my hole"s shut accidently not thinking ahead for seat belt"s on top floor for front seat bel"s on otter belt next to door. I just drilled up from the bottom , of course there was a nut welded on floor brace so I just used a drill bit just to fit inside nut. Then I took a larger bit to remove the floor portion only from the top.chased the nut from the bottom with a tap and worked great.
 

CASHguzzler409

Well Known Member
Supporting Member 6
blkblk63ss that is a good idea, and is probably what I'll do too, the holes for the seat belt were also installed with the new floor pan, now Im wondering if they are in the wrong place?. Did someone say, restoring a car is "fun".? It is but you best have your patience
tuned each day. Just received all my interior from Ciadella's today, can't wait to get it covered and in the car. thanks everyone
for the help, all the idea's were good ones, even Phil's.
:4th2
 

CASHguzzler409

Well Known Member
Supporting Member 6
Received my interior last week and finally took it up to the upholstery guy, as we open up the boxes I saw the headliner, and it
was not the color I was expecting. I was thinking the BEL Air bubble top cars came with the star design, but when I called and
asked about it, they said no, they only came with the star type in the Impala's. My question is did they change in 1962 to the star,
or is it a plain off white type, as in 1961?. thanks for any help. cashguzzler
 

Attachments

  • 20150602_144131.jpg
    20150602_144131.jpg
    29 KB · Views: 44

CASHguzzler409

Well Known Member
Supporting Member 6
Lets see, I finished up installing the silver insulation, it took me 2 half days, I was not that hard, but it did take a little cutting and taping. I used 1000 mile tape to hold it in place and after it was in placed used the silver tape to cover that, looks pretty good,
just hope the carpet fits over it.
Today was another day of disappointment on running the engine. I ordered a water pump to replace the original one that we
rebuilt, it leaked, put on the heater hoses with the H connector. NO LEAKS, the engine ran for 5-10 minutes and then goes up
to about 200 when we shut it off. We were going to adjust the values again, I think we had them at 12-20, but decided to let it cool
down just a little, when trying to restart the motor, it would not start again, that when we saw that the front carb was filling with
fuel again. Shut it off and undid the connection from the fuel pump. That let the pressure off and no more gas into carb. We
quickly removed the spark plugs to find that they were a little black, but only one was bad. We've had quite a bit of trouble with both carbs, and now we are wondering if the "fuel pump" is pushing to much gas into the AFB's. I bought a AC 4657 new fuel pump, does anyone know the pressure that this 4657 pump puts out, or what a 409 2x4 setup would use.?
:bang
 

DonSSDD

Well Known Member
Supporting Member 2
I would check the fuel pump pressure with a pressure tester, it should be 5-6 lbs I think.

Don
 

CASHguzzler409

Well Known Member
Supporting Member 6
DonSSDD I did check the fuel pressure and it is between 3-4 pounds. The new AC Delco 4657 pump should put out 5.0 - 6.5 pounds.
This is a new rebuilt motor and has not run more than 10 minutes at a time, before it either gets hot (200) or there is a problem of some kind, water leak, etc. We have a 180 degree thermostat, new 4 core rad, which is moving the water fast when looking at it with the cap off. We're taking the carb to a carb rebuilder, he has a run motor and maybe can find our problem. thanks for the suggestions, will keep you advised.
 

CASHguzzler409

Well Known Member
Supporting Member 6
Took the front carb to the carb man and he put it on his run machine, ran it for a hr, stopped it, started it, let it sit and it started right up again. Said it had good vacuum, he did take it apart and put in the red tip needles and a small type clip that holds them. I sure hope
this works, summer is running out. I was going to add the anti-freeze, but think I'll wait till we try running it again. Crossing my fingers..!
Just some pictures of the floor heat/sound deadner, it should help with the heat, if it ever runs...... lol
:love
 

Attachments

  • 100_2221.JPG
    100_2221.JPG
    85.6 KB · Views: 135
  • 100_2222.JPG
    100_2222.JPG
    60.4 KB · Views: 130
  • 100_2223.JPG
    100_2223.JPG
    83.3 KB · Views: 125
  • 100_2224.JPG
    100_2224.JPG
    103.3 KB · Views: 129
  • 100_2212.JPG
    100_2212.JPG
    94.3 KB · Views: 131
  • 100_2213.JPG
    100_2213.JPG
    86.8 KB · Views: 101

62impala409

 
Supporting Member 1
I'm afraid it's going to take more then that 50 yards of sound deader to muffle that beast under the hood. Just say'in! LOL Keep us updated on the carb issue.
 

62bubble

Well Known Member
Supporting Member 5
Cash, the original bench seat floor tracks for your 62 air,did measure 9" center to center holes. They changed the length of seat tracks in 1963 to a longer hole pattern, this being 11" center to center. The new floor pans that they now reproduce have the holes cut out for the 63 and 64 tracks, hence, 11" holes center to center. Also, the after market floor braces have the bolt holes set on the flanges of the braces, and when installed, will conform to the holes in the aftermarket floor pans...I believe this is why you have encounter the problem that you have had. As you can see from Shake & Bake's pictures, the 61 and 62's had that extra under the floor pan square brace , and that is where the holes for the seat tract were in stalled, not on the flange of the long floor braces , as are the new floor braces...I hope I did not confuse the issue . Let us know how you make out, or if this makes sense to you... Mike
 

CASHguzzler409

Well Known Member
Supporting Member 6
Just a quick note on the 2x4 carb problems. The only thing that was changed on the last problem was, he changed the needle and seat
and also used a different attachment to the float. Car ran great, both carbs not leaking when shut down, I think we finally conquered
that problem?.... I did have the headliner installed and it looks great, it only took the upholstery pro 3 hrs.

We had quite a time installing the rear window, I mean 2 days worth, but now its done and we can move on. One thing to remember
on the Bel Air models, remember to put on the drip rail stainless LAST, as it gets in the way of putting the bottom molding's on the rear body, especially the little clip that has the push in type clip by the corner of the 1/4 glass. Be sure to take a file and clean the small hole out, as it gets full of primer and paint, making it harder to install. This clip is also very hard to put in the stainless so take your time, it will slide into the slot with some patience. Just hope you didn't loose this clip, as I don't know if they sell them.

Another thing we found is to double check the clips for the stainless, they must sit up high on the back window channel so the stainless
will allow them to clip in and hold. Also check the clips to make sure the little tab (very small part of the clip) that holds the stainless is
not broken off, or they will not clip into the stainless. If doing it yourself, you must have the plastic tools for the installation. Get as
much information as you can on how to install it, and I would say its a 2 man job. It was funny as there was 3 of us at first trying to
stretch the rubber gasket to put it on the windshield, it took all of us to do it, and quite a bit of time too.
:facepalm

I did take a picture of the brace under the floor pan, is this stock looking plate ?.

Well hope i didn't bore you with this update ....! Keep em runnin.... cashed-out

On the way home my trailer tire had a blow out..... I wonder if they were made in the USA?...... That's a whole story in itself. lol
 

Attachments

  • 100_2253.JPG
    100_2253.JPG
    80.8 KB · Views: 140
  • 100_2254.JPG
    100_2254.JPG
    67.5 KB · Views: 139
  • 100_2244.JPG
    100_2244.JPG
    73.5 KB · Views: 148
  • 100_2269.JPG
    100_2269.JPG
    54 KB · Views: 148
  • 100_2270.JPG
    100_2270.JPG
    33.6 KB · Views: 129
  • 100_2272.JPG
    100_2272.JPG
    40.5 KB · Views: 126
  • 100_2258.JPG
    100_2258.JPG
    31.7 KB · Views: 102

CASHguzzler409

Well Known Member
Supporting Member 6
Yippy, my carpet finally arrived yesterday, now I can call the upholstery man and set up a appointment to have it (interior) finished.
I had to take out the 1/4 window, because the roller was loose in the track, making it un-adjustable , for me this is not easy. I have
taken it out and fixed the problem, re-peened the rollers, and closed the gap in the channel in the vise. Im not sure about the
sequence of installing the 1/4 window parts, but after hrs I have it to the point where all that is left is the crank mechanizm, it does not
want to fit, does anyone know if it fits over the large double channel or does it fit under the channel. ?
:dunno2
 

Attachments

  • 100_2273.JPG
    100_2273.JPG
    53.4 KB · Views: 78
  • 100_2274.JPG
    100_2274.JPG
    95.2 KB · Views: 86

CASHguzzler409

Well Known Member
Supporting Member 6
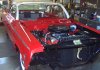
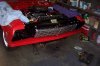
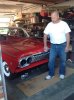
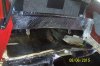
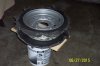
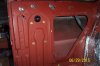
This is for the beginners or someone that hasn't ever taken out or replaced a 1/4 window before. The above pictures were taken of my
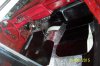
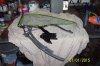
1/4 window before I took it out. Im glad I took the picture as it helped when re-installing it. I also took a picture of it all laid out
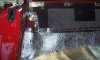
on the bench so I could see how it worked from the inside. A good idea is to mask off your chrome frames, also the outside of
your window, on the body, better safe than sorry. After getting to the point of "its not working", I had to quit working on the 1/4 widow, all I had left to do is install the crank part, but it just wasn't wanting to fit.
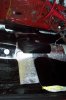
After looking at it in the morning, I decided to take it all apart and start over. I decided to leave the window in the opening
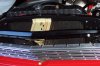
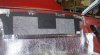
at the bottom of the access hole, towards the outside of the car, its not in the way there. First I put in the cranking mechanism, then the rear channel that goes up to the top of the window and screws into side of access hole, then hooked up the crank arm roller into the round curved piece and then screwed it into the window channel part. Last I installed the long double channel into the access hole from the bottom, making sure that both rollers were in the channel, I put in the bottom screw to hold it in place, then installed top two adjusting screws, bolts at the top. Don't forget the upper rubber stop. I've also had to take the upper window channel out again, and
re-do the channel felt, I found that using the thin window channel lining will not allow you to have the chrome:pray frame up and
secure in the channel, making it unadjustable with the adjusting 2 screws, its best to have the right size channel fuzzy, I ordered
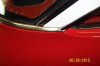
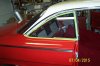
1" by 1/2 " this should be wide enough for the chrome to go up into it and be held tight. Also this is a great time to install the outside
belt line chrome fuzzy strip, and new clips to hold it in place, or use small screws, we used clips but they are really hard to clip in.
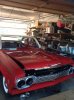
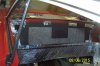
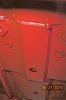
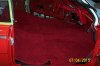
Got the carpet and set it out in the sun for a couple hrs, it did help it relax. I had to set it in the car, just couldn't wait to see it .
:blah
 

Attachments

  • 100_2276.JPG
    100_2276.JPG
    72.1 KB · Views: 68
  • 100_2277.JPG
    100_2277.JPG
    65.9 KB · Views: 67

CASHguzzler409

Well Known Member
Supporting Member 6
The Seattle weather has been great, so its easy to go to the garage, put up the garage doors so the sunshines comes in, and you can still enjoy seeing out into the yard. I had quite the time learning about the back 1/4 windows. I found out that the 1"1/2 felt I had bought wasn't really wide enough to fully cover the inner part of the upper channel, I would suggest 1"3/4. It comes in 3 ft lengths, 2 of them. Also when trying to adjust the 1/4 window to align with the door window, you use the two adjusting screws, my mistake was when re-installing those I did not install them from the inside by where the glass goes, this is the only way they work right. I also took and installed a small screw into the belt line outside window felt, right at the back window where it curls up. It holds that part of the rubber from moving at all. :brow
My next project was to work on the front of the car, head light buckets, grill, slash pan. What a job that has turned out to be.
You talk about tolerances, I bet I took off the head light buckets and grill 15 times. I finally found that if I started on the drivers side, installing the head light assembly first, then fitting the aluminum housing, then moving on to the grill it worked better for me. I did have to call in good buddy to help with the passenger side head light assembly, I guess one person could do it, but it much better and easier with more hands. It took us some time to message the aluminum housing to fit the fender, on and off it came. Maybe 10 times, but finally we got it to where it is as good as we could get it. Its not perfect, but......perfection is not reached sometimes, although we sure try to. We , my friend Gary, and my wife installed the hood. It like everything else was not
easy, it tested our patience. We did have it on, but had to adjust the hood hinges, as the hood would not close all the way. Problem was, not recognizing that the end of the hinges were both bent outward, and would catch on the bottom of the hinge when closing. We bent that part of with a huge pair of pliers, problem fixed. Now to fix the lines on hood , doors and fenders. That took us some time , had to remove some of the shims we had in the door area, tweak the bottom of the fenders in a little, push, shove, muscle the fenders a little, and it is now in pretty good shape. Here are some of the pictures I took. I hope to get the upholstery done in about 10 days, so maybe I'll get a chance to drive it before the weather turns to rain....:pray
 

Attachments

  • 100_2293.jpg
    100_2293.jpg
    87.6 KB · Views: 148
  • 100_2294.JPG
    100_2294.JPG
    47.8 KB · Views: 152
  • 100_2296.jpg
    100_2296.jpg
    78.5 KB · Views: 148
  • 100_2301.jpg
    100_2301.jpg
    82.8 KB · Views: 149
  • 100_2305.JPG
    100_2305.JPG
    66.6 KB · Views: 148
  • 100_2314.jpg
    100_2314.jpg
    85.2 KB · Views: 149
  • 100_2315.jpg
    100_2315.jpg
    63.1 KB · Views: 164
  • 100_2316.JPG
    100_2316.JPG
    70.8 KB · Views: 153
  • IMG_0888.JPG
    IMG_0888.JPG
    56.3 KB · Views: 160
  • IMG_0892.JPG
    IMG_0892.JPG
    52.9 KB · Views: 130
Top