61 Bubbletop resto

sp6t1348

Well Known Member
Supporting Member 4
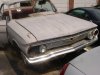
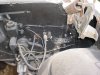
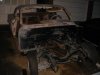
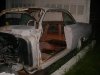
I bought a '61 Bubbletop a few months back out of New Mexico. The car is pretty straight. It was cut in in primer and has straight sheet metal. Most of the interior was in the trunk, got some spare parts, (hood, fender trunk). The car came complete with it's original 283 and iron glide, already removed of course. Due to the state of disassembly, I made the decision that becuase of the rarity of the car, it deserved a frame off restoration.

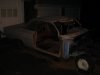
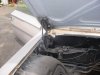
I have disassembled the car down to a rolling chassis with the doors, front clip, glass, moulding and everything removed. I am in the process of getting a storage unit to put all of the big parts in as my two car garage is full!

Even though I do not make a living as a mechanic, I have been turning wrenches since I was 15. I am now 38. I have worked part time at a local speed shop assembling and building big block chevy marine engines, and I am a factory trained Mercruiser Mmarine mechanic. So engines and trannies and mechanicals are fun for me.

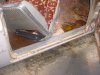
I am by no means an artist at the body work. However I bought this car specifically because it needs only a minor floorpan repair and maybe some rocker panel work. I have previously owned and restored several 62's. It has been several years since I had one and I wanted to try something different.

I knew the options, codes and could pretty much tell a clone from a real SS or 09 car. I do not know alot about the 61. I do have a 348/250 coming out of the machine shop. This 61 was 283 PG with air. I would like to do a 348 4 spd. I am going for an original look, no mods.

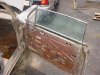
My car has bucket seats. They look exactly like what was in my 62 SS. I plan on doing all the mechanicals and prep on the body. I have a couple ideas of a work schedule as far as order of disassembly, repair and reassembly, was wondering if anyone out there has done a 61 and can give me some advice. I am not looking to cut corners, just want to do it right the first time. I sold my 62 SS went I joined the Marines and kicked myself in the rear for it. I ain't getting rid of this one. I am also in desperate need of interior advice, as mine was thrashed. I got the seats, one door panel and both rear panels, but they are rough. Thanks, guys, Sean Byrne.

61 Bubbletop-----in progress
61 Impala 4 door original 60,000 mile 283 glide car
:?
 

Attachments

  • Mvc-001s.jpg
    Mvc-001s.jpg
    38.8 KB · Views: 134
  • Mvc-002s.jpg
    Mvc-002s.jpg
    38.6 KB · Views: 109
  • Mvc-003s.jpg
    Mvc-003s.jpg
    40 KB · Views: 88
  • Mvc-005s.jpg
    Mvc-005s.jpg
    41.7 KB · Views: 117
  • Mvc-007s.jpg
    Mvc-007s.jpg
    39 KB · Views: 94

Tom Kochtanek

Well Known Member
Supporting Member 13
Good taste!

Sean:

I like your style! Previous experience with the X frame cars. Mechanically inclined. Interested in "period correct" restorations. And you selected what I consider to be one of the "cusp" body styles (1961). A hint of fins, dating back into the 1950s. Nice front clip, also a kind of 50s look. Nice lines on the sides, not slab sided bodies that came later in the 60s. I still think the 1961 model is the best of the 50s with style and appointments from the 60s. A great candidate to restore!

Sounds like you have a pretty solid car. When you begin to dismantle the vehicle, you will learn more of it's condition, and then you can respond as needed. The interior stuff is really easy to find and to install. I'd recommned Phil Reed, who is a member of this "community". He set me up with a complete interior kit and all the rubber parts needed for a frame off restoration on my 1962 SS, which I am now in the (rather long) process of restoring. Phil's phone is (816) 587-1109 and he is in Kansas City. Want to really get bit by the 348/409 bug? Attend the upcoming First Annual Convention in KC this coming September (see this site for details). I will assume you have an Impala, which has better interior appointments, as opposed to the Belair. Those were the only two "bubbletops" Chevy made that year, although I have to admit the 1961 Pontiac sport coupe is quite an attractive vehicle as well :)

Seems as if you've already found a 348, possibly one date coded for 1961. Finding a 4 speed Borg Warner T-10 from a 1961 will be a bit more challenging, but if you were to just look for a period correct T-10 you will find lots more. The solid axle Corvette guys scoop these T-10s up quickly, but the Corvette T-10 is all aluminum, while the passenger car 1961 four speed had a cast iron case with an aluminum tail. You will need to locate four speed pedals (or possibly from a 3-on-the-tree car), a smooth four speed steering column, and proper Z-bar and clutch linkage setup, to replace your PG setup.

I have a 1961 Bel Air that was originally a 348 with the column 3 speed. White over beige. What is your color combination? Is it an Impala or Bel Air? We all love pics, so if you have them, you can get everyone excited by posting those to this discussion forum. Follow the suggestions and recommendations of the fellas (sometimes I wish there were a few gals:)) who are active in this Forum and you will be well informed. Ask lots of questions when you get stuckl. Collectively there is a wealth of knowledge out there, and you can easily connect with that expertise. In the end you get to make all the decisions and then implement them. That's the fun part :)

Let us know what you need to know, and someone (often several of us) will answer your questions as best we can :) :) :) And best of luck with that restoration!

One suggestion: there are folks out there who like the original components, so consider keeping that 283 and the PG assuming it is original equipment. You can check the numbers to verify originality. Oh, and a word to the wise: you're gonna need a bigger garage:) Seriously, dismantling a car of this size requires about 3-4 times the space needed to house the vehicle itself. What was Roy Scheider's line in Jaws I when he first saw that Great White shark? "We're gonna need a bigger boat" :)

Cheers,
TomK

P.S. Save those bucket seats, or donate them to one of my ongoing projects :)
 

bobs409

 
Administrator
What can I say that Tom hasn't? :D :D

Not sure if Tom mentioned this in all that but 1961 cars didn't have bucket seats so if originality counts with you, you'll need to change that.


I like what Tom has been saying lately about saving the original running gear for the future. I am a strong believer in that myself. It will add to the value/interest of the car if you should decide to sell the car later on.


Oh yeh, welcome to the site and hope you'll become a regular around here. :)
 

jim_ss409

Well Known Member
Supporting Member 5
I think that geting a storage unit is a great idea. It's impossible to work when your shop is full of parts. I see that your car is apart already but for others that haven't started yet I would suggest taking alot of detailed pictures before you even start taking things apart. A digital camera's great for this. It's amazing how often you'll want to refer to a photo to see what kind of bolt went where when you start re-assembling things. It's also wise to use some re-sealable freezer bags to put small parts in. You can use a felt pen to write what's in each bag. If you get parts sandblasted be carefull about who you get to do it. It's very easy for them to warp the panels, especially the hood and trunk. As questions come up post them here and there's bound to be someone that has the answer. Good luck with your project.
 

sp6t1348

Well Known Member
Supporting Member 4
61 Bubbletop resto update

Here are a few more pitures as it sits now.
 

Attachments

  • Mvc-009s.jpg
    Mvc-009s.jpg
    38.4 KB · Views: 103
  • Mvc-008s.jpg
    Mvc-008s.jpg
    37.9 KB · Views: 69
  • Mvc-006s.jpg
    Mvc-006s.jpg
    40 KB · Views: 90
  • Mvc-004s.jpg
    Mvc-004s.jpg
    38.6 KB · Views: 85

sp6t1348

Well Known Member
Supporting Member 4
61 Impala Bubbletop resto update

Hey guys, thanks for the help, keep the info a coming!!!

To explain in greater detail, The car came with all of the trim and moulding in the trunk, the engine and tranny were out of it. I checked the block stamps and verified it was the correct 283. It was complete from air cleaner to oil pan. A/C compressor was still hanging on the passenger side exhaust manifold.
It had about 1" of grime and grease all over it. I pressure washed the engine, tore it down and sent it to my machinist. It was bored .030 over, decked and alignment was checked, 43 years and still within factory specs!!!!!!.New TRW hypereutetic pistons, resized the rods, crank was cut .010/.010. I had a set of #462 fuelie heads with hardened seats, stainless valves and new guides already done. I have a 1961 cast iron 4bbl intake with the correct Rochester 4bbl, all redone.

I will be using the trusty 327/300 camshaft and lifters, which I have NIB. Compression will be around 9.25:1. This is going into my 61 four door Impala, as it's original engine is getting tired.

For the bubble top I am going to use a late 1960 dated 348/250 hp engine. I bought it complete and running in outside of Hershey Pa. It has been to the machine shop, I found some .040 NOS 348 truck pistons, rods were resized, crank ground and heads are all done. I just need to assemble it. this will go into the Bubbletop.

I known that the aluminum case powerglides were not available until the 62 model year, and then only for the 327. I know that the 61 348 had several different engine and horsepower ratings and different transmissions combos. I have the shop manual and have been reading up on everything.

I am reconsidering my original plans for the four speed. I do have 1961 clutch and brake pedal quadrant I took from a '61 BelAir 4 door. I have the three speed coulumn as well. I do have an overdrive harness and cable assembly. I would be up for installing a three speed overdrive in the car. This would keep the floor intact and allow me to return the vehicle to it's 283 PG without alot of trouble.

As far as the car goes now, as you can see from the pictures, the front clip is off and disassembled, the fenders and hood are in great shape. The bumpers and brackets are good, but will be rechromed. The interior is totally out. The headliner bows are there, but the headliner is gone.

The core support has corrosion and has been eaten through underneath of the battery tray. I will either have to replace it or try to repair it. I would rather replace it. I am not sure about interchangeability on that with other years. I think the 62 core support will work.

The body is in really great condition, rocker panels will have to be replaced and the floorpans up front have to be replaced. I will be lifting the body off the frame for a full frame off. Brake lines and the whole works.

I need some help with respect to materials for the frame and suspension components. Specifically, paint, primer, colors and the like. I would like to use an epoxy based primer/surfacer on these, so that the factory finish coat has a durable substrate to adhere to.

My plan of action is as follows;

1) Finish the disassembly of the vehicle with pictures along the way

2) Itemize each fastener and part, bag it and label them

3) Repair rocker panels, floor pans with body still on frame.

4) Prep body, prime and remove from frame

5) Disassemble and sandblast and repaint frame and suspension components

6) Reassemble frame with all new bushings, springs, fastners hydraulic and fuel lines
7) Install engine, transmission, and exhaust system on rolling chassis

8) Shoot color on body and sheet metal

9) Reinstall body and sheetmetal.

10) Final assembly with electrical and rewiring

11) Interior installation

Any thoughts to this schedule? I guessed about 1000 hours plus in time.


Sean Byrne :roll
 

Tom Kochtanek

Well Known Member
Supporting Member 13
Excellent plan of action

Sean:

Looks as if you have the plan down. It will take a LOT of time :) Don't keep track, just do it. Be extra careful during disassembly, bagging and marking as indicated. Even with this, you will have those parts out for cleaning and finish coating and you will lose track of what they are, so plan on "intermediate marking" so you can get them back in the correct baggie. I messed up a bit here and it's really hard to put things back into place once they've been disupted.

You are lucky in that you have another 1961 car that is complete, and you can use it for a "model" and for comparison purposes. I needed this several times, and I'[m not yet halfway there.

It's hard to get a frame off done in a year or less, unless you have a really clean vehicle to begin with and delegate tasks or have help from others :) I started my '62SS last October. Dismantling is the easy part. Keeping track of parts, their status, and reassembly takes tons of time. The pics mentioned (taking them as you go along) really help. When I dismantled things from the firewall forward (after removing the front clip) I decided to use a video camera and even narrated a few parts so I could go back and see the order of removal and the proper bolts, etc. A few things might have been changed from the factory, so I made note of those in the video. I found a hole drilled in the firewall that didn't look right, so I made note of that (it has been welded up and smoothed before paint).

Bob has a nice list of colors for various suspension parts. I used POR on the stripped frame, then used "Chassis Black" over that (before it set up, for adhesion). I used Eastwood products (spray cans) for small parts (cad colors, silvers, cast colors, etc.) I bet I have one or more of every Eastwood colors made in a can :)

I did the inner wells, radiator surround, fan shroud, stuff like that using a 2 part epoxy with a bit of hardener. I figure to get gas and oil spilled on them, and that spray can stuff will melt right off. I struggled with the exterior choices, finally settling on a single stage Dupont application rather than basecoat clearcoat. I put a ton of paint (multiple coats) on certain areas that need lots of protection. Areas like the roof rails, firewall, and so forth I put four coats on. I ended up using almost two gallons of Ermine White. Bought a full gallon of the semi-flat/semi-gloss black used on the inner wells and such. Used four coats on those parts. I bet I did at least 10 parts over and over again, after stripping them back down (I am an amateur at best!) That's why I mentioned "don't count the hours".

Take lots of pictures, ask lots of questions, take your time. And have fun :)

Cheers,
TomK
 

sp6t1348

Well Known Member
Supporting Member 4
61 bubbletop

Tom,

I have heeded your advice. and I really do enjoy the work. I am guessing two years as a fair time estimate. I am quite comfortable with the mechanical end. Technical advice as to proper parts, options and the like I will need. I know 62's, but not 61's. That was part of the reason for the selection of this car.

I am fortunate to have the right tools and equipment for the mechanicals. I am an amateur bodyman, with enough experience and cars under my belt to do the job. I am going to use the four door for reference. It is an original car. I wil also be using some of the members completed cars to as a guide. Tommy Nolen has a beautiful 61 SS.

My original paint code is 970, my trim code is 865. Keep the tips coming in, I can't wait for Friday night and Saturday in the garage!!!
 

real61ss

Well Known Member
Supporting Member 8
Sean,
You are on the right track time wise, each of my 61's were frame off and they both took 2 years almost to the day. You'll have to do some planning to complete a frame off in 2 years. I worked about 2 to 3 hours each night on them, 5 nights a week, worked some on weekends but never seem to accomplish much on Saturdays. My buddys always seem to come by on Saturday to see what I got done during the week, that and yard work distracts me on weekends. I have always worked alone in my shop. I do have a friend that helps me with the paint but he works at his shop. I have been lucky in that the last 3 cars I did were non metalic colors (one black, two white) so color match wasn't a big problem. When I take the car apart, I give him the front clip, doors and deck lid, he strips and paints them while I'm doing the body and frame. I also have a lady that does all of my upholstery work, she has a key to my shop so she can come there and work whenever she wants. I work 10-11 hour days (construction work) so while I'm away at work, she can be working on the interior. Then I'm working on the car at night so we don't get in each others way. I also don't do any motor work other than install it in the frame. As soon as the car is taken apart, I send everything that has to be restored by someone else out so it will be coming back as I finish my work. I always send the aluminum trim to Dennis Ebert, the stainless to Bob Galewski in Va. Beach, the hood hinges and other hardware go out to Booster Dewey in Portland to be gold cad plated, the chrome goes to the chrome shop here in Richmond etc. Do all this as soon as you get the car apart or you'll be held up later. Meanwhile, the motor is at the machine shop, they assemble it also, as I said, I just install and detail it. While we're on the subject of the motor, make damn sure the guy at the machine shop knows he best not cut any nunbers off that motor. That's my way, not saying it's the right way, just my way. I realize that I'm lucky to have someone who will come to my shop and install the interior, I remember what a hassel it used to be to take the car to another shop. Also really helps to have 2 people painting stuff at the same time. Anyway, I'm seriously thinking about starting another 61 frame off project, but that's another story that only Nut (Aaron) and I know about right now!!! :brow
Good luck, I'll help anyway I can
 

Tom Kochtanek

Well Known Member
Supporting Member 13
Aha!

I was glad to hear that it takes two years to do a frame off by oneself :) OK, with the help of others....

I started about 10 months ago and I would estimate that I am about 50% complete. Makes me feel better. I was trying to get things done by September 15th, but then I am an optimist!

I keep reminding myself that it's a hobby, not a job. That makes it better!

Best,
TomK
 

jim_ss409

Well Known Member
Supporting Member 5
I found that it was important to focus on one part of the job at a time. Especially during the early stages. When you first start out everything you do makes the car look worse and the job just seems so big that it's easy to get sidetracked by other projects. I think Tommy's right about sending things like bumpers etc. out ahead of time so they'll be done when you need them. Another reason for doing this is that it helps spread out the cost so that you don't get hit with a bunch of big expences right at the end. One other thing you run into with a big project is having to answer dumb questions from guys that have no idea how much work is involved. They've seen a few episodes of Overhauling and can't understand why it should take more that a few weeks to restore a car. :dunno
 

Tom Kochtanek

Well Known Member
Supporting Member 13
Overhauling in 24 hours

Jim makes yet another set of good points :)

If you watch shows like Overhauling and do the calculations, you get two dozen experts, plenty of experience, lots of space, access to every tool imaginable, and lots of outside support (interiors, chroming, and so forth). I bet if you added the time and talent you'd get two years' worth of a single person's efforts!

And they generally start with cars that aren't as corroded as some of us work on...

I brought the finished trunk lid for the '62SS home today and set it in the garage. A friend of my 18 year old son asked "when the project would be done". I said "That's not the point. It's the journey, not the destination". I think he understood.

BTW, the trunk lid took 4 coats of primer/blocking and four finish coats to get it right. I would estimate about 20-30 hours of effort just for that one piece. But now it will fit better than new :)

The hood is also done now. Interesting thing, I found a "crease" near one of the two "raised lines" on the '62 hood, probably from the factory molds when it was released. It just wouldn't go away, even after painting it several times. Went back and blocked and blocked and blocked and blocked (sprayed it 4 times) and it got better. Then four coats of Ermine white. I am now satisfied. That's one benefit of doing it yourself, you can keep after it until it looks as good as you can get it.

Still not happy with the fenders. A few weeks and it will be all painted!

Whew, this painting is painstaking! Next time I'm going to Maaco (just kidding!).

Best,
TomK
 

bobs409

 
Administrator
I get a kick out of that Overhaulin. They get a car that has a rip in one door panel, maybe a small dent in the fender and first thing you hear is, "it's a pile of junk." Those people wouldn't know how to fix a car from the east coast!


Tom, I hear that Earl Sheib guy will paint any car for just $99.95! :roll
 

60convert

Well Known Member
hey

for the 99.95 does that mean you have to wipe the grease off the car as i am sure they are not masking of using paper and tape. wash the car off apply grease and paint and if there isn't room inside paint outside???? customer wipes grease off lol??? and what kinda paint are they using???
Jesse

I am sure Toms 62 would of been able to be painted and done in 1 day no need to worry about the amount of money he spent on the primer and and paint and making sure everything came out perfect thats all overkill.
 

dq409

Well Known Member
Supporting Member 3
bobs409 said:
I get a kick out of that Overhaulin. They get a car that has a rip in one door panel, maybe a small dent in the fender and first thing you hear is, "it's a pile of junk." Those people wouldn't know how to fix a car from the east coast!


On the last Overhaulin` they did a 65 Mustang.
It was a typical east coast (from Calif) rotted out car. It/They were amazing !!!

The only good panel was the roof.

Of all the show out there Overhaulin` is one of the better ones IMO.

All top notch craftsmen that DO know what they are doing.

Some of their projects are not to my liking but they are all done with perfection and they can take one of my cars anytime! (except the `62)

Chip Foose has one of the best eyes in the industry IMO.

Now, if you want to talk about idiots that haven`t a clue or a talented crew,,,, then the Boydster`s so called experts are the joke !
,,,dq
 

bobs409

 
Administrator
I do like Overhaulin alot. I didn't get to watch that one with the Mudstang yet but have it taped. Did you see the one with the Monte Carlo? That's the one where the vinyl top had been ripped up and the door panel was torn and they acted like it was a POS. Just like most of the cars, it was damn solid and nice. The body was straight and no holes. The interior was just about as nice before they worked on it as after.

They make most of the cars sound like they are complete junk though. I guess that's the way it is in those nice climate states. They don't know what they have. There are some cars here in Pa. that I'd like to see them fix in a week. :p

This week is Hot rod week on Discovery starting with a Hot rod build off tonight at 9 and 10. Should be worth watching.
 

sp6t1348

Well Known Member
Supporting Member 4
Overhaulin

This '61 is my first "complete frame off" restoration. I have many cars throughout the years, but always farmed out the bodywork. I feel that if I do it myself, it will be the pride of the workmanship that will make it perfect. I am glas we have this website, because I am "new" to the '61 model year. I have had several '62's apart, but never a '61.

I am really interested in doing my own bodywork, as it is one thing that I have dabbled in. The bodywork takes a heck of alot more time and patience than the mechanicals, for me.

So it is a learning curve. As for Overhaulin, it seems to be an okay presentation, but not an accurate assement of how most of us operate. That Boyd guy is just plain arrogant. I don't like the cars either.

I get sick to the stomach when I see the cutting and chopping of old classics. I have no problem with period correct 60's look cars, slightly modified, or modified only to the point they could be put back to original, but I don't like tubs, narrowed rears and tube chassis for a car that was a good piece to start out with a restoration.
 

Tom Kochtanek

Well Known Member
Supporting Member 13
The POR machine

Sean:

I call my 1961 Bel Air sport coupe "the POR machine" because I used sooo much POR-15 on it :) Actually it was an "experiment". I started stripping the body about 3-4 years ago, and my buddies talked me out of it because of the corrosion on that one overlapping seam on the firewall. They told me I'd never get it clean enough to keep it from rusting back. So I stopped.

This past summer I was "practising" using stripper (I was thinking of using chemical stripper on my '62SS project, but changed my mind and took it down to bare metal by hand) and the '61 was handy so I did the rear section with Aircraft Stripper. Nasty stuff, but it really took that original acrylic lacquer and the primer off quickly. Interestingly the rockers and quarters were solid, but that front seam on the firewall bothered me. After grinding a bit, I brushed POR-15 on the bare metal (which was kinda crusty) and then let it sit all winter and now through the summer months without a tarp on that section. It held up just great!

So I went around the whole car and stipped the corroded areas and applied the POR-15 on those spots. Still looks great after sitting outside (I took my shed down and had to move the vehicle outside until a new "manshed" gets built).

I also experimented with POR's "powermesh", a kind of fiberglass material that you soak with the POR and apply. They also make a two part epoxy/body filler that I used to build up over the powermesh application. I know it's not the same as cutting out the rust and hammering out a piece of metal on a sand bag, then welding it in place, but I wanted to try it anyway. We'll see how durable it is over time...

This was the vehicle with major rust in the C pillars on the bubbletop. It was so bad that I seriously considered cutting the top off and making one of those "fake" Bel Air convertibles. But our fearless leader Bob convinced me otherwise :) Did that buildup using POR and the epoxy. Felt bad about slabbing filler in there, but it is an experiment. Six months out in the weather and it still looks OK. And now it's got me back to spend time on the vehicle :)

Hence the designation "POR machine" :)

Cheers,
TomK
 

jim_ss409

Well Known Member
Supporting Member 5
I had a slow incompetent idiot do my bodywork, me Sometimes I think it might have been cheaper to get a real bodyman to do it because I waisted alot of paint and body supplies. But it is nice to do things yourself as much as possible. I did have a problem that showed up about a couple of weeks ago. I had done most of the bodywork and primered the car then let it sit under a tarp for a year or so while I got sidetracked on other projects. There were a few places where the tarp got wet and held the moisture. It discolored the primer but didn't seem to be a problem. So I went ahead and painted it, myself, and spent many hours sanding out the dust, orangepeel, and an insect or two. Everything looked fine for a month or so then as you might have guessed little bubbles started to apear at the spots where the primer been discolored. :doh I guess I was lucky in one way, I hadn't started to assemble anything yet. So I just sanded those spots down to bare metal and then brought the car to a real bodyshop for a relatively low cost paint job. They used good paint and it looks fine but it could use some sanding and buffing. Oh well ,live and learn. :dunno
 
Top