
This thread will showcase the restoration of my 1969 Custom 30 wrecker!
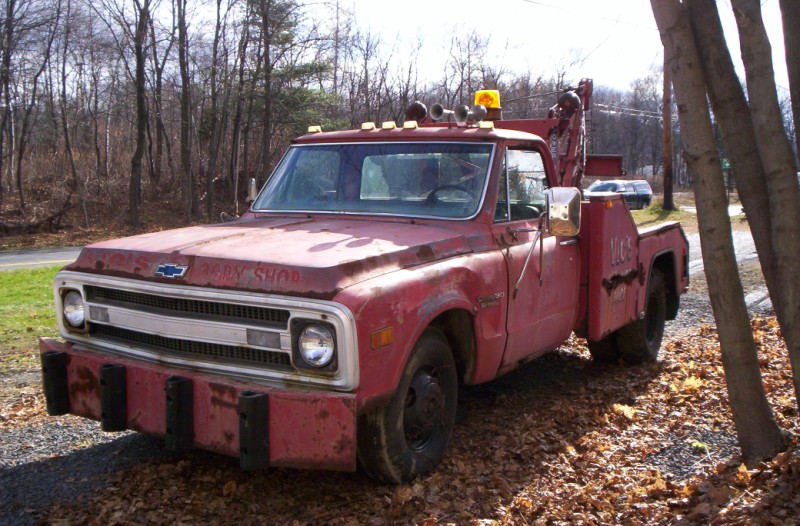
This is my latest toy, a 1969 Custom 30 wrecker. This truck came into a local junkyard and when I initially asked about it (only to buy parts from it), the owner said he wasn’t sure what he wanted to do with it yet so I just put it out of my mind. It sat for a few weeks and I would see it on my weekly visits to this yard but then one day I noticed it was gone. While down in the yard looking for parts, I spotted it way down in the corner. I got over to it and noticed someone had gotten some interior parts; door panels, arm rests, sun visors, etc. I found a few parts which I bought myself; 4bbl air cleaner, door vent shades, radio knobs, wipers, etc.. At that point, I never even considered actually buying the whole thing! (I had 8 antique cars/trucks as it was) That was a Friday but from that point through the weekend, I couldn’t stop thinking about it. It was driving me crazy! I decided to see if I could buy the whole thing and restore it back to its former glory. The 1969 Chevy trucks are and have always been my absolute favorite so why not a tow truck to add to my collection?
Monday couldn’t get there fast enough so I went to find out very early that morning. It was bitter sweet as they yard owner did agree to sell it to me IF they still had the title. I went back every other day or so checking and finally I got the good news, the title was located! I had almost given up hope by that point which was the following Friday.
I still had no idea how much this was going to cost me but I’m a regular customer there and the yard owner gives me good deals so I took a chance. In addition, he told me he had a soft spot for the truck and had considered having it restored because his first tow truck was very similar to this one. I knew he would be glad to know someone would fix it and was hoping it would help the purchase cost situation.
I had $800 in my mind as a starting point and about $1,200 as an absolute maximum! Things worked out perfectly as he told me he wanted $1,000 and that would include delivery to my house and I could get some parts from another C30 that was there at no charge. I didn’t even bother trying to haggle. The deal was made!
The next day, (Saturday) I paid for my new ride and they hauled it to my house on a rollback. I’ll got to drive behind the roll back most of the way, watching my rusty tow truck riding high atop of the roll back. I couldn’t help thinking to myself, “What the hell was I doing?” but kept telling myself I was doing the right thing.
Anyone that is familiar with junkyards will know that most of them haul cars around with front end loaders that have forks on the front. That’s ok for junkers but not something you want to have done to a truck your going to drive someday. The forks did quite a lot of damage; bent the rear driveshaft section, put a hole in the transmission case, busted a door mirror and mangled a fender.
The day I went to get it, I got to watch my truck being slowly moved through a maze of cars, hanging off of those forks, way up in the air. I wish I had my camera but truthfully, it’s a sight I won’t ever forget. It looked happy to be getting out of there though with its big smile like grill.") Again I found myself thinking, “What the hell am I doing?”
Again I found myself thinking, “What the hell am I doing?”
As luck would have it, the weather was lousy. Temps were about 20 degrees and a bit windy with a few snow flurries but that wasn’t going to stop me from playing with my new toy. While I sure wasn’t going to break out the garden hose and wash it, I did remove some junk from it and gave it a good look over making some notes and doing some planning. I even got it running that first day. The gas smelled old so I fed the engine fresh gas intravenously through a funnel attached near the fuel pump.
As soon as the gas hit the carb, it roared to life! It sure ran quiet and best of all, no smoke! I was very surprised to see the automatic choke and fast idle still worked as they should. (up until this point, I did not hear it run but was told they got it running at the junkyard and that it ran very good) Checking the numbers shows this to be the original engine.
While the trucks brake system was not working due to a broken line, I still got to drive it around a dirt lot next to my house. It drove great! It’s funny how a vehicle that sat so long and looked so bad could run and drive so nice. A few weeks later, I even hooked up a parts car I have and towed it around the lot just for fun. I used to work at a local garage and often towed cars with a 79 Chevy wrecker so it brought back a few nice memories for me. The truck towed that 68 Chevelle parts car around without missing a beat. It may be old and rusty but could still haul the freight!
Right from the start, I knew that I wanted to restore this truck to factory new condition. Sure, it’s tempting to go custom with all kinds of chrome goodies and upgrades but I’m more of an “original” type of guy when it comes to old Chevy’s. Call me a purist.
First off, I needed to learn all I could about the truck. It was quite obvious that someone named Vic owned it and had a body shop since it was painted all over it, LOL. When I paid for the truck, I got a peek at the title and it was the original and in Vic’s name. Very cool I thought! (I’m usually at least the 6th owner when I get a vehicle!) In the glove compartment I found the original owners manual with protect-o-plate that had his name & body shop address. It also listed the Chevy dealer it sold new at which is 5 miles away from me. It was sold as a conversion cab so it was just a cab without a box when new and the wrecker portion was added by a company from NJ. (more on that later…)
I did some searching on the net and found this body shop was only a few miles from me but I never heard of it and to my knowledge, never saw this truck before. (I bet we crossed paths at some point in our lives on the roads here in northeast PA)
I learned Vic had gone out of business and was selling all his trucks and odds/ends. I also learned of a person locally that had asked Vic about buying this truck on numerous occasions and Vic always told him what a good truck it was and he wanted $3,000 for it. Needless to say, that was too much so no one ever bought it and it sat outside next to the body shop for a long time.
Not sure what made him eventually sell it to a junkyard, I bet it wasn’t easy for him but in this case, I’m glad he did. Fate brought us together. I had considered contacting Vic but decided not too. I made the same considerations with other antique cars I own but always decided not to bother the previous owners not knowing if they would appreciate it. Maybe when it’s all shiny new again I’ll show it to Vic.
Another area I wanted to learn about was the wrecker body. It wasn’t hard to see it was called “Wreck-Master” with its large decals displaying proudly. Doing a search for this name on the net turned up nothing! All I found was a company named “Wreckmaster” that does certification for tow truck drivers but they had nothing to do with building wreckers.
About all I know about Wreck-Master wreckers at this point is they were sold by E.F. Wegener company of N.J. I can find no other information on that company so I can only assume they went out of business years ago. I did find a picture of a magazine article for this brand, the latest showing a mid 70’s Chevy.
I did learn this wrecker body is model 410 from a metal tag found in the glove compartment which basically means it’s a 4 ton model. (single boom) If anyone reading this can offer any info on this brand of wrecker, please contact me. I would love to see original sales ads, literature or anything showing specification, operating guide and prices.
The plan is to completely disassemble the whole truck and rebuild it piece by piece from the ground up. I recently started to take the wreckers “business end” apart as can be seen in the last 2 photos below.
I removed about 10 pounds of dirt & rust, an old broom handle, rotting wood and what not from the top of the bed and gave it a vacuuming. This made it look much better already! I took some of the boom apart and removed the home made tool box. While the tool box is not original, I consider it “vintage” so I think I will reinstall it to store the J hook chains and other items in later.
Once all the mess was cleaned up, I could start to see how the body was put together. The floor is diamond plate steel (1/8” thick) and made up from 5 pieces not including the wheel tubs. I will have to replace some of the front floor section due to rot but will be very easy to do.
The sides and top rail caps are made from 1/8 inch sheet steel so I will be replacing much of that with new due to rot or heavy rust. The rear part where the tail lights mount is much thicker, it’s 3/16” and will need the lower 3 inches replaced.
All in all, the box will be fairly easy to rebuild. Finding the metal is proving to be a bit difficult in my area however.
From the cab forward will be disassembled and all parts either refurbished or replaced. I plan on installing a one piece floor pan with all new mounts and braces, new cab corners and outer rockers. One fender is fixable and I have located a good used one to replace the bad one. I have new door skins just waiting to address that area.
The interior on this truck is a bit challenging. 1969 had a special maroon color interior option that is very hard to find used and NOT reproduced. Luckily I managed to find most of the original parts that were taken off the truck while it was in the junkyard. All I am missing is the sun visors and clips. 1969 had a one year only special door panel design and I was happy to find the originals.
The seat I learned had some changes done to it. Custom trucks came with cloth inserts in the seat. This now has vinyl inserts. I guess it’s not easy being a seat in a wrecker! No one is reproducing the maroon so finding a new seat cover will be challenging as will a dash pad and floor mat, all of which are maroon in color.
Mechanically, the truck will simply be rebuilt and restored to new condition. I will make no upgrades or changes. It runs great and even if it does only have 49,000 original miles (not confirmed), it is still 42 years old so I will tear the engine down for inspection and at the very least, replace rings and bearings, etc. If needed, a complete rebuild will be done.
The pictures give this truck the appearance that it is red but in fact, its original color is a red-orange shade. (dash area in photo shows original color) Being a purist, I will go with that original reddish-orange but would prefer a basic red color myself.
I have mentioned staying original with this build and will for most of it however there are a few items I may change or add. I have located a rubber sling type lift for the back to replace the strange looking hunk of steel it came with. While I won’t be towing many cars, I may have to “rescue” one of my antique Chevys some day and I sure don’t want to use that against any of my bumpers!
Another item I located from a wrecker found in a junkyard is a hand crank winch for raising/lowering the boom height. While this wrecker only had a stationary cable and the boom stayed in one position, adding the adjustable feature will allow me to get this thing under my car port! LOL
Lastly, I found a hydraulic brake line lock in another wrecker that I think I will add. Most wreckers would have these added for safety but mine never did. It mounts under the dash and plumbs into the brake lines. It works by locking the trucks brakes on by pulling out a handle. This will be nice to keep the truck from rolling if I ever do tow a car. This will be much safer than trusting only the emergency brake.
While I do have the wrecker body and workings to deal with that most truck restorers do not, I look at the bright side. At least I don’t have to buy bumpers! LOL. No tail gate or pickup bed parts needed either.
I look forward to going full steam with the tear down this spring. I am just waiting for warmer weather. I will post more pictures and continue with this “novel” as I progress.
Thanks for reading!


The Purchase
This is my latest toy, a 1969 Custom 30 wrecker. This truck came into a local junkyard and when I initially asked about it (only to buy parts from it), the owner said he wasn’t sure what he wanted to do with it yet so I just put it out of my mind. It sat for a few weeks and I would see it on my weekly visits to this yard but then one day I noticed it was gone. While down in the yard looking for parts, I spotted it way down in the corner. I got over to it and noticed someone had gotten some interior parts; door panels, arm rests, sun visors, etc. I found a few parts which I bought myself; 4bbl air cleaner, door vent shades, radio knobs, wipers, etc.. At that point, I never even considered actually buying the whole thing! (I had 8 antique cars/trucks as it was) That was a Friday but from that point through the weekend, I couldn’t stop thinking about it. It was driving me crazy! I decided to see if I could buy the whole thing and restore it back to its former glory. The 1969 Chevy trucks are and have always been my absolute favorite so why not a tow truck to add to my collection?
Monday couldn’t get there fast enough so I went to find out very early that morning. It was bitter sweet as they yard owner did agree to sell it to me IF they still had the title. I went back every other day or so checking and finally I got the good news, the title was located! I had almost given up hope by that point which was the following Friday.
I still had no idea how much this was going to cost me but I’m a regular customer there and the yard owner gives me good deals so I took a chance. In addition, he told me he had a soft spot for the truck and had considered having it restored because his first tow truck was very similar to this one. I knew he would be glad to know someone would fix it and was hoping it would help the purchase cost situation.
I had $800 in my mind as a starting point and about $1,200 as an absolute maximum! Things worked out perfectly as he told me he wanted $1,000 and that would include delivery to my house and I could get some parts from another C30 that was there at no charge. I didn’t even bother trying to haggle. The deal was made!
The next day, (Saturday) I paid for my new ride and they hauled it to my house on a rollback. I’ll got to drive behind the roll back most of the way, watching my rusty tow truck riding high atop of the roll back. I couldn’t help thinking to myself, “What the hell was I doing?” but kept telling myself I was doing the right thing.
Anyone that is familiar with junkyards will know that most of them haul cars around with front end loaders that have forks on the front. That’s ok for junkers but not something you want to have done to a truck your going to drive someday. The forks did quite a lot of damage; bent the rear driveshaft section, put a hole in the transmission case, busted a door mirror and mangled a fender.
The day I went to get it, I got to watch my truck being slowly moved through a maze of cars, hanging off of those forks, way up in the air. I wish I had my camera but truthfully, it’s a sight I won’t ever forget. It looked happy to be getting out of there though with its big smile like grill.
Again I found myself thinking, “What the hell am I doing?” As luck would have it, the weather was lousy. Temps were about 20 degrees and a bit windy with a few snow flurries but that wasn’t going to stop me from playing with my new toy. While I sure wasn’t going to break out the garden hose and wash it, I did remove some junk from it and gave it a good look over making some notes and doing some planning. I even got it running that first day. The gas smelled old so I fed the engine fresh gas intravenously through a funnel attached near the fuel pump.
As soon as the gas hit the carb, it roared to life! It sure ran quiet and best of all, no smoke! I was very surprised to see the automatic choke and fast idle still worked as they should. (up until this point, I did not hear it run but was told they got it running at the junkyard and that it ran very good) Checking the numbers shows this to be the original engine.
While the trucks brake system was not working due to a broken line, I still got to drive it around a dirt lot next to my house. It drove great! It’s funny how a vehicle that sat so long and looked so bad could run and drive so nice. A few weeks later, I even hooked up a parts car I have and towed it around the lot just for fun. I used to work at a local garage and often towed cars with a 79 Chevy wrecker so it brought back a few nice memories for me. The truck towed that 68 Chevelle parts car around without missing a beat. It may be old and rusty but could still haul the freight!
The Plan
Right from the start, I knew that I wanted to restore this truck to factory new condition. Sure, it’s tempting to go custom with all kinds of chrome goodies and upgrades but I’m more of an “original” type of guy when it comes to old Chevy’s. Call me a purist.
First off, I needed to learn all I could about the truck. It was quite obvious that someone named Vic owned it and had a body shop since it was painted all over it, LOL. When I paid for the truck, I got a peek at the title and it was the original and in Vic’s name. Very cool I thought! (I’m usually at least the 6th owner when I get a vehicle!) In the glove compartment I found the original owners manual with protect-o-plate that had his name & body shop address. It also listed the Chevy dealer it sold new at which is 5 miles away from me. It was sold as a conversion cab so it was just a cab without a box when new and the wrecker portion was added by a company from NJ. (more on that later…)
I did some searching on the net and found this body shop was only a few miles from me but I never heard of it and to my knowledge, never saw this truck before. (I bet we crossed paths at some point in our lives on the roads here in northeast PA)
I learned Vic had gone out of business and was selling all his trucks and odds/ends. I also learned of a person locally that had asked Vic about buying this truck on numerous occasions and Vic always told him what a good truck it was and he wanted $3,000 for it. Needless to say, that was too much so no one ever bought it and it sat outside next to the body shop for a long time.
Not sure what made him eventually sell it to a junkyard, I bet it wasn’t easy for him but in this case, I’m glad he did. Fate brought us together. I had considered contacting Vic but decided not too. I made the same considerations with other antique cars I own but always decided not to bother the previous owners not knowing if they would appreciate it. Maybe when it’s all shiny new again I’ll show it to Vic.
Another area I wanted to learn about was the wrecker body. It wasn’t hard to see it was called “Wreck-Master” with its large decals displaying proudly. Doing a search for this name on the net turned up nothing! All I found was a company named “Wreckmaster” that does certification for tow truck drivers but they had nothing to do with building wreckers.
About all I know about Wreck-Master wreckers at this point is they were sold by E.F. Wegener company of N.J. I can find no other information on that company so I can only assume they went out of business years ago. I did find a picture of a magazine article for this brand, the latest showing a mid 70’s Chevy.
I did learn this wrecker body is model 410 from a metal tag found in the glove compartment which basically means it’s a 4 ton model. (single boom) If anyone reading this can offer any info on this brand of wrecker, please contact me. I would love to see original sales ads, literature or anything showing specification, operating guide and prices.
The plan is to completely disassemble the whole truck and rebuild it piece by piece from the ground up. I recently started to take the wreckers “business end” apart as can be seen in the last 2 photos below.
I removed about 10 pounds of dirt & rust, an old broom handle, rotting wood and what not from the top of the bed and gave it a vacuuming. This made it look much better already! I took some of the boom apart and removed the home made tool box. While the tool box is not original, I consider it “vintage” so I think I will reinstall it to store the J hook chains and other items in later.
Once all the mess was cleaned up, I could start to see how the body was put together. The floor is diamond plate steel (1/8” thick) and made up from 5 pieces not including the wheel tubs. I will have to replace some of the front floor section due to rot but will be very easy to do.
The sides and top rail caps are made from 1/8 inch sheet steel so I will be replacing much of that with new due to rot or heavy rust. The rear part where the tail lights mount is much thicker, it’s 3/16” and will need the lower 3 inches replaced.
All in all, the box will be fairly easy to rebuild. Finding the metal is proving to be a bit difficult in my area however.
From the cab forward will be disassembled and all parts either refurbished or replaced. I plan on installing a one piece floor pan with all new mounts and braces, new cab corners and outer rockers. One fender is fixable and I have located a good used one to replace the bad one. I have new door skins just waiting to address that area.
The interior on this truck is a bit challenging. 1969 had a special maroon color interior option that is very hard to find used and NOT reproduced. Luckily I managed to find most of the original parts that were taken off the truck while it was in the junkyard. All I am missing is the sun visors and clips. 1969 had a one year only special door panel design and I was happy to find the originals.
The seat I learned had some changes done to it. Custom trucks came with cloth inserts in the seat. This now has vinyl inserts. I guess it’s not easy being a seat in a wrecker! No one is reproducing the maroon so finding a new seat cover will be challenging as will a dash pad and floor mat, all of which are maroon in color.
Mechanically, the truck will simply be rebuilt and restored to new condition. I will make no upgrades or changes. It runs great and even if it does only have 49,000 original miles (not confirmed), it is still 42 years old so I will tear the engine down for inspection and at the very least, replace rings and bearings, etc. If needed, a complete rebuild will be done.
The pictures give this truck the appearance that it is red but in fact, its original color is a red-orange shade. (dash area in photo shows original color) Being a purist, I will go with that original reddish-orange but would prefer a basic red color myself.
I have mentioned staying original with this build and will for most of it however there are a few items I may change or add. I have located a rubber sling type lift for the back to replace the strange looking hunk of steel it came with. While I won’t be towing many cars, I may have to “rescue” one of my antique Chevys some day and I sure don’t want to use that against any of my bumpers!
Another item I located from a wrecker found in a junkyard is a hand crank winch for raising/lowering the boom height. While this wrecker only had a stationary cable and the boom stayed in one position, adding the adjustable feature will allow me to get this thing under my car port! LOL
Lastly, I found a hydraulic brake line lock in another wrecker that I think I will add. Most wreckers would have these added for safety but mine never did. It mounts under the dash and plumbs into the brake lines. It works by locking the trucks brakes on by pulling out a handle. This will be nice to keep the truck from rolling if I ever do tow a car. This will be much safer than trusting only the emergency brake.
While I do have the wrecker body and workings to deal with that most truck restorers do not, I look at the bright side. At least I don’t have to buy bumpers! LOL. No tail gate or pickup bed parts needed either.
I look forward to going full steam with the tear down this spring. I am just waiting for warmer weather. I will post more pictures and continue with this “novel” as I progress.
Thanks for reading!
 :
:


")


 bang
bang


