1969 Custom 30 Tow Truck restoration

bobs409

 
Administrator
A long overdue update to this build thread:

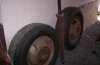
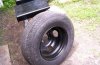
Got the rear back in and the refurbished brake drums back on. The rear part of frame is done and just in primer for now. Note the bolt heads are gold. I bought all new Grade 8 bolts to replace the factory rivets I cut out so these will be painted black with the frame later. I'll wait until the whole frame and front suspension is done before spraying it with Chassis coat or SEM. (see pic's #1 & #2 below)

Right now, I'm in the process of removing the front coil springs and all suspension/steering components so I can clean and detail everything. (see pic #3 below)

The block and all parts just came back from the machine shop. Block needed to be bored .30 over and I upgraded to hardened valve seats & stainless valves but otherwise, the engine will remain stock. Nothing custom or modified on this one. I have all the new parts stock piled up so I'll be putting it together very soon. (see pic #4 below)

Transmission is all cleaned up now. I have to make a plate to fix the hole on the bottom made by the junkyard loader forks and a nice coat of red oxide primer is all this will need to finish. (see pic #5 below)

100_5177.jpg100_5188.jpg100_5197.jpg100_5173.jpg100_5174.jpg
 

bobs409

 
Administrator
I scored a set of (6) newer non split wheels with very good tires at a local junkyard recently. The 4 back ones are like new and all match each other. The 2 fronts are very similar to the rears and in good condition. They are all Firestone truck radials. Sure beats paying for new tires! I'm giving the wheels the POR treatment and after that, will be shining up the tires and they'll be sharp looking! I'll have all of these rebalanced for good measure. Here's a before and after shot.

Looked like hell when I got them but second pic shows one cleaned up with 2 coats of POR 15. At $25 a piece, I wasn't complaining.

One thing I'd like to mention is the thing I found most irritating about this build. It's actually getting all the parts! Between comparison shopping to get the best deals, back orders, high shipping costs and some parts just being difficult to locate, it has to be the worst part of this build. I'm still trying to get a new inner cowl panel.

I've searched all over and found this item ranges from $195 to $315! Add UPS oversize III or truck shipping on to that and it's a real expensive PITA! Why some vendors can ship UPS and others insist on truck shipping is a mystery to me. And why is there such a price difference? The word GOUGE comes to mind. ?? I've even been to a big local car show in hopes of finding one but none of the vendors had any.
frown.gif


Luckily, that piece isn't really needed right now so I have time. I believe I have about 99.8% of all the parts needed now. The only thing I can think of that I still need yet will be some 1/8 inch sheetmetal for some box repair, a new windshield and a gallon of 514 red paint! (actually it's red/orange IMO)

Still haven't found anyone local that can fix my bent driveshaft. Just another one of those troublesome items. Trying to find one is a junkyard is impossible! When you are lucky enough to find a 1 ton, they already picked it up with the loader which bends driveshafts immediately (which is why I need one in the first place!)

Staying positive, focused and continuing forward bit by bit. I've learned very quickly that doing a full restoration is alot like eating an elephant, you have to take it one bite at a time. :D
 

Attachments

  • 100_5195.jpg
    100_5195.jpg
    60.3 KB · Views: 7
  • 100_5180.jpg
    100_5180.jpg
    63.8 KB · Views: 7

bobs409

 
Administrator
Still eating that elephant! Since last time, I've been putting the engine together. Last year, I finally learned how to rebuild an engine and since that short time, this is my third one! I did (2) 454's last year so doing the 350 was no problem.

100_5238.jpg100_5340.jpg

As mentioned in the last update, I've taken the whole front suspension & steering apart and now have treated the parts to 2 coats of POR 15. Everything has been reinstalled with many new parts including; front drums, wheel cylinders, brake shoes, spring kits, brake hoses and wheel seals. My ball joint boots were all torn so I opted to just replace all 4 of the ball joints as I couldn't find just the boots since it's a 1 ton and parts like those are impossible to locate. Most of this truck is going to be brand new!

100_5334.jpg
100_5339.jpg


Soon I'll be done with the frame work and I can spray on a coat of Chassis coat and call that part of the job done. The frame has been the hardest part so far and the most work! After that's done, a little work on the cab floor will finish that up followed by a coat of red oxide primer there. I will then be able to put the cab back on the frame where it will live for at least the rest of my lifetime.

Once I'm to that point, the engine will go in and I will get it runnning so I can break in the cam. That should take me close to mid fall so will be time to wind things down a little. At this stage, the hard stuff will be done. Next year will be alot more fun!

Over the winter, I have a few projects set aside to do in my garage such as reupholster the seat, install the door skins and prep the fenders. Since I can bring those into my garage, I'll keep those for the cold weather.

Speaking of weather, it's been so hot around here (and most of the country!) I took some time off of the cab & frame and worked inside the garage out of the heat. I rebuilt the carburetor and the distributor. I also continued the never ending process of cleaning, blasting, primering and painted all the various bolts, fasteners and small odds/ends. Sometimes it feels like there's no end to that.

Lately I've gotten back to the cab, I finished up the last few welds on the rockers and I'm doing any body work on the lower areas that needs to be done. Much easier to do this now that the cab is tipped onto it's firewall.

While the cab is still tipped up, I will be painting the ceiling. The typical paint gun isn't designed to be sprayed while tilted back very far so this can be a challenge in the normal position of the cab. Much better to do that now and I'll get a sneak peak at the new shade of 514 red (orange in my opinion!) which should help in the motivation department.
smile.gif
 

bobs409

 
Administrator
Here's some pics of the assembled engine before, during and after the paint. It's all ready to go. It's just waiting on me to get the rest of the truck done. I'll be installing it soon and firing it up to break in the cam rather than letting it sit over winter.

And that's where I am today. Stay tuned...

100_5429.jpg100_5443.jpg100_5445.jpg100_5447.jpg
 

Don Jacks

Well Seasoned Member
Supporting Member 3
Looking good Bob,but I noticed theres a bolt missing [at least before paint] on the front of the engine.:eek I know you just love engine oil leaks.:cuss
 

bobs409

 
Administrator
Actually the bolt is there, just looks like it isn't in the photo's.

After the oil leak on my 71 pickup because of a missing bolt which I believe you diagnosed for me, that's one thing I won't forget again. :D
 

Phil Reed

Well Seasoned Member
Supporting Member 10
Bob.............Brain in Texas needs some help. Wanna winter in the warm, friendly Texas air??????
 

bobs409

 
Administrator
Thanks guys. I'm having fun with it. I'm right on schedule with where I wanted to be so far.

This thing just might be done by next year! I was thinking 3 years at first but should be more like 2. I haven't added up the reciepts and always heard not to until your finished so guess I better not. :eek :hide

I think it should get some "looks" going down the road. :D
 

oldskydog

Well Known Member
Supporting Member 10
Looking good Bob. I may be joining you in the truck rehab. After passing on the deal last year on those two 72 Supers, I've been keeping my eye out for a good project. One of my neighbors has a 70 short wide in his back yard, but it belongs to his son and he doesn't want to sell it (yet). I found a 72 short stepside dissassembled project for $1000, a 70 short wide original owner with air for about $ 1800, and a 71 Custom Deluxe with air longbed for about the same price.
3nb3m43l55V15U55P1b849a00aa2abf941d0a.jpg3me3oc3ld5Y35W55X6b8431245cae88fd1a95.jpg2011-08-04_18-53-02_808_640x361.jpgIMG-20110729-00007_640x478.jpg2011-08-04_18-51-21_766_640x361.jpg2011-08-04_18-52-26_182_640x361.jpg
 

bobs409

 
Administrator
They look like good builders Cecil. The 67-72 were the best looking trucks Chevy made! :D

I do know about that website, in fact you'll find this same build thread there. :deal I go there every morning to learn about my favorite trucks.

Hey, keep a watch out for some "fly swatter" mirrors for me. :)
 

oldskydog

Well Known Member
Supporting Member 10
Hey Bob, how about an update. I've been watching the 67-72 truck forum for any progress, but haven't seen anything lately. I'm still shopping for a truck project and love that site.
 

bobs409

 
Administrator
It's been quite a while since I updated this build thread. I have been saving pictures and writing things down as they happened but never seem to find the extra time to post. So here goes...

The transmission is now done so that is scratched off the list. I made a plate that bolts onto the bottom to cover the big hole left by the junk yard loader forks. Almost looks like it belongs there! 100_5497.jpg

I used a red oxide primer on this which is the factory color. This pic shows it completed with the PTO bolted back on. It's made by Chelsea and was painted a bright red under all the gunk so that's what it was returned to. I used some POR Metal mask to paint areas that should be natural steel color. 100_5537.jpg

Back to the cab. The last thing to get done on the cab while it was tipped upward was to paint the ceiling. Much easier to do that now rather than overhead. This is the first look at the new paint color. It's 514 Red according to GM but it's much more orangy-red. It looks nice all fresh and new! Better than I expected. 100_5514.jpg

I finally got the frame all done and sprayed with Chassis coat. S-o-o-o glad to be past the dreded frame work! That took forever. Here it is getting a washing a few days before painting. 100_5592.jpg
 

bobs409

 
Administrator
Below shows the painted frame with some of the components back on. The shocks and assorted brackets were reinstalled as well as new fuel lines, brake lines and hoses.

I chose to buy brake tubing and gravel guard in bulk and made my own lines. Much cheaper than buying preformed kits and they came out great! I chose regular steel over stainless steel and clear coated them with clear POR 15 so they stay nice looking.

100_5724.jpg100_5725.jpg100_5727.jpg100_5728.jpg
 

bobs409

 
Administrator
Well here it is. The cab going back on. Being a one man show, I just took my time and used jacks and blocks to gradually pick the cab up high enough to roll the frame under, then lowered back down. 2-3 guys would have made this step go alot faster!

100_5722.jpg100_5723.jpg100_5738.jpg100_5743.jpg100_5744.jpg100_5746.jpg
 
Top