I don't know why a block couldn't be resleeved.What I believe that you're looking at is the factory counter bore which will go away at about .060.If you're only going .030-.040 DO NOT put it back in,it will cost you about half a point of compression.

You are using an out of date browser. It may not display this or other websites correctly.
You should upgrade or use an alternative browser.
You should upgrade or use an alternative browser.
348 in a '33 Roadster
- Thread starter JED
- Start date
fourzeronine
Well Known Member
I don't think that block has been sleeved since there doesn't appear to be evidence of it on the deck surface or through the notch. I think it's just an optical illusion of the stock counterbore.
It is actually not an optical illusion. The top of the cylinder, just below the combustion chamber, has a raised section that is about 1/4" - 3/8" wide (I didn't measure it, but I can) that is smaller than the 4.125" bore of the cylinder area below it. That means that if I bring the piston to TDC, the raised section would extend below the top of the piston top, which strikes me as odd. The other 348 block I have does not have this raised ridge around the top of each cylinder. That's what made me question if it is a sleeve (I have never seen a sleeved W-engine, so I don't know what it should look like). I'm just curious as to what I have and what I can do with it.I don't think that block has been sleeved since there doesn't appear to be evidence of it on the deck surface or through the notch. I think it's just an optical illusion of the stock counterbore.
fourzeronine
Well Known Member
Are you talking about this bit between the arrows? It sounds like the cylinder bores are really worn and you're seeing the bit that wasn't contacted by the rings.
A sleeved block would have a faint circular line around the bore at the deck surface with the material on either side being a slightly different color due to the difference in material. It would potentially be really hard to spot. The same line and color difference would extend through the valve pocket.

A sleeved block would have a faint circular line around the bore at the deck surface with the material on either side being a slightly different color due to the difference in material. It would potentially be really hard to spot. The same line and color difference would extend through the valve pocket.
Except for these two cylinders (the top two photos are of the same cylinder, #1. the bottom photo is of #7 cylinder and has a smaller circular gouge). Also note the surface in the combustion chamber in the first photos. I assume these were from rust, although the block was clean when I got it. BTW, I used my bore gage on the cylinders and except for the first cylinder (below), they are all no more than 0.0035" worn beyond the 4.125" standard bore. I couldn't get a good reading on the depth of the gouge in the #1 cylinder so I don't know how deep it is.All those cylinders need is a good bore/hone job.


 :
:fourzeronine
Well Known Member
That block is most definitely not sleeved currently, but I think it would need to be in order to clean it up and make it useable. It's lead a rough life.

I just snagged a '60 distributor for my 348 on eBay for much less than I expected. Tag reads 1110948, date code 0H26. Was listed as a hi-performance unit with a short oiler. The unit is complete except for rotor and cap. The counterweight mounting plate was slightly bent during shipping, but can be straightened. Everything else looks good.
My question is: I bought it to turn it into a oil primer tool. Is this too valuable an item to modify into an oil primer?
John
My question is: I bought it to turn it into a oil primer tool. Is this too valuable an item to modify into an oil primer?
John
Use as an oiler only if you don't use or modify the original shaft unit.Grab an old small block dizzy,use the shaft from it.Then you will still have a "performance"dizzy for someones numbers correct build.That number was listed for 59-61 250-280-305 horse engines,pretty standard stuff it sounds like.
Don, I thought that a SBC oil priming tool or distributor would not work in a W engine for priming the engine because the drive shaft housing shape would not provide oil flow to both heads. I already have an SBC oil priming tool for my SBC engines. Will it bring both sides of a 348 up to oil pressure?
Don is talking about using a small block distributor shaft in the 409 distributor housing to save the 409 distributor shaft. Now if this was a truck distributor then just go for it.
Thanks, I understand now. (sometimes it takes me awhile).Don is talking about using a small block distributor shaft in the 409 distributor housing to save the 409 distributor shaft. Now if this was a truck distributor then just go for it.

I didn't realize how long it has been since I posted an update on my 348 in a roadster project.
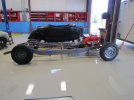
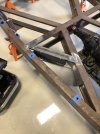
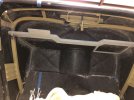
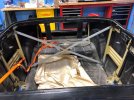
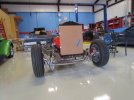
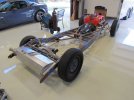
Current update is that the chassis is done. I just got the body & doors aligned on the Wescott fiberglass body. A '33 Ford roadster has suicide doors, which leaves the cowl section able to move all over the place, which makes it difficult to shim the align the leading edge of the doors with the cowl. They seem to either stick out at the top or the bottom of the leading edge on one side or the other. Anyway, I finally got the body moved around into position where the doors were aligned properly and then I welded in temporary cross bracing to hold it in place. I also fabbed a cross brace for the front of the cowl that serves as both a stiffener to the cowl as well as a mount for the steering column and the fuse panel. I also welded in a permanent "X"-brace at the back of the cockpit to keep the body from twisting as well as serve as a bulkhead between the seating area and the trunk. That was completed 2 weeks ago.
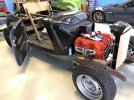
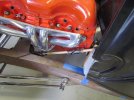
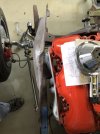
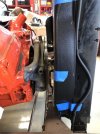
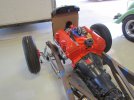
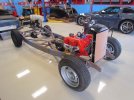
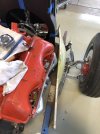
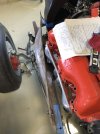
I still have done nothing more with the engine and transmission - both need to be rebuilt, but I am using them for getting everything mocked up an fitted into the car. I solved my engine fan to radiator problem with a Derale fan and added a Vintage Air fan shroud to my Walker radiator. The Sanderson block hugger headers are on the engine and, surprisingly, clear the front fender inner fender panels, so it looks like a full hood can be used. I managed (after several years of looking) to acquire a really nice original 1933 Ford grille (don't ask how much those cost, but it is more than the engine). The stainless steel fuel tank has an in-tank fuel injection pump and the fuel sending unit installed and I made 3/8" stainless steel fuel lines for both fuel feed and return for the fuel injection system. An external trans cooler has been mounted in the frame with an air duct to scoop air thru the cooler. I also added heat barrier plates to keep the exhaust heat away from the trans cooler and the brake master cylinder. Plus lots of little things & parts that take both time and money to get done.
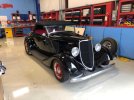
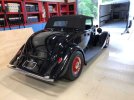
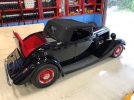
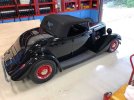
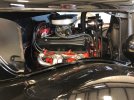
...and then it happened. Ten days ago a friend in Florida send me a link to an add for a finished '33 Ford roadster with an SBC crate motor and a TH-350 for sale in Alabama. I won't identify the price, but as a finished car, it was less than the cost of things that I still needed to get to finish my "348 in a '33 Roadster" project. Short story is I picked it up and trailered it home this past Thursday. My wife told me that, at 75 years old, I should get the finished car and enjoy it now rather than spend the next 3-4 years working to finish the project. She's probably right.
Next weekend is the annual New Braunfels, TX swap meet and I am taking the unfinished roadster project to try and sell it. I am putting together a list of everything that I have with prices and should have that finished tomorrow. If anyone is interested in a different project with all new parts (everything is new except for the engine and trans), drop me a note.
Current update is that the chassis is done. I just got the body & doors aligned on the Wescott fiberglass body. A '33 Ford roadster has suicide doors, which leaves the cowl section able to move all over the place, which makes it difficult to shim the align the leading edge of the doors with the cowl. They seem to either stick out at the top or the bottom of the leading edge on one side or the other. Anyway, I finally got the body moved around into position where the doors were aligned properly and then I welded in temporary cross bracing to hold it in place. I also fabbed a cross brace for the front of the cowl that serves as both a stiffener to the cowl as well as a mount for the steering column and the fuse panel. I also welded in a permanent "X"-brace at the back of the cockpit to keep the body from twisting as well as serve as a bulkhead between the seating area and the trunk. That was completed 2 weeks ago.
I still have done nothing more with the engine and transmission - both need to be rebuilt, but I am using them for getting everything mocked up an fitted into the car. I solved my engine fan to radiator problem with a Derale fan and added a Vintage Air fan shroud to my Walker radiator. The Sanderson block hugger headers are on the engine and, surprisingly, clear the front fender inner fender panels, so it looks like a full hood can be used. I managed (after several years of looking) to acquire a really nice original 1933 Ford grille (don't ask how much those cost, but it is more than the engine). The stainless steel fuel tank has an in-tank fuel injection pump and the fuel sending unit installed and I made 3/8" stainless steel fuel lines for both fuel feed and return for the fuel injection system. An external trans cooler has been mounted in the frame with an air duct to scoop air thru the cooler. I also added heat barrier plates to keep the exhaust heat away from the trans cooler and the brake master cylinder. Plus lots of little things & parts that take both time and money to get done.
...and then it happened. Ten days ago a friend in Florida send me a link to an add for a finished '33 Ford roadster with an SBC crate motor and a TH-350 for sale in Alabama. I won't identify the price, but as a finished car, it was less than the cost of things that I still needed to get to finish my "348 in a '33 Roadster" project. Short story is I picked it up and trailered it home this past Thursday. My wife told me that, at 75 years old, I should get the finished car and enjoy it now rather than spend the next 3-4 years working to finish the project. She's probably right.
Next weekend is the annual New Braunfels, TX swap meet and I am taking the unfinished roadster project to try and sell it. I am putting together a list of everything that I have with prices and should have that finished tomorrow. If anyone is interested in a different project with all new parts (everything is new except for the engine and trans), drop me a note.
Attachments
-
 2020_10_14-BodyLift-Install-IMG_1200.JPG58.2 KB · Views: 24
 -
 2020_10_21-FirstBodyInstall-IMG_2782.jpg92.1 KB · Views: 24
 -
 2020_11_21-1st Seat Mockup-IMG_1661.JPG68.7 KB · Views: 24
 -
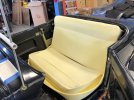 2020_12_11-SeatMockup-IMG_2861.jpg75 KB · Views: 24
 -
 2021_03_27-TransCoolerX-Member-IMG_3272.jpg73.7 KB · Views: 23
 -
 2022_08_31-InnerFenderApronSplashShieldMockup-IMG_5231.jpg71.1 KB · Views: 23
 -
 2022_09_01-FanShroudCutOutFitment-IMG_5246.jpg85.8 KB · Views: 24
 -
 2023_03_07-Cowl Cross Brace-Final Weld-IMG_6269-c.jpg65.9 KB · Views: 24
 -
 2023_03_13-Rear cockpit cross brace-IMG_6345-c.jpg91.9 KB · Views: 24
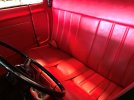
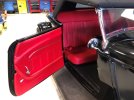
...and the new finished roadster that I just dragged home from Alabama:
Attachments

Very nice!! Is it a glass body?