
You are using an out of date browser. It may not display this or other websites correctly.
You should upgrade or use an alternative browser.
You should upgrade or use an alternative browser.
348er in Switzerland
- Thread starter Dä Huäbär
- Start date
Are you trying to be a know it all jackass or is that just the way your coming across?Oh , seems to be working well for you, good luck with the 348" stroker , the 1958 Chevrolet Maintenance Manual could be helpful , they sell reprints

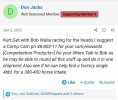
That rotating assembly looks great, I think its the same thing I am ordering. Did you get it through Show-Cars? Your car should run like it never had before, you are increasing the cubic inches of that engine by 86 if you have a .030 overbore.


Dä Huäbär
Well Known Member
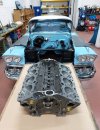
It's been a long time since I've written anything on here about my engine overhaul . The engine is now complete , installed and the first few hundred miles have been driven . There were still various problems at the beginning , but I drove with a very big grin on my face
 . I think without the help here from the forum , my Impala would not be on the road .
First of all I would like to thank Bob Walla , who helped me a lot with his knowledge and the spare parts . But I would also like to thank Don Jacks for types and spare parts . 32witha409 giv also a good type for my steering gear . But also everyone else who stood by me with their knowledge and I was able to benefit from their knowledge .
I will describe my engine revision in the near future and of course also post photos
I bet she's a head turner over there. Congratulations
Dä Huäbär
Well Known Member
I took Don Jacks advice to heart and wrote to Bob Walla explaining my situation . Bob was very accommodating and promised to help me . One problem I have here in Switzerland , is the distance to the USA . Everything has to be sent by air mail and that makes the whole thing enormously expensive . Bob agreed to sell me some of his new complete cylinder heads and to collect all the parts I was missing and ship them all together to Switzerland . I thought that was really great, since we had never done business together before . Bob , thanks again here !
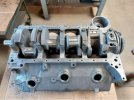
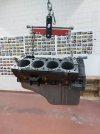
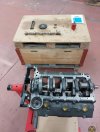
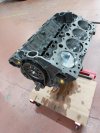
The block had been in the engine factory for a long time. It was cleaned in the bathroom and completely derusted and made shiny on the outside and inside . Then it was drilled out 0.30" on the boring machine and finely honed . After this work , I was able to install the crankshaft together with the connecting rod and piston for the first time . Of course , the outer connecting rod bolts were lined up at the bottom of the block , but I knew that , with 4" stocke . I marked everything where necessary , disassembled everything again and worked on the block at the relevant points with a small grinder . After cleaning the block in a bath , everything was screwed back together . And lo and behold , the crankshaft could turn completely
The block had been in the engine factory for a long time. It was cleaned in the bathroom and completely derusted and made shiny on the outside and inside . Then it was drilled out 0.30" on the boring machine and finely honed . After this work , I was able to install the crankshaft together with the connecting rod and piston for the first time . Of course , the outer connecting rod bolts were lined up at the bottom of the block , but I knew that , with 4" stocke . I marked everything where necessary , disassembled everything again and worked on the block at the relevant points with a small grinder . After cleaning the block in a bath , everything was screwed back together . And lo and behold , the crankshaft could turn completely
Attachments
Dä Huäbär
Well Known Member
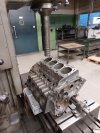
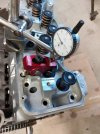
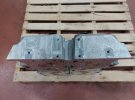
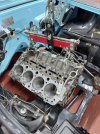
After a few months , I received a large package from Bob Walla . He found all the missing parts for me and sent them to Switzerland together with 2 new cylinder heads . The joy was great , better than Christmas and Easter together  . Now I have assembled the engine with the crank drive , connecting rods , piston and camshaft as a test . The heads and the intake mounted as a test , everything fits . With an adjustable push rod and soft valve springs , I then turned the valve train and measured everything . To my astonishment , the exhaust valves are not lined up in the engine block . It even has enough play that nothing happens . I told Bob that I don't value as much horsepower as possible at 6000 rpm , but rather a good idle and enough steam from the cellar . A Comp cam 48-802-11 is now installed . He then sent me the matching pushrods . After I disassembled everything again , I milled the cylinder heads at the front and adjusted them so that they look similar to a normal cast iron head . Not that I don't like Bob's logo , but for the traffic registration at the road traffic office . If they see that you have mounted aluminum heads , you have to bring a performance diagram and reinforce the whole chassis . After that I brought the block to my workshop
. Now I have assembled the engine with the crank drive , connecting rods , piston and camshaft as a test . The heads and the intake mounted as a test , everything fits . With an adjustable push rod and soft valve springs , I then turned the valve train and measured everything . To my astonishment , the exhaust valves are not lined up in the engine block . It even has enough play that nothing happens . I told Bob that I don't value as much horsepower as possible at 6000 rpm , but rather a good idle and enough steam from the cellar . A Comp cam 48-802-11 is now installed . He then sent me the matching pushrods . After I disassembled everything again , I milled the cylinder heads at the front and adjusted them so that they look similar to a normal cast iron head . Not that I don't like Bob's logo , but for the traffic registration at the road traffic office . If they see that you have mounted aluminum heads , you have to bring a performance diagram and reinforce the whole chassis . After that I brought the block to my workshopAttachments

Last edited:
Ha, we all like govt rules. You'll be making music soon.
Dä Huäbär
Well Known Member
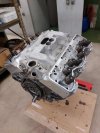
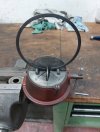
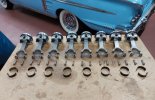
First the new 409 oil pan from Show Cars had to be adjusted . File all the holes and use the big hammer to work the mounting surface flat . Then mounted and tried on in the engine compartment , whether you would have enough space . It has 0.5" space above the front axle , so everything is fine . Then came the last assembly of the crankshaft and the camshaft with the timing chain . Since I have only installed the pistons without piston rings so far , the rings had to be adjusted first . That means the the front side has to be filed down with a file . For this I received a special small machine from my engine builder . It takes a whole day to file and adjust all 32 piston and oil scraper rings . With that , the crank drive was finished
Attachments
-
 Screenshot_20230511_143345_Gallery.jpg72.1 KB · Views: 37
 -
 Screenshot_20230511_143350_Gallery.jpg105 KB · Views: 38
 -
 Screenshot_20230511_142843_Gallery.jpg79.8 KB · Views: 39
 -
 Screenshot_20230511_142944_Gallery.jpg78.1 KB · Views: 35
 -
 Screenshot_20230511_142950_Gallery.jpg84.8 KB · Views: 35
 -
 Screenshot_20230511_142806_Gallery.jpg61.5 KB · Views: 38
 -
 Screenshot_20230511_143012_Gallery.jpg70.5 KB · Views: 42
 -
 Screenshot_20230511_143041_Gallery.jpg79.1 KB · Views: 41
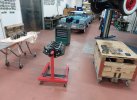
Your "garage" is too clean!!!!!!!!!First the new 409 oil pan from Show Cars had to be adjusted . File all the holes and use the big hammer to work the mounting surface flat . Then mounted and tried on in the engine compartment , whether you would have enough space . It has 0.5" space above the front axle , so everything is fine . Then came the last assembly of the crankshaft and the camshaft with the timing chain . Since I have only installed the pistons without piston rings so far , the rings had to be adjusted first . That means the the front side has to be filed down with a file . For this I received a special small machine from my engine builder . It takes a whole day to file and adjust all 32 piston and oil scraper rings . With that , the crank drive was finished
Kurt, you are absolutely right. I was pretty meticulous when I was younger. Everything in its place and clean, etc. It was a necessity, I had a couple of jobs and several hobbies. A "real life" as they say.
It seems that old age is trying to tell me to leave that part for the younger folks and simply focus on what I enjoy and enjoy what and whoever I am involved with at the time.
It seems that old age is trying to tell me to leave that part for the younger folks and simply focus on what I enjoy and enjoy what and whoever I am involved with at the time.
I'm trying my best of getting rid of what I don't need. It's helping but not fast enough. 