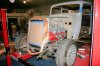
Well I am getting close to starting this project, last weekend I resolved the radiator, hoses, fan and such. It has been challenge after challenge, but thats what building cars is all about. I have posted pictures on and off thru this journey and I hope this helps others in their quests!

You are using an out of date browser. It may not display this or other websites correctly.
You should upgrade or use an alternative browser.
You should upgrade or use an alternative browser.
409 in a 1935 chevy
- Thread starter jwhotrod
- Start date


Yeah, what Bosco said !! jw, that appears to be a very serious looking engine. Are you planning on anything other than cruising?
cruisin'
Ronnie,
I learned allong time ago that there was always somebody a little faster, a little moer shiny, with a lot more money. So other than some grudge racing I dont think so.
I started building this car as a therapy project when an ols friend of mine was sick with cancer and we decided some of our best times together was when we were building together. The last 2 years he was alive were "magic" becuase we went back to building and sent some VERY quality time together.
At that point it was set up with a small block and a turbo 350 trans. Later on I won a 700r4 at a rod run, and the 409 came along too. Not liking motors to set around the 09 went in the sedan with the 700r4 and that is what you see here.
Now I've been reading what goes on here on the board and got a lot of good info from you "Old Farts" (I include myself in that" and here is the rest of the setup.
This car sits on the original frame (boxed) with a modified fatman front end (shims like a GM front end) and a 8" f**d rearend in a triangulated 4 bar setup and airride air suspension in the rear.
custom Stainless steel tank with internal injection pump and the injection unit was built by Mark Campbell at Street and Performance by the guy that had the motor rebuilt originally.
The motor is a '64 block with 690 heads and a flat tappet cam (do not know what it is) full roller rockers and all arp bolts, balanced and "blueprinted". So I do know that the cam was picked to generate enough vacum to run the "TPI".
I plan to have the pumpkin setup with 3:55 or 3:73 gears and an Auburn limiteed slip spool like I have in my 34 5 window. ( TPI'd ZZ4 small block)
This is to be my road car, we run long distance in the summer, from Knoxville TN in May, Indy and Nashville, TN in June, Des Moines and Columbus in july, Evansville, In in Aug, Ka'zoo, MI in Sept and some times Charlotte, NC in Oct.
So, it was intended to be a road car that I could play with the Mustangs and Camaros at night.
So, fabrication i have done, and am doing, building my own Stainless exhaust (learning to TIG weld) and genrally having a good time.
I hope that helps a little, and if I can answer any other questions I surely will.
Big Jim
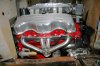
EFI Setup
Well, as I said it is a custom sheetmetal manifolded TPI setup built by S&P. Mark Campell says he wont build another one 'till he hears this one run. I am working hard toward that goal. I did see a VERY similar setup on a 392 Hemi in a 48 Chrysler in Nashville last year, it could have been this ones sister(also built by S&P). And it ran well.
I will say, I built a small diameter HEI distributor for this setup, and it wasnt very difficult. That is a istributor that plugs into the harness like the distributor in a stock TPI on a camaro or corvette.
If it runs half as good as the TPI in my other car it will be a killer application. I pulled the plugs out of my ZZ4 the other day and realized that they had been in the car for 10 years and about 80,000 miles. The plugs were ALL very perfectly soft brown (perfect combustion) color and gapped a consistant .065/.066 from what they had originally been gapped at .040" so other than wearing they were still perfect. The car runs 400 hp @400+ ft/lb torque @ 22 mpg @80 mph with the AC running. So I am looking forward to gobs of power and efficiency here too.
Jim,
Looking good
I would be very interested in knowing more about the EFI set up.
Well, as I said it is a custom sheetmetal manifolded TPI setup built by S&P. Mark Campell says he wont build another one 'till he hears this one run. I am working hard toward that goal. I did see a VERY similar setup on a 392 Hemi in a 48 Chrysler in Nashville last year, it could have been this ones sister(also built by S&P). And it ran well.
I will say, I built a small diameter HEI distributor for this setup, and it wasnt very difficult. That is a istributor that plugs into the harness like the distributor in a stock TPI on a camaro or corvette.
If it runs half as good as the TPI in my other car it will be a killer application. I pulled the plugs out of my ZZ4 the other day and realized that they had been in the car for 10 years and about 80,000 miles. The plugs were ALL very perfectly soft brown (perfect combustion) color and gapped a consistant .065/.066 from what they had originally been gapped at .040" so other than wearing they were still perfect. The car runs 400 hp @400+ ft/lb torque @ 22 mpg @80 mph with the AC running. So I am looking forward to gobs of power and efficiency here too.
Big Jim, Thanks for the reply. Please give us an update every now and then. No doubt , your car will be something really special. 
")
TPI Setup
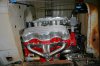
One REALLY big thing I need to caution all of you with is this. Just because someone tells you they will build you a sheetmetal manifold for a custom application DO NOT ASSUME it will be complete. This manifold was just that, a manifold, the water was not tied together, the throttle linkage was not worked out, there was a LOT of "little" thing left to the "end user". We built the thermostat housing and tied the water together. you can search back and see where I was asking about flow rates and tube sizes, we settled on 1" AN fittings and stnlss stl tubing and built our own flutted housing. It just goes to prove what i have said in the past. No matter what the Ad says, Nothing just "bolts in"
And just because it says its done does not mean it is complete. The Walker radiator fit in the grill shell but was rubbing the water pump pulley, I cut the brackets off the radiator and moved it 1.5" forward in the shell, then cut down the original 1935 radiator brackests and reinstalled it in the grill shell. Bosco went after the firewall in his 32, I had room in front os I went forward. I cannot put thecondensor infront of theradiator now so it will go back under the car. Even at that the lower hose goes thru the AC belt and wraps around the compressor as itgoes to the water pump.
Big Jim bang
bang
One REALLY big
thing I need to caution all of you with is this. Just because someone tells you they will build you a sheetmetal manifold for a custom application DO NOT ASSUME it will be complete. This manifold was just that, a manifold, the water was not tied together, the throttle linkage was not worked out, there was a LOT of "little" thing left to the "end user". We built the thermostat housing and tied the water together. you can search back and see where I was asking about flow rates and tube sizes, we settled on 1" AN fittings and stnlss stl tubing and built our own flutted housing. It just goes to prove what i have said in the past. No matter what the Ad says, Nothing just "bolts in"And just because it says its done does not mean it is complete. The Walker radiator fit in the grill shell but was rubbing the water pump pulley, I cut the brackets off the radiator and moved it 1.5" forward in the shell, then cut down the original 1935 radiator brackests and reinstalled it in the grill shell. Bosco went after the firewall in his 32, I had room in front os I went forward. I cannot put thecondensor infront of theradiator now so it will go back under the car. Even at that the lower hose goes thru the AC belt and wraps around the compressor as itgoes to the water pump.
Big Jim
bangconstruction update
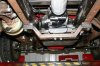
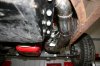
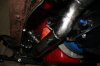
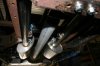
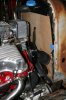
Well, I said I would keep up with the construction photos, I have completed the exhaust back to the mufflers (stainless works turbos) 2-1/2" exhaust, and have worked out the fan and radiator setup.
You will see I stuck a pieceof 2" plastic conduit in to approximate a 3" drive shaft to check clearance. Cheap and easy. As you can see Im closer and closer to starting this thing.
Big Jim
Attachments
polishing exhaust
I dont think so, I polished the welds enough to make sure I didnt have pin holes, etc in them, but this is going to be a driver and not a "show car". The SS exhaust is for longevity and I was and am very interested in learning and advancing my ability to TIG weld. So, this is a learning project asmuch as anything. Also, we have found that SS exhaust has a great contibution to great tone, so why not.
My best friend was a radiator and exhaust guy who died some time ago and this is also kind of a left handed tribute to him and what I learned from and experienced with him.
We will paint or powder coat the frame, I will ceramic coat the headers now that I know they fit good and will do what I want. And I will probably chop the top on this car about 2" because that is something we have never done to a car. That "learning thing" again.
Big Jim
jw nice ride but the best part of reading thread is doing it whit a friend i just about finished my project and some of the days working on it was best spend with friends helping me when nobody is around its just not as much fun . but like all things friends get married have childern and just dont have the time but are still friends
friends
Gabriel:
As you say the best part is always the friends that help and work along side of you. We all know that anyone who says he does "all the work" on a project like thsi is less then completely honest. We all are a product of our collective friends knowledge.
I built a new shop in my backyard as community workspace where the guys I run around with can bring their cars, work, and share tools, etc. and generally have a good time it has been therapy for some with health problems, and generally an awsume time.
I've seen your work here and it is spectacular to say the least. I did not mean above that I was opposed to show cars, they definetly have their place and are great, as are race cars. If you have seen any of Troy Treppaniers work like Chicane they are jewelry or "carart" to say the least, no exposed fasteners, smoothed and fitted bumpers, just awsume work.
But, even at that if you talk to Troy, his dad Jack, or Moose that travels with the cars he shows, the best part is he is one of the most caring,sharing individuals I have ever met. He will tell you there are NO secrets in what he does, and he will share process and work info at the drop of a hat. He always has young "kids" working with him and not only does he teach them, but when they are showing the cars he has the "kids" explain their work so they get confidence in their work and presentation skills as they grow.
Anyway I ramble, thanks for the reply and next time we come to Charlotte I will ook you up. I do a lot of business with Fatman in your neighborhood as well, he and his "guys" are all geat, sharing people as well.
Take care and keep the painted side up!!!!!!
...Even at that the lower hose goes thru the AC belt and wraps around the compressor as itgoes to the water pump...
I'd strongly advise engineering a routing for either the hose or belt that eliminates the need to run the hose through the belt. You'll have to drain the radiator just to change that belt, and I KNOW you'll curse yourself the first time you have to do that after it's all assembled. Would you rather have a headache trying to figure it out now, or a headache later once the belt needs to be replaced and the hoses have decided to have an intimate relationship with the H2O pump and radiator?
Neat set-up, otherwise.
Lower hose
I did and have thought about it, and here is my feeling. I know I need to drain the radiator to change the belt, but i dont think that is something that needs to be done
1. very often
2. without warning (preventive maintenance)
3. It is the AC belt only so it is me that gets hot if it goes not the motor, so that being an accessory belt I thoughti it to be an "acceptable risk".
4. i would probably change the belt when the radiator is drained for flushing, etc annually or semi annually.
The overriding factor here is that I moved the radiator forward 1-1/2" in the shell and moved the lower neck on the radiator 1-1/4" to get it out of the compressor and cannot move either any more.
Now, I could move the AC compressor and Alternator up on top of the valve covers and solve this, but I was feeling and still do think that over 50% of the reason for putting this '09 in this car is that it IS an '09 and should look like one.
I am going to paint the ac compressor and the alternator black so they disappear in the frame and the 409 looks like a 409 it just so much cleaner.
Thanks for the thoughts, that is how we all backcheck each other and I DO appreciate that.
Big Jim
Progress on my build
All:
I hope everybody had a good Christmas and has a Great New Year ahead!!
Just thought i should update my 409 story, we started the motoer enough to run the cam in and get the injection worked out. But it turned out I have a "soft cam" in the motor ,3 of the cam lobs are wearing and I can see porosity and marks in the lobes. And while I'm at it it wasnt the oil, I used Joe Gibbs break in oil and a bottle of EOS. It is a soft cam that wasnt hardened properly. We had primed it every 90 degrees thru 2 revolutions, before priming it again and starting it.
It ran great but started getting lifter noise, reset the valves, and was quiet for a while but came back. Tore it down and found the cam wearing.
Anyway, I started talking to the Race Shop about dealing with the cam and putting hard seats in the heads which i've wanted to do anyway. Other thsn that it was great, carryies 60 pounds of oil pressure, ran at the thermostat opening, 180 to 190 degrees with NO tendency to heat, so the setup and fabrication of the cooling system,etc. went well. Will keep you in touch.
Big Jim
 Not good. I hope, someone, makes Good.:eek:
Big Jim, Man, that sucks!!! Do everything by the book, do everything right, and still lose a cam. That just ain't right !! I would be very angry. Hope you get it all straightened out. Good luck.......
dealing with it
I am not all that upset all though it is annoying. I bought this engine from a friend and he never could tell me who made the cam. It was some one maybe California that ground the cam and has since gone out of business, (Big Shock) anyway it wasnt quite "lumpy enough " for me anyway, I had intended to go after the hard valve seats anyway because of the fuel we are forced to use. this just adds to it.
The race shop says they work with Sig Erson and understand my EFI as well so i am talking to them about this.
That way they will do the head work run the cam in and dyno the motor and give it back to me ready to stick in the car and start. This way I KNOW what is in the motor and what it is doing. While I guess you could say, ther is fault it will work out for the best in the end. At least I wasnt thrashing to go on a trip, or had already left and this "popped up " and left me stranded somewhere!!!!
Big jim
Stick62
Well Known Member
All:
I hope everybody had a good Christmas and has a Great New Year ahead!!
Just thought i should update my 409 story, we started the motoer enough to run the cam in and get the injection worked out. But it turned out I have a "soft cam" in the motor ,3 of the cam lobs are wearing and I can see porosity and marks in the lobes. And while I'm at it it wasnt the oil, I used Joe Gibbs break in oil and a bottle of EOS. It is a soft cam that wasnt hardened properly. We had primed it every 90 degrees thru 2 revolutions, before priming it again and starting it.
It ran great but started getting lifter noise, reset the valves, and was quiet for a while but came back. Tore it down and found the cam wearing.
Anyway, I started talking to the Race Shop about dealing with the cam and putting hard seats in the heads which i've wanted to do anyway. Other thsn that it was great, carryies 60 pounds of oil pressure, ran at the thermostat opening, 180 to 190 degrees with NO tendency to heat, so the setup and fabrication of the cooling system,etc. went well. Will keep you in touch.
Big Jim
What brand cam was it?