409 Stroker build

Mongo

Well Known Member
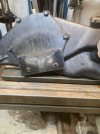
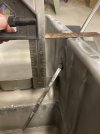
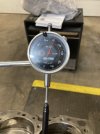
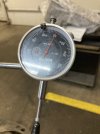
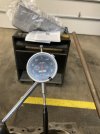
Then after I had the end play that I wanted I put the water pump on and all of my end play disappeared. So apparently the plate that I had originally installed on the back of my water pump to keep my timing cover from flexing outward was too thick and therefore putting additional pressure on my cam button thus causing the block damage that I found
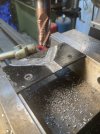
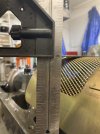
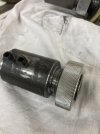
So I machined.030 off of the plate and now I should be good to go
 

Attachments

  • 56766977-BBED-427A-876F-98752E575D77.jpeg
    56766977-BBED-427A-876F-98752E575D77.jpeg
    90.1 KB · Views: 40
  • EB285EE9-91B5-4F1B-931E-89343BE2C780.jpeg
    EB285EE9-91B5-4F1B-931E-89343BE2C780.jpeg
    85.6 KB · Views: 37

Mongo

Well Known Member
Okay guys I’m looking for suggestions here
Just determined that I need my oil pump pick up to be 1” deeper in my pan. No problem I can get that done but I installed my windage tray to give myself some clearance to the rods and from what I have read on the subject I should have my oil level so that it’s just touching the windage tray so that when it’s fired up the level will drop to a level that is not in contact with the tray but still sufficient enough for the engine
So as you can see from the pictures if I want to get to that level I should make a new mark much higher on the stick than it is right now
What do you guys think
 

Attachments

  • 419564AF-6DDE-43E2-B5B7-6415559A7E3D.jpeg
    419564AF-6DDE-43E2-B5B7-6415559A7E3D.jpeg
    76.2 KB · Views: 57
  • E0C22536-1948-4A8C-AB07-BA71F814FD90.jpeg
    E0C22536-1948-4A8C-AB07-BA71F814FD90.jpeg
    58.1 KB · Views: 51

Murphdog

Well Known Member
Supporting Member 2
I may be missing something, but there is a vertical baffle?? at the end of your square blade in pic 2 that appears to be a problem. Looks like your measuring 4" from the pan rail to the bottom of the windage screen in pic 1. In pic 2, the 4" mark is way below that baffle??. For starters I would level the pan and put X quarts of water in it and see where it comes on the dip stick. Remember your filter will be holding 3/4 or 1 of the 7?? you want to run, so fill pan accordingly. I realize that the settled oil level will drop when the engine fires and is running. Would be curious how much that would be. Don't know if it would drop an inch or not.:rub:rub Glad the rear cap trick helped.
Jeff
 

Murphdog

Well Known Member
Supporting Member 2
Mongo,
Just my 2 cents here. I would have cut the other end. The end you cut should have been the same thickness as the hub of the gear. The lock plate traps it and "should " keep it from wallowing around. May not be an issue, just thinking out loud.
 

Mongo

Well Known Member
Murphdog
The other end is the bearing retainer and snap ring
Not enough material there for me to remove without also removing the snap ring grove
So disassembling it and removing the material where I did was my only option
Other than hammering out the timing cover
 

Attachments

  • E845D59D-6EA0-4716-B9A4-4A8959B597EE.jpeg
    E845D59D-6EA0-4716-B9A4-4A8959B597EE.jpeg
    28.5 KB · Views: 4

Murphdog

Well Known Member
Supporting Member 2
I see what you are up against now. The pic you posted earlier in the lathe looked like the plain solid aluminum buttons that I have seen. Would it be possible to put a spacer ring on the front side so the button stays firm against the front of the cam?? Food for thought. How did the windage tray/pan deal work out?
Jeff
 

Mongo

Well Known Member
Still not positive about the oil level to windage tray topic
I think that I will just make sure that it is below the windage tray and it will be good to go
The way the dip stick is marked now its about 2 inches below that
And I believe that would be too low
So I’m thinking 1/2” to 1” max for distance between the windage tray and the oil level
I have welded a 3 inch extension to the oil pan sump so I’m sure that I won’t be running out of oil even with the high volume pump
 
Last edited:

Mongo

Well Known Member
Degreing in my cam I found that it’s about 3 degrees advanced from what the cam card says
Checked it several times and also verified that I was exactly in the middle of the TDC dwell so my timing set allows me to advance or retard the crankshaft timing 4 degrees which would give me 2 degrees of cam timing
So I’m going to do that and check it out again and I will post the results
 

Attachments

  • C44797B7-3E06-472F-9864-AED95515AC3E.jpeg
    C44797B7-3E06-472F-9864-AED95515AC3E.jpeg
    86.5 KB · Views: 11
  • DE937405-F027-4AF6-8825-06380BF8828D.jpeg
    DE937405-F027-4AF6-8825-06380BF8828D.jpeg
    69.8 KB · Views: 10
  • D90CB7E7-C8D7-46C8-8B3E-747C7875EA60.jpeg
    D90CB7E7-C8D7-46C8-8B3E-747C7875EA60.jpeg
    53.6 KB · Views: 8
  • 297578A0-D98B-4CBA-978D-F95D3511B22B.jpeg
    297578A0-D98B-4CBA-978D-F95D3511B22B.jpeg
    52.2 KB · Views: 8
  • C1843EEF-9D90-4567-86EA-B5858C868127.jpeg
    C1843EEF-9D90-4567-86EA-B5858C868127.jpeg
    69.9 KB · Views: 12

Mongo

Well Known Member
Made a crank turning tool with a register exactly the ID of my degree wheel
Sometimes it is good to be a Machinist
 

Attachments

  • 0FF7E609-BA11-4F52-B009-5D682D012872.jpeg
    0FF7E609-BA11-4F52-B009-5D682D012872.jpeg
    71 KB · Views: 15
  • E05BD011-A214-45D3-A076-061679B68485.jpeg
    E05BD011-A214-45D3-A076-061679B68485.jpeg
    60.2 KB · Views: 15
  • CD36C1D5-0FE2-4491-BB2A-750FC57DA8C4.jpeg
    CD36C1D5-0FE2-4491-BB2A-750FC57DA8C4.jpeg
    55.5 KB · Views: 16

Mongo

Well Known Member
My oil pump pick up was an inch too short for my modified pan so I had a buddy of mine who is an excellent welder and fabricator make me one out of stainless steel and I think that he did an awesome job
 

Attachments

  • 1DF181C7-FF13-4060-9B70-C57D9258E913.jpeg
    1DF181C7-FF13-4060-9B70-C57D9258E913.jpeg
    88.4 KB · Views: 31

64ss409

Well Known Member
Supporting Member 9
I had a cam a few years ago that was off. I don't know if it was the chain (Cloyes True Roller) or the cam (Isky), but I had to advance it 4 degrees to get the cam readings "straight up" to the specks that came with it.
 

Mongo

Well Known Member
Well retarding the crank worked out perfectly
Before my readings were all about 3 degrees too advanced and after putting the crank gear in the retard position I’m almost perfectly inline with what the cam card says
 

Attachments

  • AE401F70-41F3-499C-B446-C5891FEEEB33.jpeg
    AE401F70-41F3-499C-B446-C5891FEEEB33.jpeg
    55.7 KB · Views: 2
  • 7F9B6137-EA34-4AFD-897C-6729B5076661.jpeg
    7F9B6137-EA34-4AFD-897C-6729B5076661.jpeg
    61 KB · Views: 1
  • 80549D7D-1DB7-4F2A-BEF4-1F3DA18B63D6.jpeg
    80549D7D-1DB7-4F2A-BEF4-1F3DA18B63D6.jpeg
    55.3 KB · Views: 2
  • B35FDA05-A86C-488B-BA73-06772A04BEBB.jpeg
    B35FDA05-A86C-488B-BA73-06772A04BEBB.jpeg
    66.8 KB · Views: 2

Mongo

Well Known Member
Picked up an aluminum 2 piece timing cover from Show Cars and that eliminated my timing cover flex
Now I have my cam end play set at.007
 

Attachments

  • 4CB02287-EA9E-415D-9DB8-8FF80E3EB523.jpeg
    4CB02287-EA9E-415D-9DB8-8FF80E3EB523.jpeg
    80.1 KB · Views: 21
  • 06B4249C-72D9-4CBD-BCB6-CFDB94D4DAD9.jpeg
    06B4249C-72D9-4CBD-BCB6-CFDB94D4DAD9.jpeg
    69.4 KB · Views: 22
Top