61 Impala restoration

61BISCAYNE

Well Known Member
Supporting Member 1
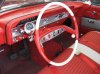
Your car looks fantastic!!
Lots of progress in a very short time.
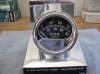
What did it cost you for the speedo service?
The two places I have talked to gave estimates
of $200 minimum. :eek:

I just want mine lubed and calibrated.
Danny
 

Jhall

Well Known Member
more progress

I installed the ensolite (closed cell foam) in the back seat area.

I then turned my attention to finishing up the dash. I purchased a new replacement speaker from http://www.turnswitch.com. I reinstalled the factory AM radio and fired it up. Everything works as it should. I installed the new glove box liner/glove box door as well as the heater control delete plate. I'm real pleased how the dash turned out.
 

Attachments

  • IMG_1679_1.JPG
    IMG_1679_1.JPG
    97.8 KB · Views: 81
  • IMG_1681_1.jpg
    IMG_1681_1.jpg
    74.9 KB · Views: 94
  • IMG_1684_1.jpg
    IMG_1684_1.jpg
    74 KB · Views: 100

Jhall

Well Known Member
Interior

I started working on the interior over the weekend . I tackled the front door panels first. We purchased a full kit from CARS the end of 2008. While looking over the backing board I noticed it had 1962 on them and didn't have the perferated cutouts for the plastic reflectors this car came with. Luckily I had kept the originals and was able to trace it onto the door panel. I've got the fronts completed with the exception of recoverying the armrests and screwing the bottom of the panel to the door.

Once the front door panels were installed I moved onto the package tray area and installed the cover.

I then moved onto the rear door panels. I first installed the windlace and then the panel. Everything lined up as it should. I marked out the screw holes in the rear of the door panel for the filler panels and mocked them up.

Next came recovering the rear armrest boxes. I was hesitant tackling this task as I've never done any interior work before. I decided today was going to be the day and had at it. I'm please how they came out.
 

Attachments

  • IMG_1688_1.jpg
    IMG_1688_1.jpg
    53.2 KB · Views: 52
  • IMG_1693_1.jpg
    IMG_1693_1.jpg
    47.1 KB · Views: 52
  • IMG_1698_1.jpg
    IMG_1698_1.jpg
    42.8 KB · Views: 53
  • IMG_1710_1.jpg
    IMG_1710_1.jpg
    55.3 KB · Views: 52
  • IMG_1707_1.jpg
    IMG_1707_1.jpg
    54.6 KB · Views: 71

Jhall

Well Known Member
armrests

Worked on wrapping the armrests today and screwed the bottom of the door panel to the door.
 

Attachments

  • IMG_1713_1.jpg
    IMG_1713_1.jpg
    56.4 KB · Views: 28
  • IMG_1714_1.jpg
    IMG_1714_1.jpg
    56.4 KB · Views: 28

Jhall

Well Known Member
Carpet installed

I worked on installing the carpet over the weekend. The carpet kit was from ACC. There was a few areas that I used the heat gun to stretch it out. I had to trim alittle from each side. All in all I'm very pleased with the results. My dad an I worked on Sunday getting the front windlace installed. We had to do it a few times to get it right. We finished the day by installing the shifter boot. This was a bit of a challenge getting the boot between the floor and the carpet as there was a lot of padding.
 

Attachments

  • IMG_1738_1.jpg
    IMG_1738_1.jpg
    66.7 KB · Views: 108
  • IMG_1741_1.jpg
    IMG_1741_1.jpg
    86.6 KB · Views: 112
  • IMG_1743_1.jpg
    IMG_1743_1.jpg
    67.9 KB · Views: 113
61 Impala Interior

Ciadella Interiors would like to help out with the interior restroation of this 61 Impala. Great quality workmanship from the pictures. And we can add to superior quality. Thank You; Pete
 

Jhall

Well Known Member
Interior

We installed the rear seat, front kick panels, front seat belts and front seat trim over the weekend.

We took it out for a ride this afternoon and were pleasantly surprised how well the sound deadener quieted the inside of the car down.

Next on the agenda is to schedule a visit to my interior guy so he can install the headliner/visors.
 

Attachments

  • IMG_1749_1.jpg
    IMG_1749_1.jpg
    50.6 KB · Views: 48
  • IMG_1751_1.jpg
    IMG_1751_1.jpg
    68.5 KB · Views: 71
  • IMG_1752_1.jpg
    IMG_1752_1.jpg
    69.7 KB · Views: 79

WENGINE

Well Known Member
Supporting Member 2
Looking real good:beerbang:clap:clap:clap Keep going the no more work and pure pleasure of driving is just around the bend:cheers Ken
 

Jhall

Well Known Member
Steering Column

Kerrbss,

The steering column is from Ididit... tilt, flashers. Its really convenient to tilt the original wheel out of the way getting into the car.

Jason
 

Jhall

Well Known Member
Tachometer

My dad picked up a new Sunpro retro tach (FZ88R) for the 61 and I got it installed today. Since the Ididit column was pushed as far forward as possible for a comfortable driving position I was worried that it wouldn't fit where I wanted it. The fit/finish came out great. I am still able to utilize the full tilt function. We took the car out this afternoon and everything works as it should. I ended up wiring the tach using a weatherpak connector for quick disconnect options. The tach has a light green back light which illuminates the gauge nicely.
 

Attachments

  • IMG_1828_1.jpg
    IMG_1828_1.jpg
    61 KB · Views: 68
  • IMG_1832_1.jpg
    IMG_1832_1.jpg
    72 KB · Views: 71
  • IMG_1834_1.jpg
    IMG_1834_1.jpg
    75.2 KB · Views: 73

Jhall

Well Known Member
No plans on doing the faceplate change as I would assume it would need to be recalibrated for the 7K faceplate.
 
Top