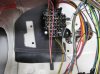
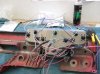
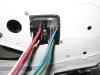
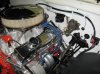
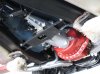
I started on the install of the American Autowire classic update kit. So far I'm how the install is going. You will need to open up the firewall hole for the new panel. Make sure to order the kit up prior to painting your firewall, I was able to do the surgery without any issues though. The lower hole basically is at the edge of the trim plate which I had to notch slightly. I started by mounting the fuse panel and wiring up the dash. The kit comes with a dash quick disconnect for the lights/gauges which made for ease of installation. I placed the dash on the workbench and started wiring away. AAW loomed the dash kit where the wires needed to go with zip ties. So far I have the dash wired, engine bay almost completed and front light kit run. The kit has an accessory pig tail for future upgrades so you don't have wires tied up everywhere. You will also need to notch/modify the firewall pad to clear the new fuse panel. The light switch hole in the dash had to be notched at the 10:00 position to allow for the connector to slip on...no big deal. More to follow.........

You are using an out of date browser. It may not display this or other websites correctly.
You should upgrade or use an alternative browser.
You should upgrade or use an alternative browser.
61 Impala restoration
- Thread starter Jhall
- Start date
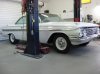
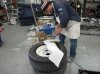
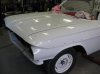
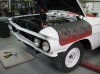
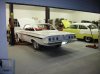
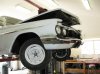
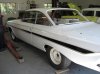
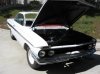
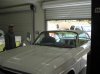
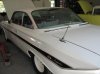
Marco finished color sanding/polishing the front and rear valances, touched up the floor pan in a couple of areas where we had the 4x4's to lift the body & shot the underside of the hood. We installed the hood and now its starting to look like a car again.
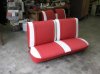
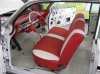
I had the front/rear seats redone with the CARS seat covers, I'm real happy with the way they turned out.
I finished wiring the front headlights/parking lamps and horns. I will start on the back half of the car next week.
If anyone is looking for a painter/bodywork in the Southern California area I will definately vouch for Marco Paredes. He is based out of Long Beach CA. Ph# 323-365-1426.
Attachments
AAW light switch
More on the classic update wiring kit from AAW.
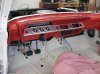
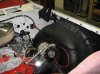
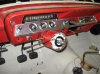
The kit comes with a new light switch with its own billet knob. My dad and I thought it would look out of place using the supplied knob. We took a look at the stock shaft/knob and it fit right into the new light switch. The only problem is that it stucked out farther than we liked in the off position. We were able to remove the factory knob by holding the shaft with visegrips (wrapped with a towel) and lightly hammering the end of the factory knob using a punch. The knob came right off. We cut/hacksawed the original shaft down and reinstalled the factory knob. We utilized some quick drying model glue and lightly tapped it back on with a rubber mallet. Looks totally original now and functional.
More on the classic update wiring kit from AAW.
The kit comes with a new light switch with its own billet knob. My dad and I thought it would look out of place using the supplied knob. We took a look at the stock shaft/knob and it fit right into the new light switch. The only problem is that it stucked out farther than we liked in the off position. We were able to remove the factory knob by holding the shaft with visegrips (wrapped with a towel) and lightly hammering the end of the factory knob using a punch. The knob came right off. We cut/hacksawed the original shaft down and reinstalled the factory knob. We utilized some quick drying model glue and lightly tapped it back on with a rubber mallet. Looks totally original now and functional.
more progress
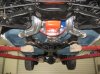
I finished up the wiring over the weekend and my Dad and I tested it out. Everything seems to work as it should. I installed the steering column, brake resevoir, 4spd backup switch, driveshaft and exhaust system.
Today we started on the exterior trim. We are working with the repop stuff which is posing some challenges. The original clips that tie the door pieces together had to be modified/filed down to fit the new moldings. So far we have the drivers side front fender (easy one) and drivers door (harder) completed. My dad and I agree the fit isn't too bad. We mocked up the drivers side quarter section. We had to massage the Y molding/clip that ties into the quarter molding section in a similar fashion as the door.
It was too late for us to make any critical decisions so we shut it down for the weekend.
Attachments

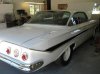
We made some good progress over the weekend. All the side and rear trim is installed as well as the rear bumper and valances. All in all we are pleased with the reproduction side trim. We did have to shorten the top trim piece that goes along the quarter panel about a 1/4" on each side so it would line up better by the door.
My dad and I modified the factory turn signal lever to fit the Ididit column. He grinded a flat spot on the end of the lever, I welded some material on each side...some more grinding, drilled the hole and put a slight bend on it. I think this will work out better since we are running the stock steering wheel.
My dad and I modified the factory turn signal lever to fit the Ididit column. He grinded a flat spot on the end of the lever, I welded some material on each side...some more grinding, drilled the hole and put a slight bend on it. I think this will work out better since we are running the stock steering wheel.
Attachments
We installed the front bumper and valances over the weekend. My dad is cleaning up the window regulators this week so we can move onto the glass installation. He has already installed the new windwing glass that had delaminated.
Attachments
side glass
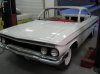
We installed all the EZ tint side glass over the weekend. The passenger side fits really well. The drivers side still needs some adjustment.
We installed all the EZ tint side glass over the weekend. The passenger side fits really well. The drivers side still needs some adjustment.
Attachments


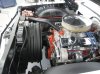
We installed the radiator/fan shroud over the weekend. The car fired right up but the timing was off so we had to advance the distributor one tooth and the timing fell right into place.
We finished up the adjustment of the side glass and everything is working as it should. We had to raise the drivers side door about an 1/8"....just enough adjustment on the door side hinge to make up the difference. We installed the softseal door seals. They were not labeled which side they went on so i winged it. The drivers side fits well, the passenger side will need some work.
Does anyone have a close up picture which side they go on ?
Once we got the windows where we wanted it we proceeded to install the door handle/lock mechanisms. Everything closes as it should.
We called a glass guy to come out Monday and the front/back went in within 15 minutes. The stainless trim went in just fine in the front. We had problems with the rear stainless trim, particularly the lower drivers side piece....just wouldn't go in. The glass guy said the trim clips were questionable, but I think they would have worked. We feel he didn't get the glass in totally centered which caused it to be too tight on the drivers side as the passenger piece was going in just fine.
We had him remove the glass and we have some clips ordered up.
Attachments

more progress
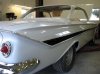
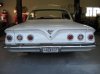
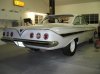
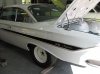
My dad and I made good progress over the weekend. We installed the new clips around the rear window and got the back glass/trim installed. We installed both rear antennas, trunk weatherstripping, rear quarter panel emblems, left/right outside mirrors, both front fender gunsights and the stainless trim around the bottom of the front windshield.
My dad and I made good progress over the weekend. We installed the new clips around the rear window and got the back glass/trim installed. We installed both rear antennas, trunk weatherstripping, rear quarter panel emblems, left/right outside mirrors, both front fender gunsights and the stainless trim around the bottom of the front windshield.
Attachments

Looking good. I like the black insert !
Now mobile
We had another productive weekend. I masked and painted the rear chrome trim below the back windshield and got them installed. We installed the front cowl panel. The front seat was installed in preparation of getting the car on the road. The car is up and running. The T-10 4spd is leaking from the front seal bad enough we will need to pull it back out. We think a 1-2 syncro is bad as its difficult to get the car to down shift from 3-2 or 3-1 without double clutching.
It was nice to get the car back on the road !
Attachments
More progress
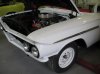
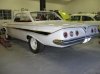
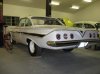
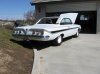
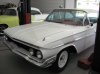
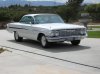
The front of the car is now complete. Grill, upper grill & headlight buckets installed.
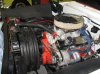
My dad and I decided the T-10 needed to be pulled out and rebuilt. I contacted Ron Worthen (Ron's Transmission Service)(trannyman48@hotmail.com) in Garden Grove CA and took the trans to him. He specializes in 4-speed transmissions (rebuild/exchange etc.) and can even build date coded units. We discussed our engine combination with him and he suggested we would be better off with a Muncie M-20 wide ratio trans. We got it installed and up and running last weekend. The car is a real pleasure to drive now. Solid shifting up and down the gears.
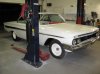
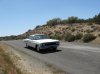
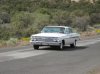
Today the weather was great, no wind in the low 70's. I shot the radiator shroud in the morning and my dad and I got it installed in the afternoon. Once the car was up and running my dad took it out for a spin. Attached are a few pics.
After driving it around the block we have found the speedo is making noise. I popped speedo out this evening and will take a look at it over the weekend.
The front of the car is now complete. Grill, upper grill & headlight buckets installed.
My dad and I decided the T-10 needed to be pulled out and rebuilt. I contacted Ron Worthen (Ron's Transmission Service)(trannyman48@hotmail.com) in Garden Grove CA and took the trans to him. He specializes in 4-speed transmissions (rebuild/exchange etc.) and can even build date coded units. We discussed our engine combination with him and he suggested we would be better off with a Muncie M-20 wide ratio trans. We got it installed and up and running last weekend. The car is a real pleasure to drive now. Solid shifting up and down the gears.
Today the weather was great, no wind in the low 70's. I shot the radiator shroud in the morning and my dad and I got it installed in the afternoon. Once the car was up and running my dad took it out for a spin. Attached are a few pics.
After driving it around the block we have found the speedo is making noise. I popped speedo out this evening and will take a look at it over the weekend.
Attachments

Looking great !!!!  ........... I would rather have a wide ratio 4 speed as well, good choice.
Dave
........... I would rather have a wide ratio 4 speed as well, good choice.Dave
Car is looking fantastic!!  You and your dad have a lot to be proud of!!
You and your dad have a lot to be proud of!! bang
bangMore progress
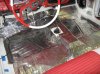
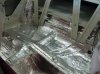
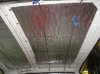
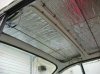
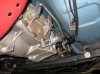
I spent the weekend putting some sound deadener in the car. I ordered up a roll of the BXT60 62.5 sq.ft. from RaamAudio (http://www.raamaudio.com), 2 yards of the ensolite & some spray adhesive for the ensolite. I was able to complete the whole floor pan and roof section with no left overs. I haven't installed the ensolite yet but the hard work is done.
I was able to get the speedometer fixed locally (Empire speedo & tach 909-350-0402, Derek Bennett) in Fontana California. I dropped it off on Monday morning and picked it up 3hrs later. He disassembled it, lubed the mechanisms and calibrated it for me. Excellent service.
I threw on the dog dish caps as I'm running out of things to do. The car is about ready to go to the interior shop for the headliner/carpet installation.