You are using an out of date browser. It may not display this or other websites correctly.
You should upgrade or use an alternative browser.
You should upgrade or use an alternative browser.
61 Impala restoration
- Thread starter Jhall
- Start date
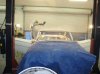
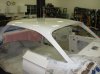
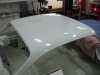
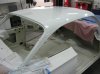
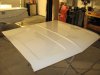
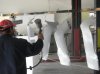
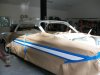
The top was shot this evening and came out really nice. Tomorrow Marco will work on preparing the rest of the car for paint.
Attachments
Great progress!
That is coming along nicely, I bet you and your Dad are getting real excited!
I need for Marco to come over to my place and help me get kick started back on my paint project") . It just toooo cold out here to even think about venturing into the garage to continue blocking and prep work...
. It just toooo cold out here to even think about venturing into the garage to continue blocking and prep work...
Working in single stage allows you to shoot the top and the jambs, etc. without having to clear them before moving on to other portions. I am trying to figure out the best sequence to do my '62 using base/clear and taking on a two tone paint scheme. Since the clear has a "window" that makes it a little more challenging for me as an amateur working alone. I've gotten some advise elsewhere, and it appears I will be in for long taping sessions over a period of a few days to get it done correctly.
Yours is looking just great, and we all look forward to the continuation of the project. Putting together those pieces after paint sure gets the blood flowing. Lots of detail in terms of fit and finish.
Cheers!
TomK
That is coming along nicely, I bet you and your Dad are getting real excited!
I need for Marco to come over to my place and help me get kick started back on my paint project
. It just toooo cold out here to even think about venturing into the garage to continue blocking and prep work...Working in single stage allows you to shoot the top and the jambs, etc. without having to clear them before moving on to other portions. I am trying to figure out the best sequence to do my '62 using base/clear and taking on a two tone paint scheme. Since the clear has a "window" that makes it a little more challenging for me as an amateur working alone. I've gotten some advise elsewhere, and it appears I will be in for long taping sessions over a period of a few days to get it done correctly.
Yours is looking just great, and we all look forward to the continuation of the project. Putting together those pieces after paint sure gets the blood flowing. Lots of detail in terms of fit and finish.
Cheers!
TomK
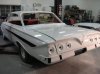
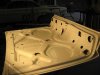
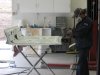
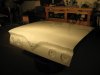
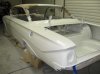
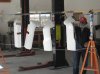
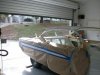
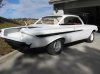
The car was painted just in time last night as the weather turned on us today (rainy & cold). My dad got the garage warmed up to 60 degree's where Marco likes to paint at and the whole process lasted about two hours.
Attachments

bubbletop1961
Well Known Member
That is going to be such a nice car. Cant wait to see the future progress.
Mr.1961
Well Known Member
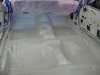
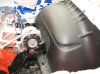
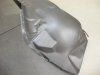
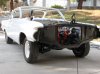
I worked on installing the mud flaps on the front inner fenderwells. I utilized some stainless welding wire and bent them into a U-shape, worked like a charm.
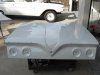
Looks as if you guys sprayed a flat black finish over choosing a satin finish on the the inner fender wells any particular reason?
BTW, the Bubbletop looks fantastic.
Innerfenderwells,
We shot the inner fender wells with the same eastwood satin chassis black. Depending on how heavy we shot it determined the sheen. The first time it was too glossy for my taste. We shot it a second time and used the paint gun to provide some air over the painted surface to flatten it out to a more satin finish.
We shot the inner fender wells with the same eastwood satin chassis black. Depending on how heavy we shot it determined the sheen. The first time it was too glossy for my taste. We shot it a second time and used the paint gun to provide some air over the painted surface to flatten it out to a more satin finish.
Now comes the fun part!
Your project is really turning out great. Now comes the fun part, where you finally start to put it back together. OK, you've got a bit of cut and buff to go, but that will be done and you'll begin to assemble. Lots of detail in those doors and windows and glass, that's the part I like. Also hanging the bright work really gets the juices flowing (it's hard to stop).
I still think you need a fresh date coded 1961 348 in that engine bay .
Cheers!
TomK
Your project is really turning out great. Now comes the fun part, where you finally start to put it back together. OK, you've got a bit of cut and buff to go, but that will be done and you'll begin to assemble. Lots of detail in those doors and windows and glass, that's the part I like. Also hanging the bright work really gets the juices flowing (it's hard to stop).
I still think you need a fresh date coded 1961 348 in that engine bay
.Cheers!
TomK
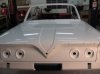
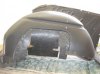
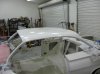
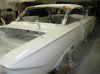
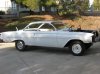
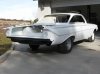
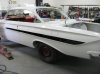
I took the masking paper off last night and pushed the car out this morning to start curing the paint.
Jhall, what paint did you use?
 waterbase? BTW niiiccceee!
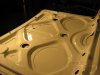
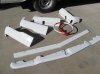
The front/rear valances, upper grill support, lower front fender support panel and top/bottom of the steering wheel was painted this week.
Attachments

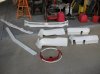
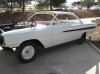
Marco applied the accent stripes. He first hit the area with 800 grit sand paper to scuff the area and applied the base black and three coats of clear.
Attachments
More progress
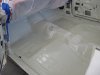
The project continues to advance. Quick question: Did you do the inside of the trunk area in primer, or is that a finish coat? Do you have plans to use the splatter paint in that area?
When I see pictures of your project, then look outside (snow) I get increasingly envious.
Keep up the good work!
TomK
The project continues to advance. Quick question: Did you do the inside of the trunk area in primer, or is that a finish coat? Do you have plans to use the splatter paint in that area?
When I see pictures of your project, then look outside (snow) I get increasingly envious
.Keep up the good work!
TomK
"Marco applied the accent stripes. He first hit the area with 800 grit sand paper to scuff the area and applied the base black and three coats of clear"
Your car looks great!!! Everyone has their own way of doing things.....I shoot the accent stripes first, lot less masking.
Your car looks great!!! Everyone has their own way of doing things.....I shoot the accent stripes first, lot less masking.