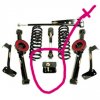
Adjustable upper control arms

Fathead Racing

Well Known Member
Supporting Member 7
Actualy no in this case. The ends are grade 8 heims with teflon centers. And since the stock arms are 13 3/4 center to center and these go below 13 1/2 there's enough there to adjust the pinion. hmmmmm. :D
The only thing is that these are straight vs curved..does that matter??

Well, since I will be moving the upper mounting points up 1 3/4" or more I will be loosing the arched arms and going with the straight one's anyway! Thing is, how much does the tractor supply want for two of these? This seems like a realy good idea. I wonder if we could add on poly ends like the stock bushings? I could powder coat these things and really make them look trick.
 

Tic's60

Well Known Member
Supporting Member 3
Well, since I will be moving the upper mounting points up 1 3/4" or more I will be loosing the arched arms and going with the straight one's anyway! Thing is, how much does the tractor supply want for two of these? This seems like a realy good idea. I wonder if we could add on poly ends like the stock bushings? I could powder coat these things and really make them look trick.

16.95 EACH! I need to start shopping in the farm equipment isles! I may not raise mine but I still want to use straight ones. Someone else here does that as well.
 

Fathead Racing

Well Known Member
Supporting Member 7
16.95 EACH! I need to start shopping in the farm equipment isles! I may not raise mine but I still want to use straight ones. Someone else here does that as well.

Yeh, the Farm supply is one of my favorite stores to poke around in. If you want parts that can be fabbed up and used for racing.;)
 

Fathead Racing

Well Known Member
Supporting Member 7
I would like to hear from bubbletop61 and Aubrey, why did you choose to raise the mounts for the rear upper control arms 2" and 1 3/4" respectively? What other changes did you make? I need to make a decision on how far up to raise the upper arms. It looks like lowering the lower arms would be a simple job also. I guess I need that program from the "wully Bully" team.

Regards, Ray.
 

models916

Well Known Member
Supporting Member 7
Ray

If you have adjustable upper arms it is a lot easier to lower the front of the upper arms the same amount. Just bolt on a new U channel with lower drilled holes. You can buy the bracket (anti-squat) but it is expensive for what it is.
 

Fathead Racing

Well Known Member
Supporting Member 7
If you have adjustable upper arms it is a lot easier to lower the front of the upper arms the same amount. Just bolt on a new U channel with lower drilled holes. You can buy the bracket (anti-squat) but it is expensive for what it is.

Did you mean the lower arms?
 

models916

Well Known Member
Supporting Member 7
No

Instead of raising the back where it attaches to the housing, the same effect is achieved by lowering the front where it attaches to the crossbar. From what I have been seeing, a 1.5-2" drop in the front achieves the anti-squat.
 

models916

Well Known Member
Supporting Member 7
Here is a pic of anti-squat block

I copied this from Impala Bob site
 

Attachments

  • RSK-GPLUS_rearKit_Med-01.jpg
    RSK-GPLUS_rearKit_Med-01.jpg
    35.2 KB · Views: 86

Fathead Racing

Well Known Member
Supporting Member 7
Very good, looks like that bracket would be easier than welding to the upper housing brackets and easier to make.:clap thank you. What effect does lowering the lower arms at the frame have in combination with the above adjustment? If I lower the lower arms at the frame under the car it will help lower the rear of the car. Right now the car sits a little lower in the front by about 2" or more.
 

models916

Well Known Member
Supporting Member 7
Looks good on paper

If you draw it out on paper, it seems that it would be benificial also. Might be over kill. Can't hurt to have the adjustability available. Simple to weld on a new longer attachment to the frame with multiple holes just in case.
 

Fathead Racing

Well Known Member
Supporting Member 7
Just came from the garage. Because the Ford 9" is offset to the drivers side I cannot move the frame mount down without reinventing the wheel. I will be welding extentions to the existing brackets on the rearend housing. Problem is that the control arm comes too close to the center section when moved down on the frame. Moving up on the housing bracket gives more clearance in the same area. Oh well :dunno
 

Fathead Racing

Well Known Member
Supporting Member 7
I would like to hear from bubbletop61 and Aubrey, why did you choose to raise the mounts for the rear upper control arms 2" and 1 3/4" respectively? What other changes did you make? I need to make a decision on how far up to raise the upper arms. It looks like lowering the lower arms would be a simple job also. I guess I need that program from the "wully Bully" team.

Regards, Ray.

Need to move this forward, I still need an answer!;)
 

Steve "wully bully"

 
Supporting Member 1
Ray,
We are currently in the process of modifying a complete frame for racing for a guy. We are using those brackets that are pictured, along with relocating the mounts higher on the rear, and the front lower frame mounts. It all comes down to properly locating the instant center. The factory suspension was designed for a nice cushy ride, which is the exact opposite of what you want for racing. To launch a drag car best, you want the suspension pushing down on the rear, by lifting the body, or "separating". The factory set-up does the opposite, it allows the rear to squat, which "unloads" the downforce on the rear tires. I can give you more specific instructions, if you like, just send me a PM.
Steven
 

jim_ss409

Well Known Member
Supporting Member 5
It's hard to get firm recommendations about where your instant center should be. But from what I've gathered somewhere in the range of about 40" ahead of the axle and about 7 or 8 inches off the ground would be in the ball park for most of us. They say faster cars will want a lower instant center. You can see in the picture below that the lower bar on Gordon's car is angled downward so it has a fairly low instant center. This car hooks up great. An instant center that low might not work as well on a lower powered car.
 

Attachments

  • 2007-12-07 033cr.jpg
    2007-12-07 033cr.jpg
    82.1 KB · Views: 78

Fathead Racing

Well Known Member
Supporting Member 7
Ah yes, I would fit into the lower powered car, Still shooting for a real quick street strip stock stroke 409.
 

Fathead Racing

Well Known Member
Supporting Member 7
It's hard to get firm recommendations about where your instant center should be. But from what I've gathered somewhere in the range of about 40" ahead of the axle and about 7 or 8 inches off the ground would be in the ball park for most of us. They say faster cars will want a lower instant center. You can see in the picture below that the lower bar on Gordon's car is angled downward so it has a fairly low instant center. This car hooks up great. An instant center that low might not work as well on a lower powered car.

Thanks to all of you I think I'm starting to get it :scratch
 

walkerheaders

Well Known Member
Supporting Member 6
dang it!!!!!!!!!!!!!!! i just typed about a half hour explanation and hit some button on my laptop that erased it all?????????????? dang!

i'll try again:

think of only the lower arm in your mind. you are standing on level ground and the front of the car is to your right.

the lower arm from rear to front should point downward about 2 degrees. why?

the first reaction under the shock of dumping the clutch is for the rear housing to rotate rearward. therefore pushing the energy downward and forward thru the lower arms. this pushes downward on the frame to weight and plant the tires. the very next reaction is for the rear housing to seperate from the body (because of the upper arm angle) when the housing seperates, it pushes even harder on the tires and next, the lower arm angle has changed to now pushing forward on the car. (isnt this the direction we REALLY wanted to go?) when the car is at rest, with a 2 degree down angle, this also contributes to our instant center being under the middle of the car.
once we set a car to ride with the lower angle correct, we rarely ever change it.

Uppers: rear to front can be nearly 7 degrees downward. remember, the uppers are a pivot point and get pulled on under power. the amount of angle down determines how hard the housing will be pulled downward. the down angle also contributes to the instant center being under the middle of the car. on sticky trax and with good tires, you dont want all that bite or violent reaction so we (take some "bite" out of it) by raising the front of the uppers to a less violent (power robbing) reaction.

have u ever wondered why a jacked up chevelle will wheelhop? the lower bar angles are up in the front. first reaction, push upward on the body. second, as the rear seperates, lift the body more, it then falls back down and starts the bounce. simple repeat that process quickly........wheelhop.

preload: when you have the car at rest and ride height, there will always be a spot in the upper right bar where you can adjust it to nuetral or NO LOAD. it will be loose in your hand. get to this spot, turn the bar (lengthen) by hand until snug, then LENGTHEN the upper 1 or 2 flats (no more than 2) (1/6th of a turn is a flat) this preloads the 4 link system the correct way.

looking from the rear of the car:
the driveshaft is trying to plant the left tire and raise the right tire.
COUNTER ACTION: the engine is trying to raise the left side of the body and plant the right side
thats why a bag in the right rear helps. a shock hard to compress on the Right and a shock hard to extend on the left is a good theory.......but you have to be careful using 2 differant shocks so that the car wont feel funny down the rest of the track. (theres more to the pass than the launch)

these are my own words so i'll put my name to it. Bob walker Jr. but the theory of all this has been around for ever.

if u get all this balanced, success
 

Fathead Racing

Well Known Member
Supporting Member 7
Thanks Bob, I was waiting for you answer last night and wondered where it went when I saw you were replying to my post. Steve from the "Wully Bully" team has been helping me also. At this point in time all I want to do is raise the uppers at the axle housing and maybe lower the lowers at the frame. The answer I am looking for is something someone else has already done and had success with. In other words, I need a generic measurement, like 2" on the uppers and 2" on the lowers or what? I will use your 7 Dg/ 2 Dg measurement and translate that to inches and see how that works out.

Thanks to everone for their help, keep the suggestions coming!
Regards, Ray
Fathead racing.
 
Top