
You are using an out of date browser. It may not display this or other websites correctly.
You should upgrade or use an alternative browser.
You should upgrade or use an alternative browser.
My 2nd Gen F-body
- Thread starter Sera
- Start date


Thank you guys.
I'm considering my options on the exhaust - I really need to be running 1 7/8" headers for the power I am ultimately planning - so makes sense to get the right ones from the start.
After its too cold and dark outside I've been working on building the ECU up for this. I'm using Megasquirt 3x so I can run sequential fuel and spark. It's got more features than I need but it's future proof. It will also communicate directly with my Megashift transmission controller via CAN so it keeps things simple.
Take one bare board
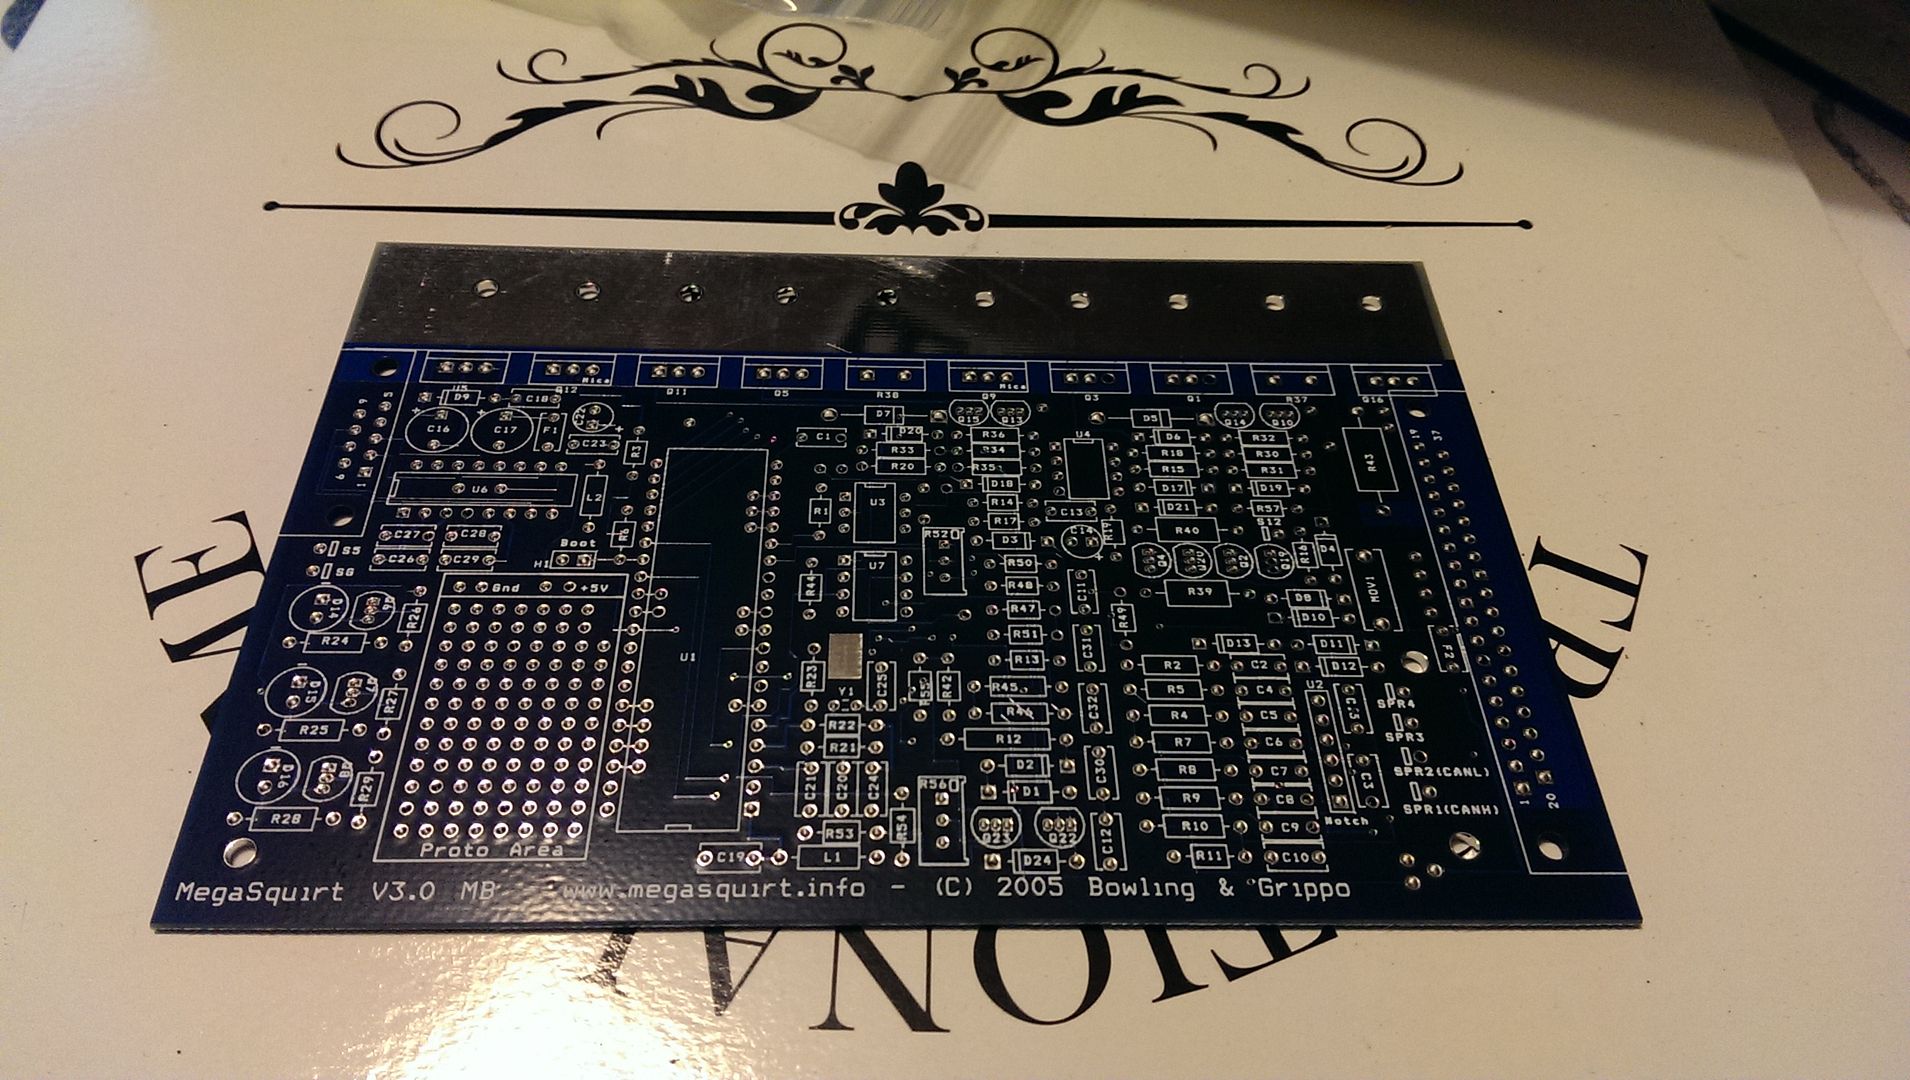
Do a bit of electrical witchcraft

At the stage of testing and cleaning the board now, before finally fitting the processor and cramming it all into its case.
You have many, many more talents than I.

Sera
Active Member
Thanks guys ") I just make it up as I go along
I just make it up as I go along 
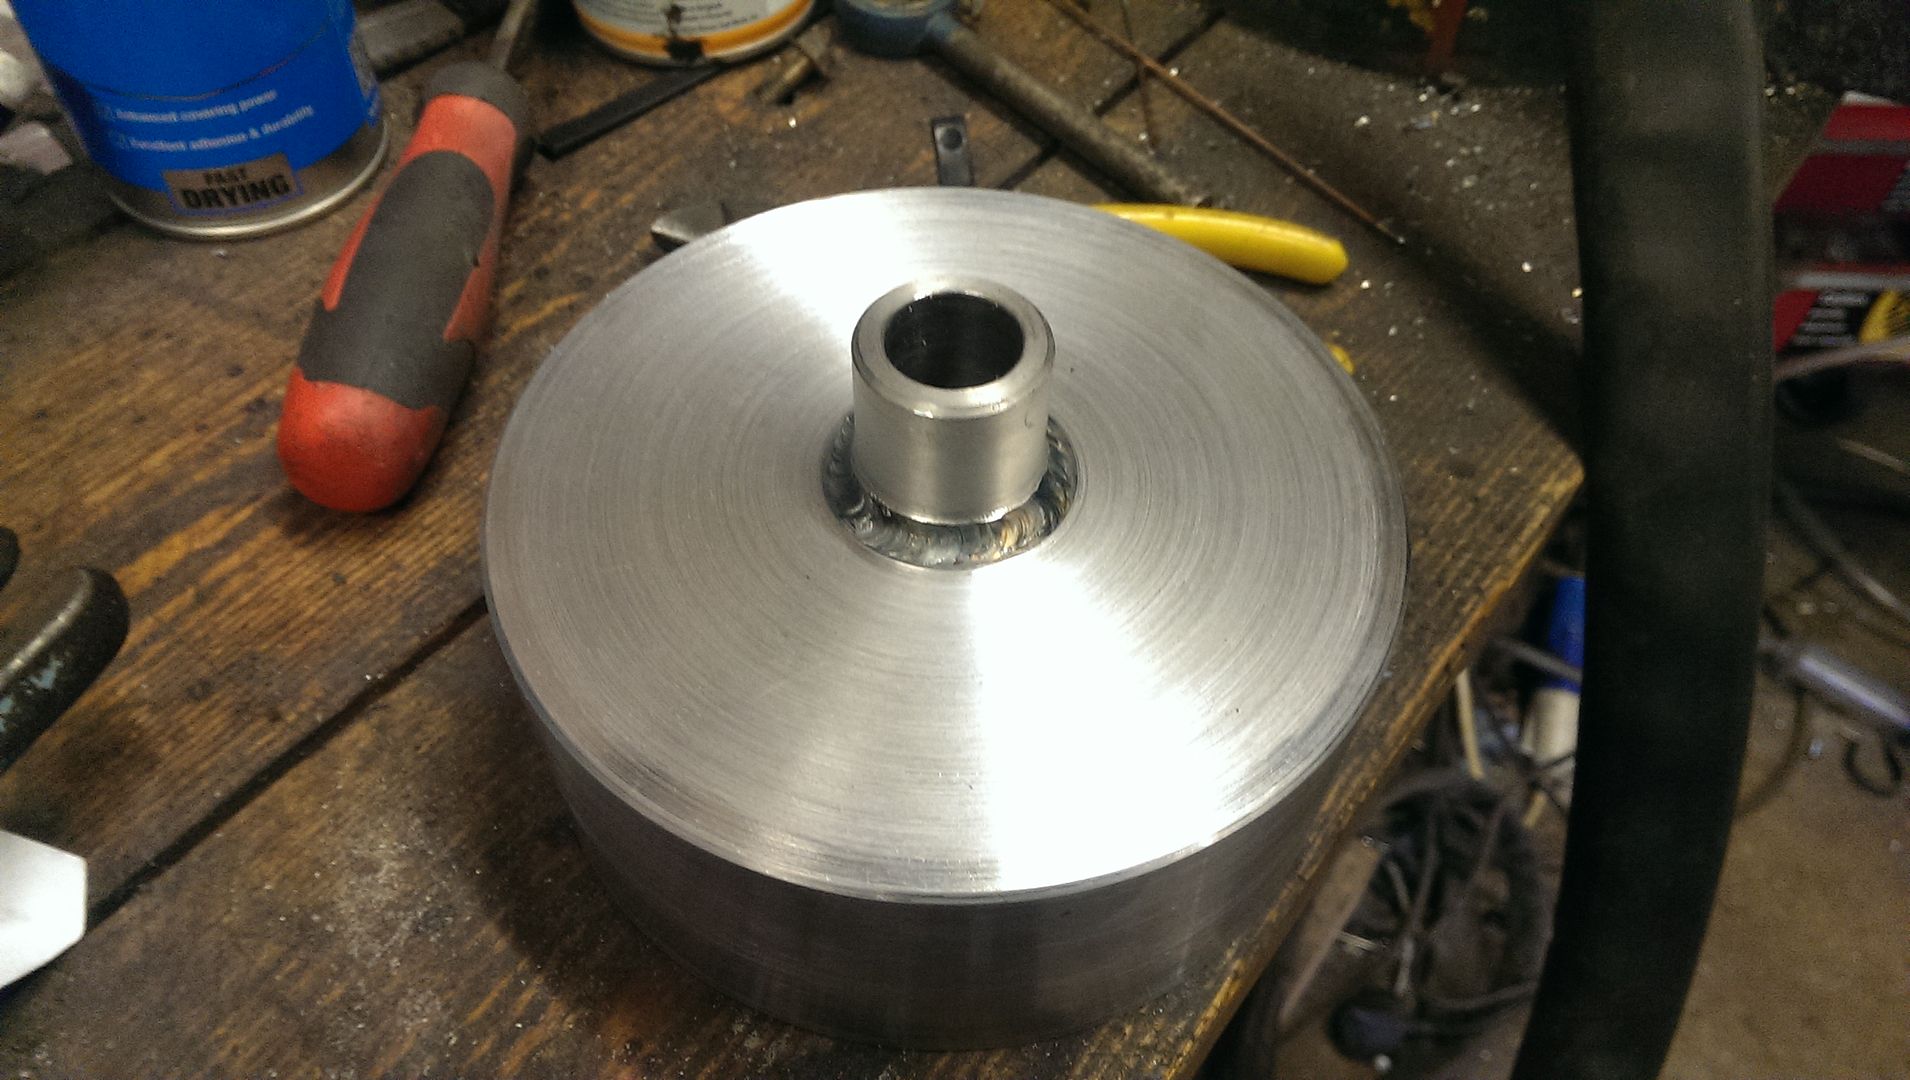
The last couple of evenings I've made the water pump pulley. I had a brand new water pump with the engine, but it had no pulley fitted. Seemed silly to spend a fortune on a new pump when I could make a pulley easily.
Used a piece of thick walled steel pipe, had a blank laser cut to fit in the end and welded it in. Then turned up a boss to fit in the centre before putting it all in the lathe and skimmed it up all over. I welded the plate to the tube inside too. I've just painted it and I'll fit it over the weekend. Took a couple of hours

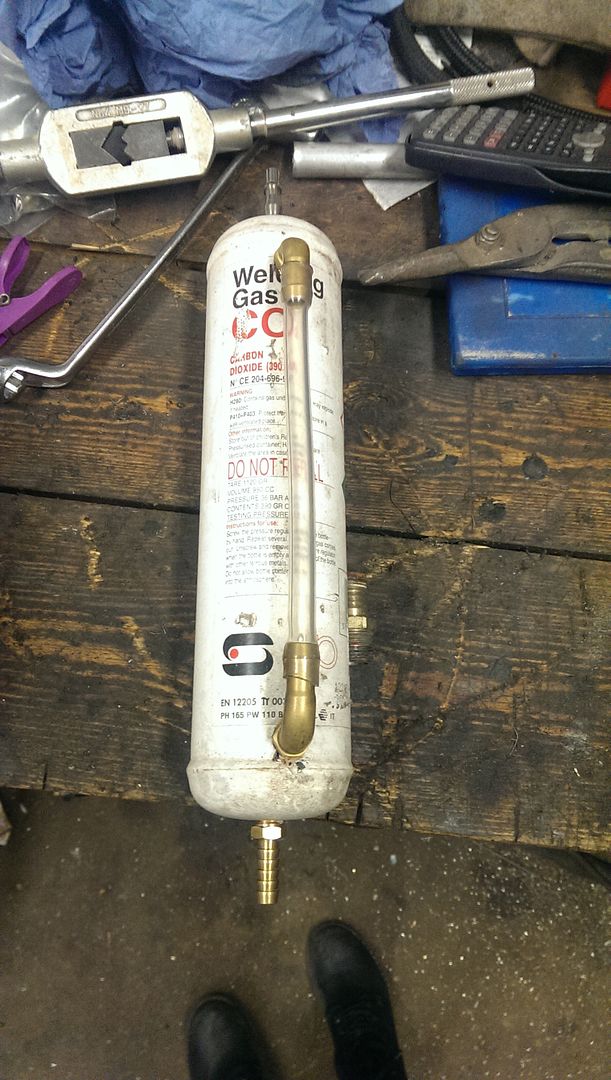
And this evening I've made myself a priming tool. The LS has no distributor, so you can't prime it like the old SBC. You can buy tools for about $250 to do it, but for a few bucks you can make your own. Loads of ideas on youtube for different options. I had an old disposable welding gas bottle, which has a 1 litre capacity. Bigger would have been better, but it will just take a bit longer with this one as I'll have to refill it a few times, most people seem to use about a gallon of oil during the priming process.
I just drilled and tapped a few holes in it (it's good thick wall section) and screwed in some hose fittings and some for a sight gauge too. I'll unscrew the top airline fitting, fill it with oil and connect it to the port on the side of the block with an adapter before connecting it to an airline to pressurise it with about 25psi to force oil around the block, fill the lifters and get oil up to the rockers.
Pretty simple, and I used stuff I had in the workshop.
I just make it up as I go along The last couple of evenings I've made the water pump pulley. I had a brand new water pump with the engine, but it had no pulley fitted. Seemed silly to spend a fortune on a new pump when I could make a pulley easily.
Used a piece of thick walled steel pipe, had a blank laser cut to fit in the end and welded it in. Then turned up a boss to fit in the centre before putting it all in the lathe and skimmed it up all over. I welded the plate to the tube inside too. I've just painted it and I'll fit it over the weekend. Took a couple of hours
And this evening I've made myself a priming tool. The LS has no distributor, so you can't prime it like the old SBC. You can buy tools for about $250 to do it, but for a few bucks you can make your own. Loads of ideas on youtube for different options. I had an old disposable welding gas bottle, which has a 1 litre capacity. Bigger would have been better, but it will just take a bit longer with this one as I'll have to refill it a few times, most people seem to use about a gallon of oil during the priming process.
I just drilled and tapped a few holes in it (it's good thick wall section) and screwed in some hose fittings and some for a sight gauge too. I'll unscrew the top airline fitting, fill it with oil and connect it to the port on the side of the block with an adapter before connecting it to an airline to pressurise it with about 25psi to force oil around the block, fill the lifters and get oil up to the rockers.
Pretty simple, and I used stuff I had in the workshop.
 You saved, some serious money.
That's some really neat work your doing there Sera. Good idea on the pre-oiler.  I have an old Snap On fuel injector cleaner that has a quart canister for cleaning solution. I've used that a couple of times to pre-oil and engine. It's got a regulator/ pressure gauge and clear tubing to see when your out of oil.
I have an old Snap On fuel injector cleaner that has a quart canister for cleaning solution. I've used that a couple of times to pre-oil and engine. It's got a regulator/ pressure gauge and clear tubing to see when your out of oil.Sera
Active Member
Thank you very much gents
I've spent all day wiring again, and the engine is completely hooked up. Hopefully I'll be able to check the function of everything tomorrow if I can get some power on the loom. Still have quite a lot more to do yet, but shouldn't be too long before it's ready to be fired up...
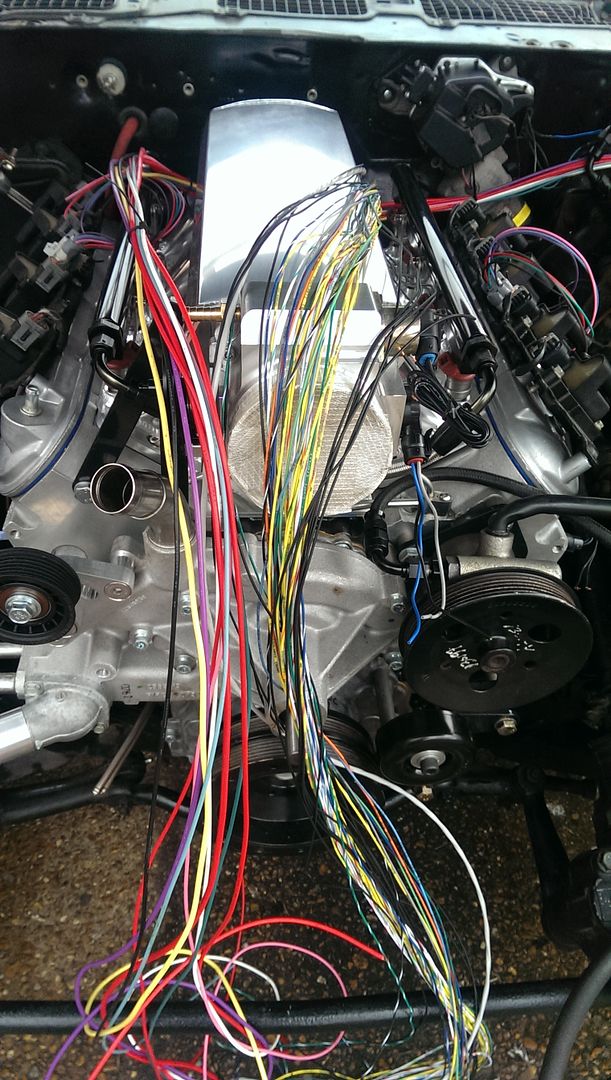
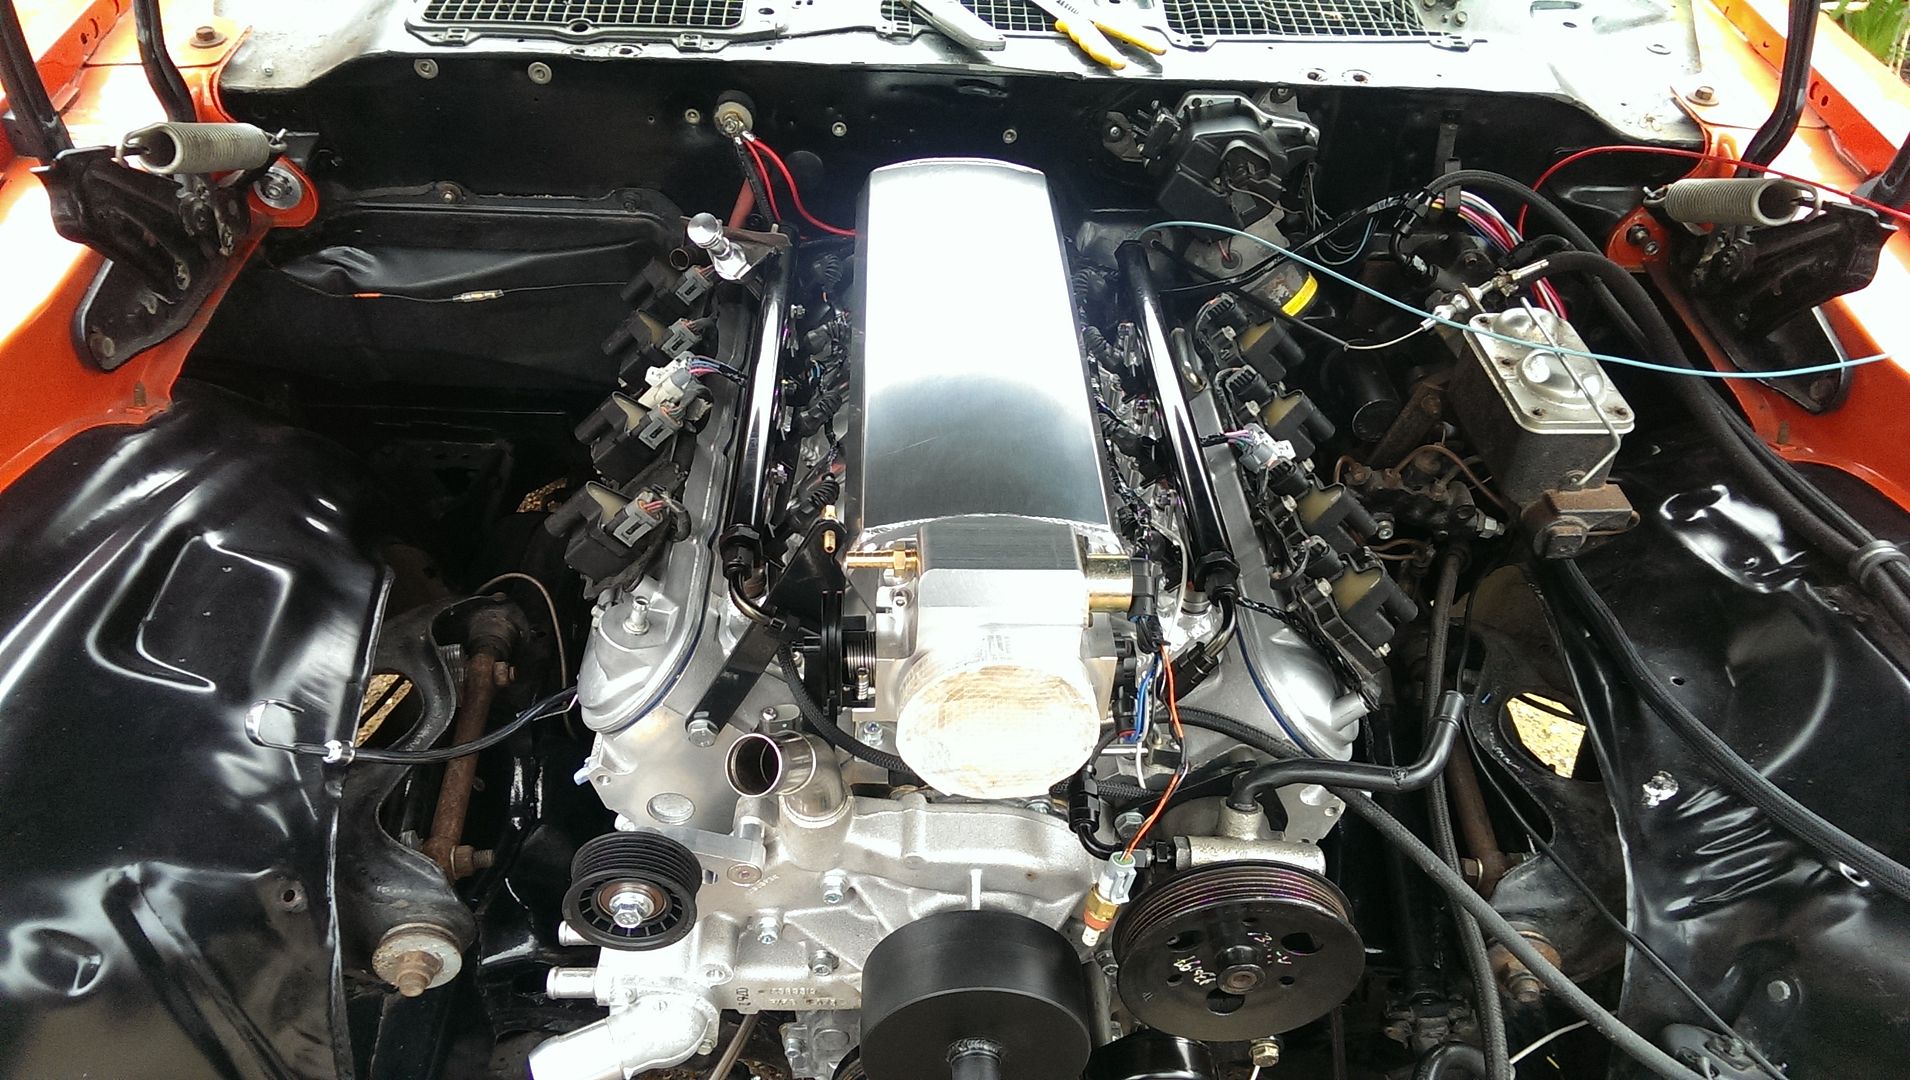
I've spent all day wiring again, and the engine is completely hooked up. Hopefully I'll be able to check the function of everything tomorrow if I can get some power on the loom. Still have quite a lot more to do yet, but shouldn't be too long before it's ready to be fired up...
Last edited:
Sera
Active Member
The car is at that stage where you can't really see where you've been working. Lots of silly little jobs that all take ages to sort.
Yesterday I finished cutting a hole in the floor to clear the oil cooler lines on the 4L80E - downside of such a large transmission. I hammered out a domed aluminium cover plate for it and put a squirt of non-setting sealer round it before screwing it to the floor. Now if I ever need to get at the fittings I can do it without dropping the transmission out...!

Next I fitted new body seals for the doors to replace the leaky ones. I did replace them with new when I rebuilt the car the first time, but they didn't last very long. I bought a different make this time and they seem much better. With the rain that's forecast for the rest of the weekend I expect I will find out if the new seals have fixed the problem, or not.
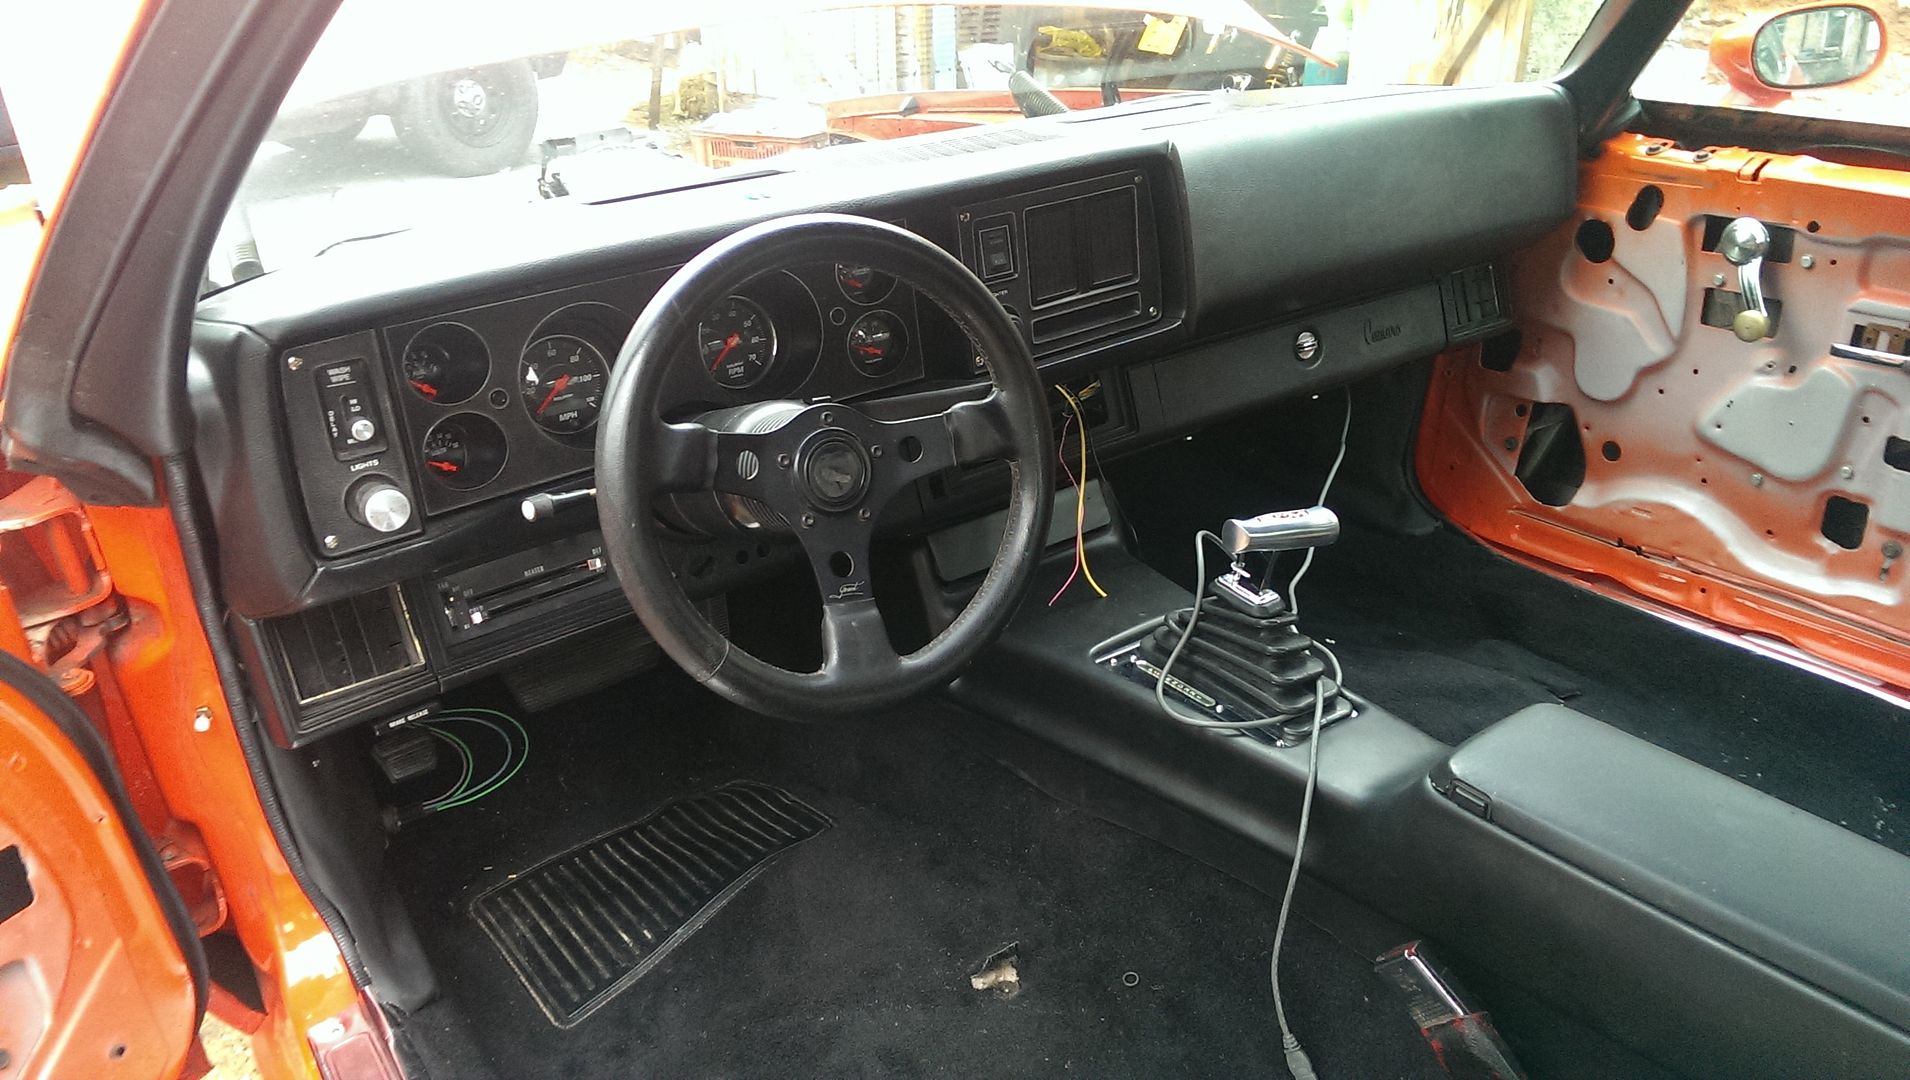
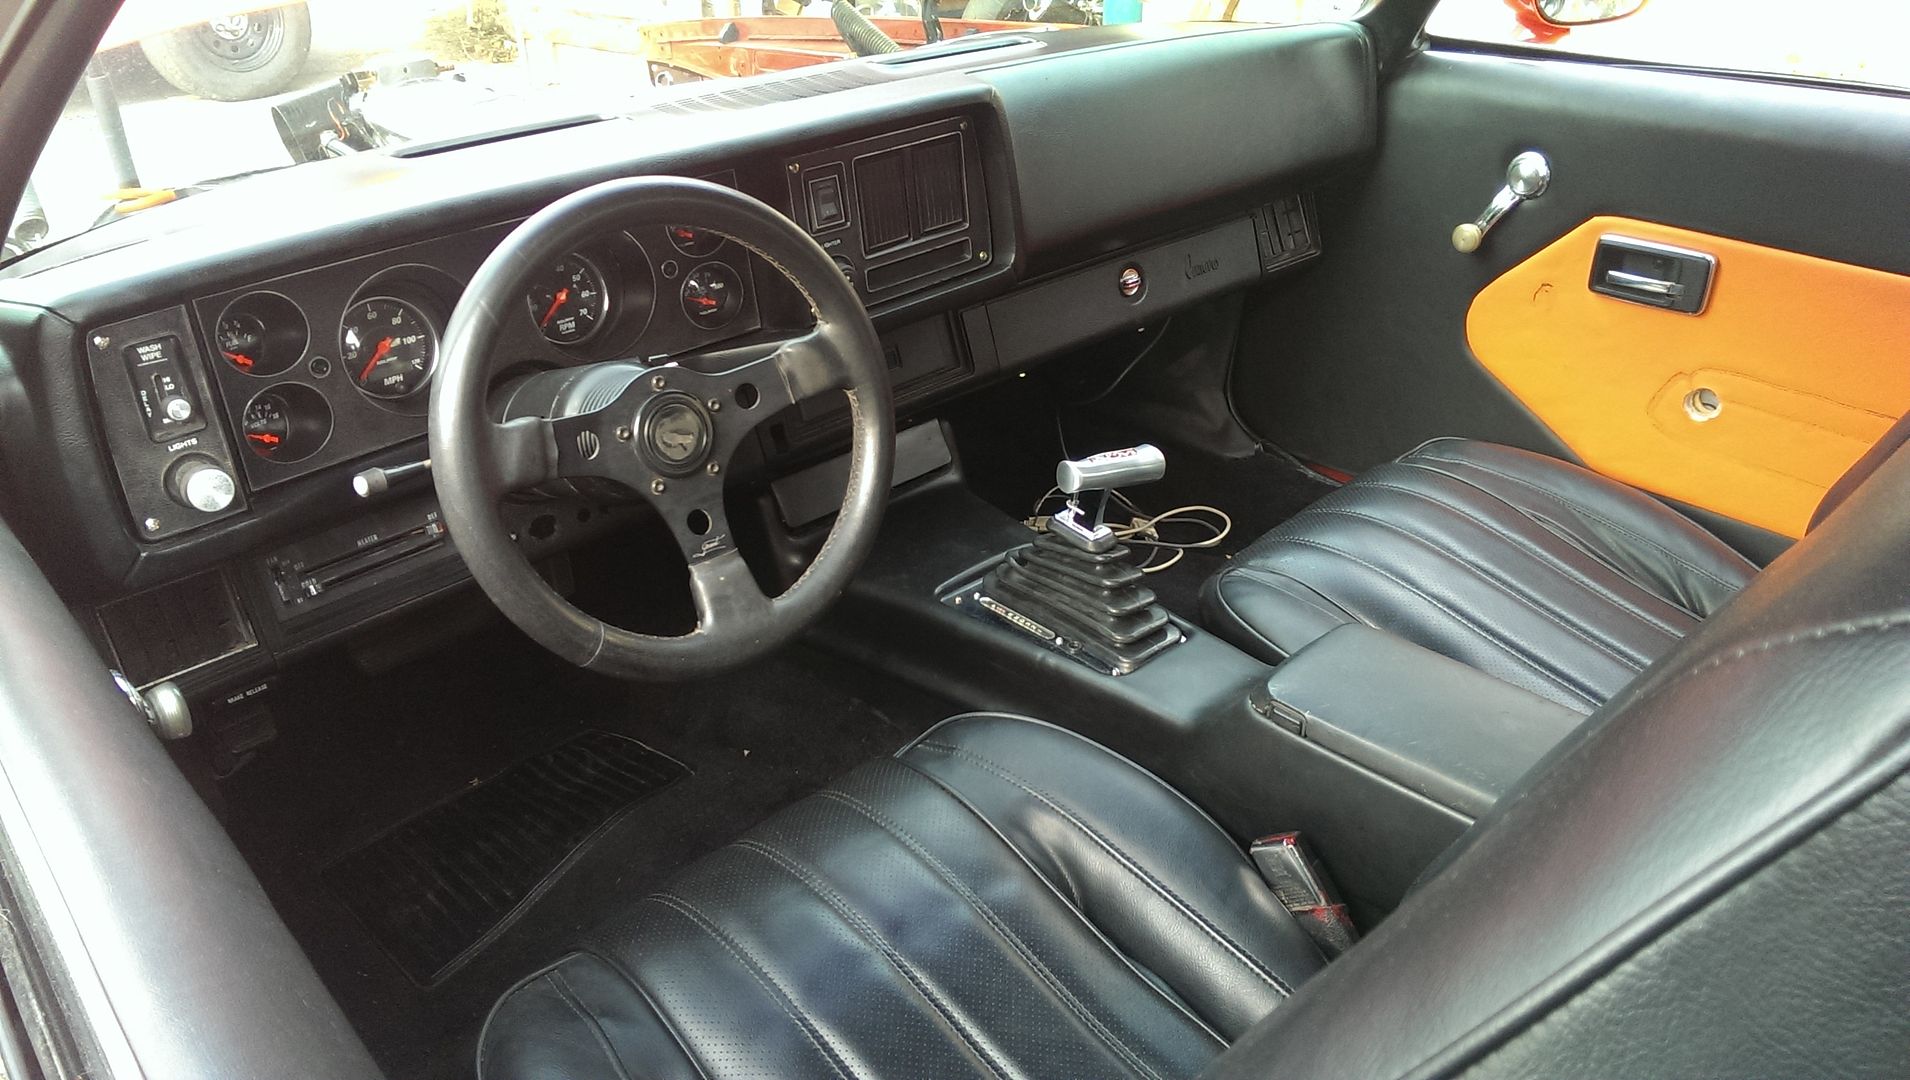
After that I finished off all of the dash wiring with a couple of minor exceptions and then refitted the carpet, dash, instruments etc.
Tested the electricals that I can and everything seems to work so far.
Today I got quite a lot done, but nothing much to see - which is always annoying...
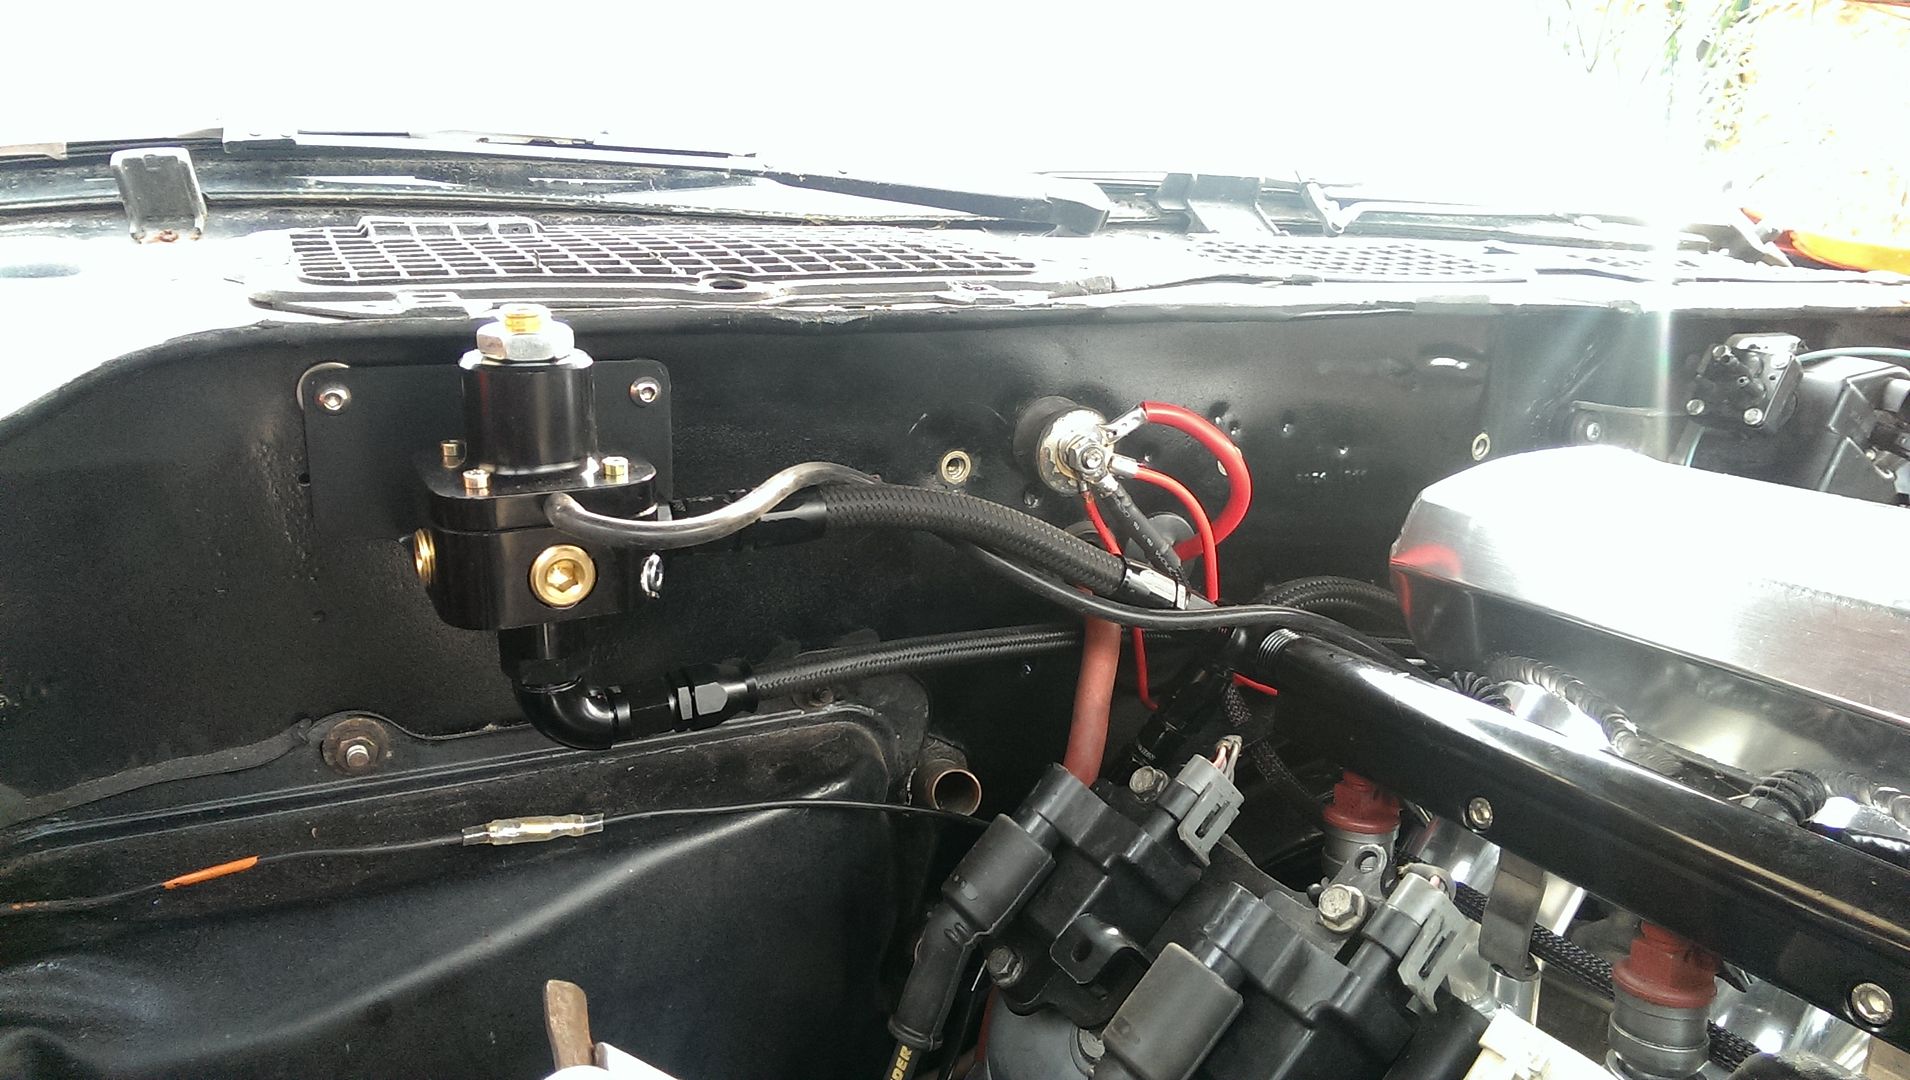
Wired the rear lights, fuel pump, dome light and starter solenoid (which I've moved to the back of the car with the battery - I never liked having a 50mm^2 hot cable running front to back with no fuse. And I also dropped in a big 16mm fused main battery feed for the rest of the car, that runs up to a stud on the firewall where everything takes it's power from. Overkill, but if I ever upgrade things like fuel pumps, or ever fit a stereo or something then I won't have to touch that again...
Spent a good hour fitting the shifter cable - and swearing - trying to get it adjusted right was a pain. Not sure if the throws on the 4L80E shifter are slightly different to other transmissions or not....
Made the throttle cable up and fitted that - do need to modify the stop on the throttle body so that I can get full throttle - not unusual on those Chinese throttle bodies...
Spent 2 hours messing around with the ECU and TCU trying to get them talking to eachother via CAN - got there eventually! Loading new firmware on the TCU seemed to fix the problem - so it was either corrupt or there was a bug in the old code.
Yesterday I finished cutting a hole in the floor to clear the oil cooler lines on the 4L80E - downside of such a large transmission. I hammered out a domed aluminium cover plate for it and put a squirt of non-setting sealer round it before screwing it to the floor. Now if I ever need to get at the fittings I can do it without dropping the transmission out...!
Next I fitted new body seals for the doors to replace the leaky ones. I did replace them with new when I rebuilt the car the first time, but they didn't last very long. I bought a different make this time and they seem much better. With the rain that's forecast for the rest of the weekend I expect I will find out if the new seals have fixed the problem, or not.
After that I finished off all of the dash wiring with a couple of minor exceptions and then refitted the carpet, dash, instruments etc.
Tested the electricals that I can and everything seems to work so far.
Today I got quite a lot done, but nothing much to see - which is always annoying...
Wired the rear lights, fuel pump, dome light and starter solenoid (which I've moved to the back of the car with the battery - I never liked having a 50mm^2 hot cable running front to back with no fuse. And I also dropped in a big 16mm fused main battery feed for the rest of the car, that runs up to a stud on the firewall where everything takes it's power from. Overkill, but if I ever upgrade things like fuel pumps, or ever fit a stereo or something then I won't have to touch that again...
Spent a good hour fitting the shifter cable - and swearing - trying to get it adjusted right was a pain. Not sure if the throws on the 4L80E shifter are slightly different to other transmissions or not....
Made the throttle cable up and fitted that - do need to modify the stop on the throttle body so that I can get full throttle - not unusual on those Chinese throttle bodies...
Spent 2 hours messing around with the ECU and TCU trying to get them talking to eachother via CAN - got there eventually! Loading new firmware on the TCU seemed to fix the problem - so it was either corrupt or there was a bug in the old code.
Looks like you are moving right along.
You will be out burning a tire before you know it.
You will be out burning a tire before you know it.
sycsteve
Well Known Member
Looking very nice. I had a '79 Berlinetta in H.S. that was suppose to be my first car. Put 400 s.b and a leaky Holley Doubble pumper in it and that was the end of that 
Sold the car to a friend for $500 but could not find the title. He chopped it up and junked it. I found the title about 7 years ago in a box of stuff lol.
Sold the car to a friend for $500 but could not find the title. He chopped it up and junked it. I found the title about 7 years ago in a box of stuff lol.
Last edited:
Sera
Active Member
Thanks very much
Today I spent the morning sorting the fuel system out - replacing all of the rubber fuel hose as it had succumbed to our wonderful fuel with ethanol in... I've replaced it with the proper R9 rated hose this time, so hopefully it will be OK now. After that I dropped the fuel tank out because the fuel sender has always been temperamental. Found that it was actually a stuck float. Freed it off and reassembled the tank before rubbing it down and giving it a fresh coat of paint as it had some over spray on it from when the car was sprayed.
Then I got rained off, so had to call it a day.
Oh and I found out that my door seals still leak, despite replacing them with new. They seem to leak where the door and body seals meet at the back of the door. I give up on that particular problem....
Sera
Active Member
Had a good few days doing odd little jobs. Got the fuel tank back in. Made the mount for the new fuel pump and prefilter.
Fitted the pushrods and the motor and primed the oil system through the port on the side of the block. Mounted the alternator and wired it up. Measured up for the belt too.
Mounted the solenoid in the trunk and hooked up the battery. Cranked it over to check I was getting a signal to the ECU and it all look ok so far. Had some issues the with the transmission controller, but seem to have fixed that.
Mounted the new wideband controller in the dash and tested it. All ok.
Refitted most of the interior, just need to fix the door handles and re-dye the backs of the seats. Put some polythene sheeting behind the door panels this time. Should keep them dry.
Also mostly finished plumbing the fuel system. Got a few more bits to do yet, but its nearly there....
Managed to nab a pair of gear shift paddles for cheap too. Will be really easy to mount and they are super neat.
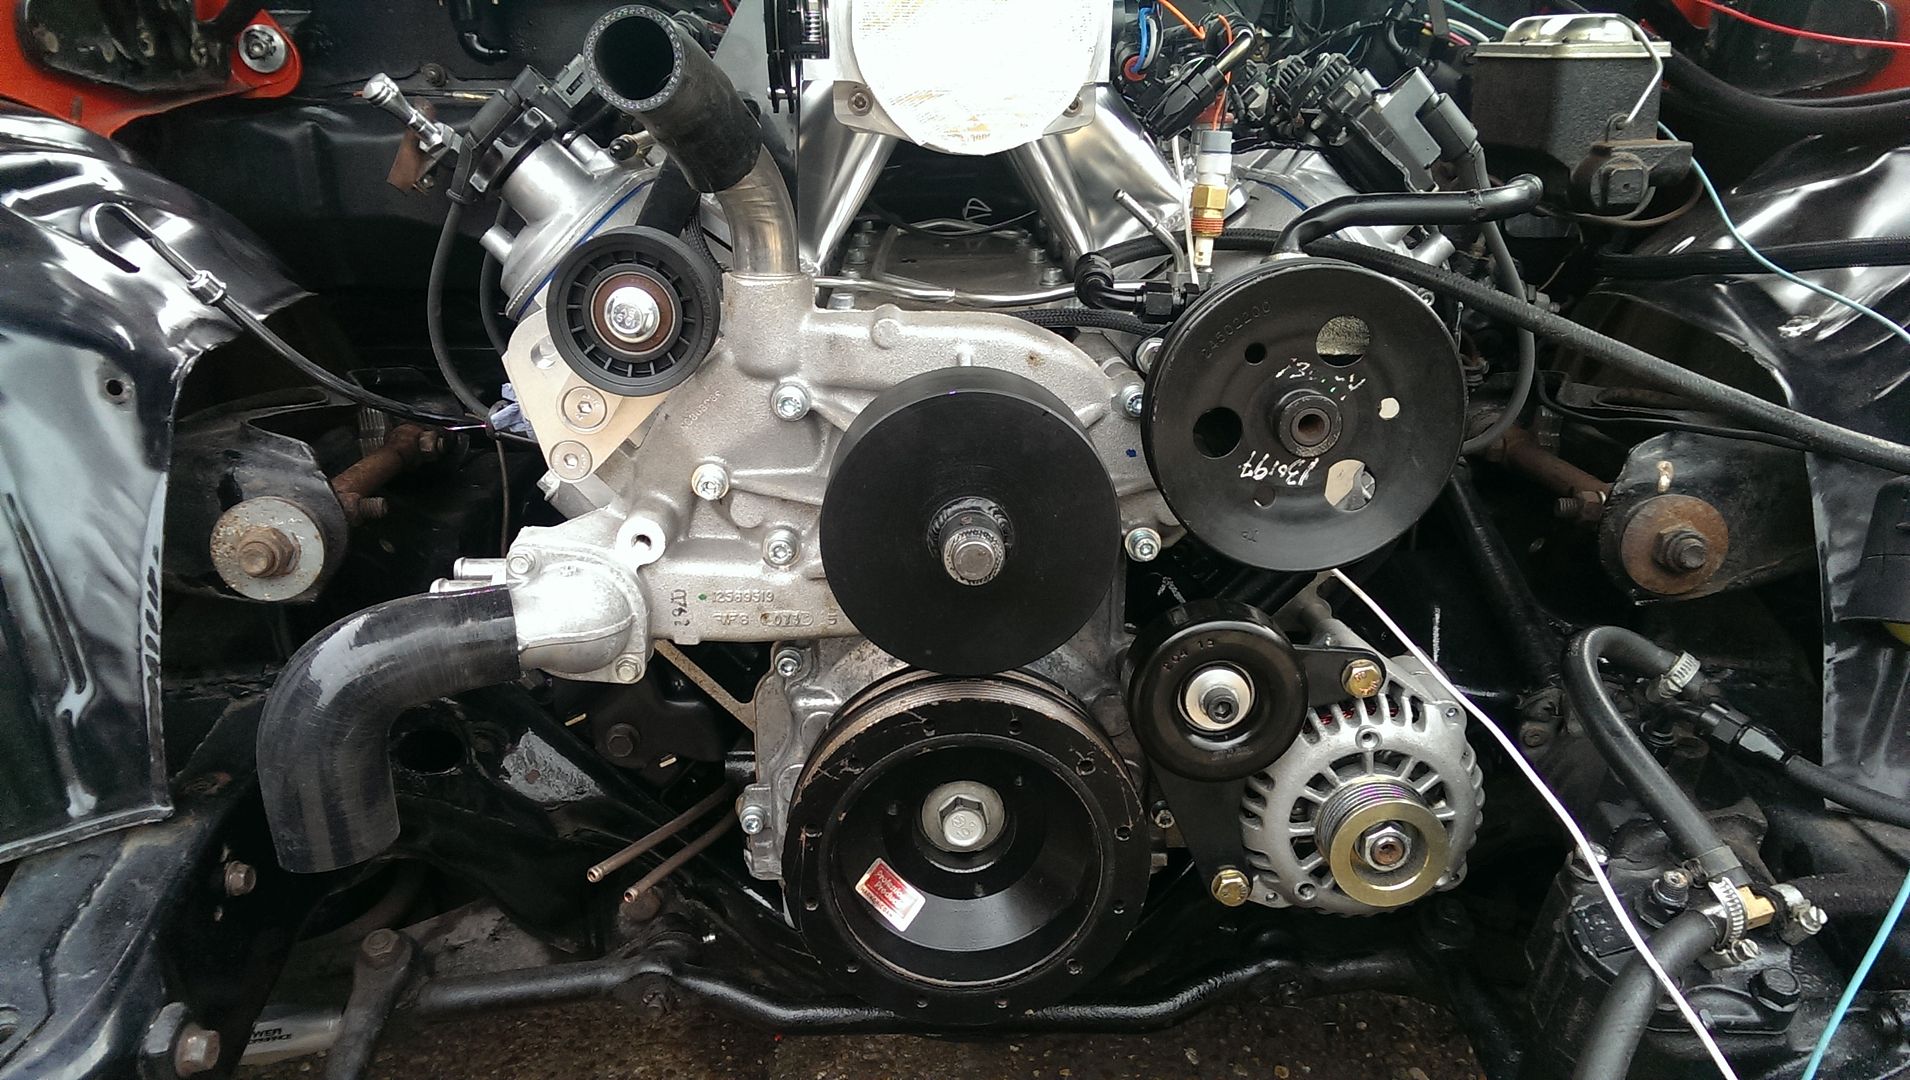


You move at break neck speed...........nice work 
Sera
Active Member
Thanks guys....
I'm in the UK... not many of these cars over here - and even less built by a girl, lol
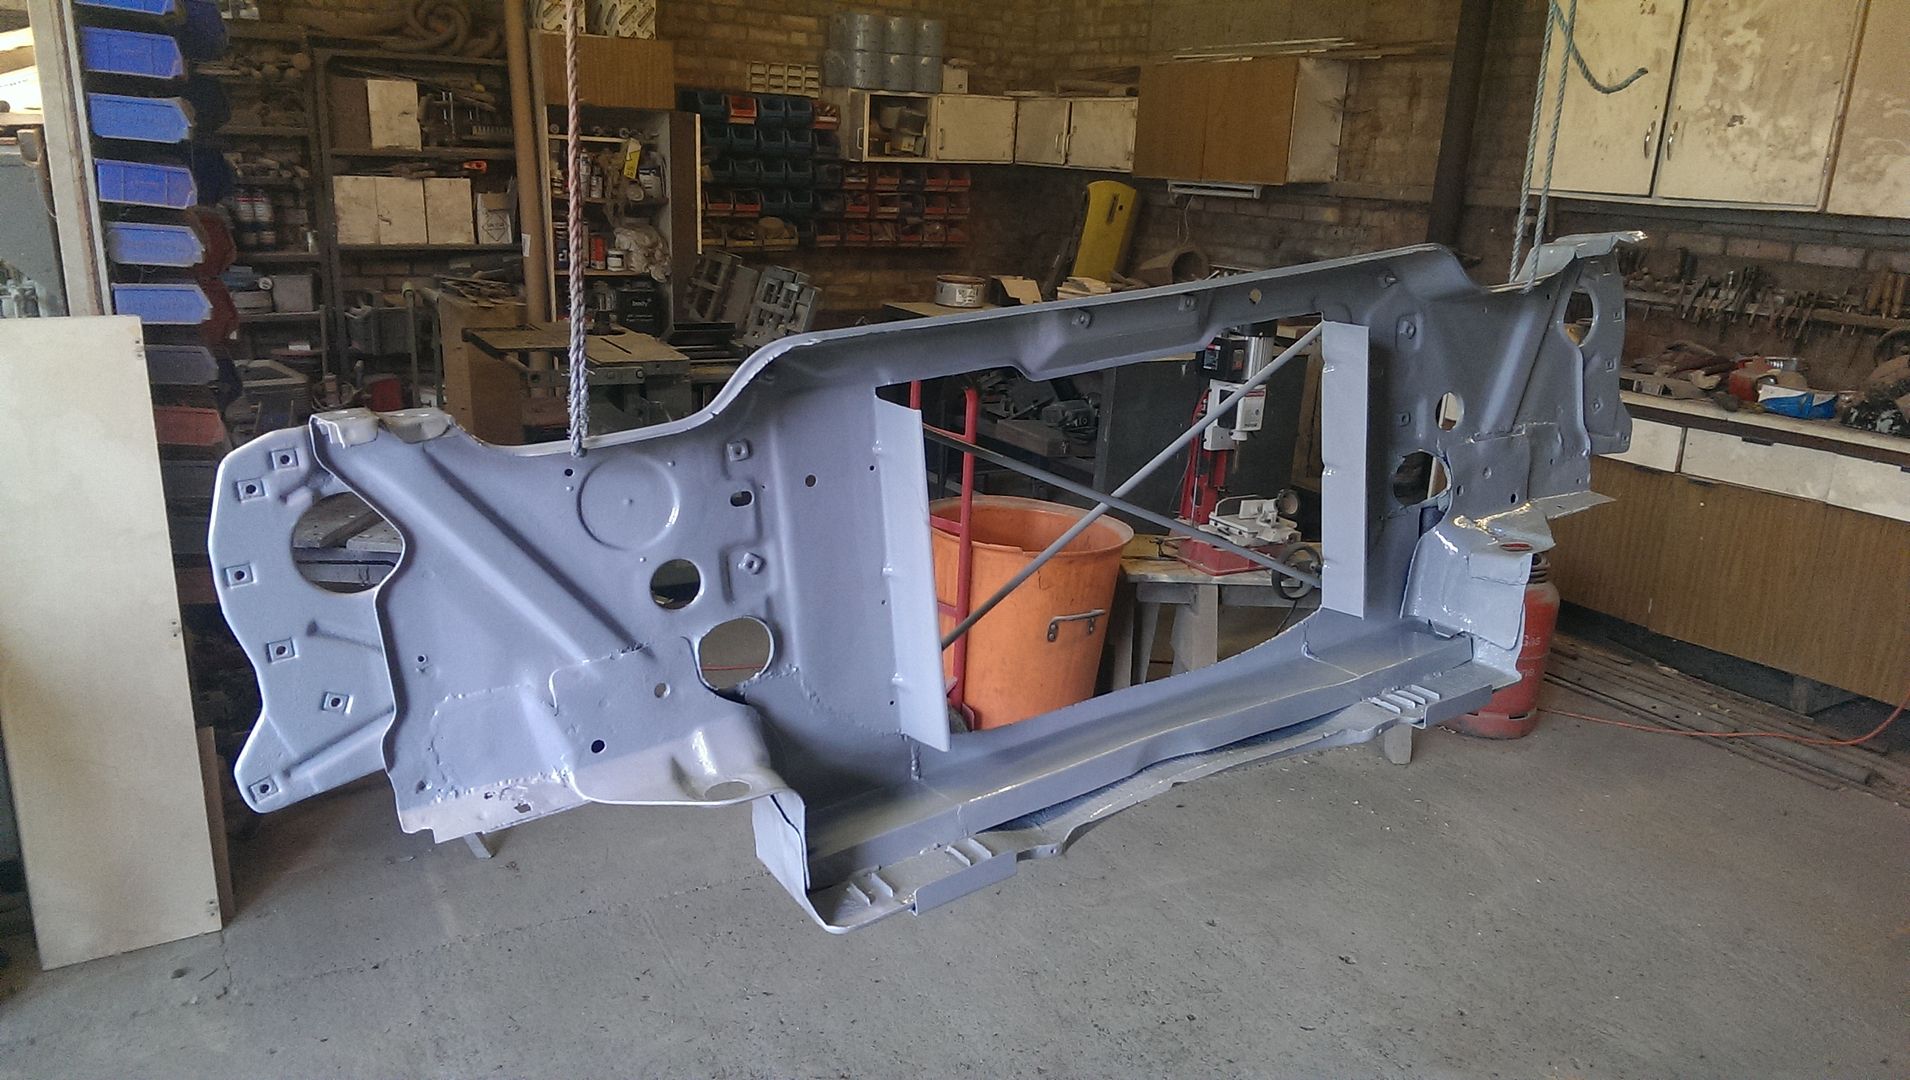
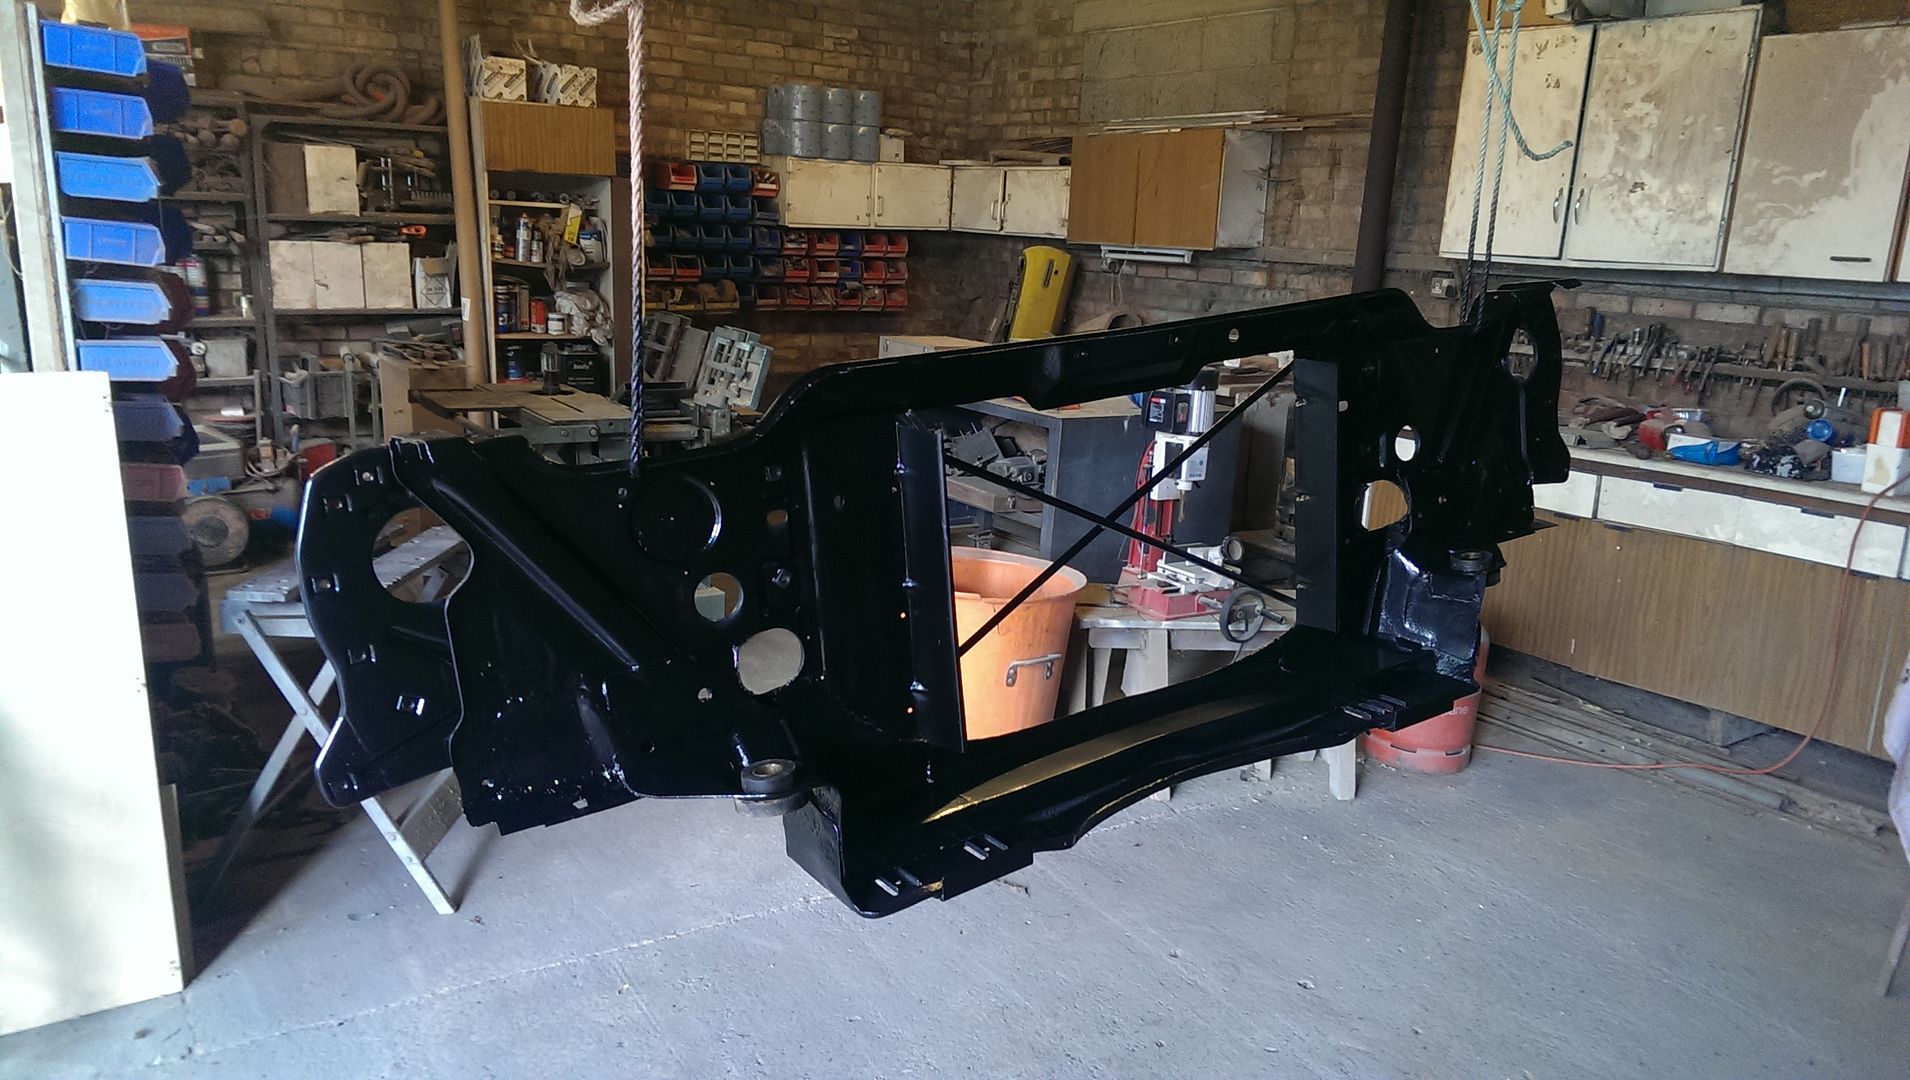
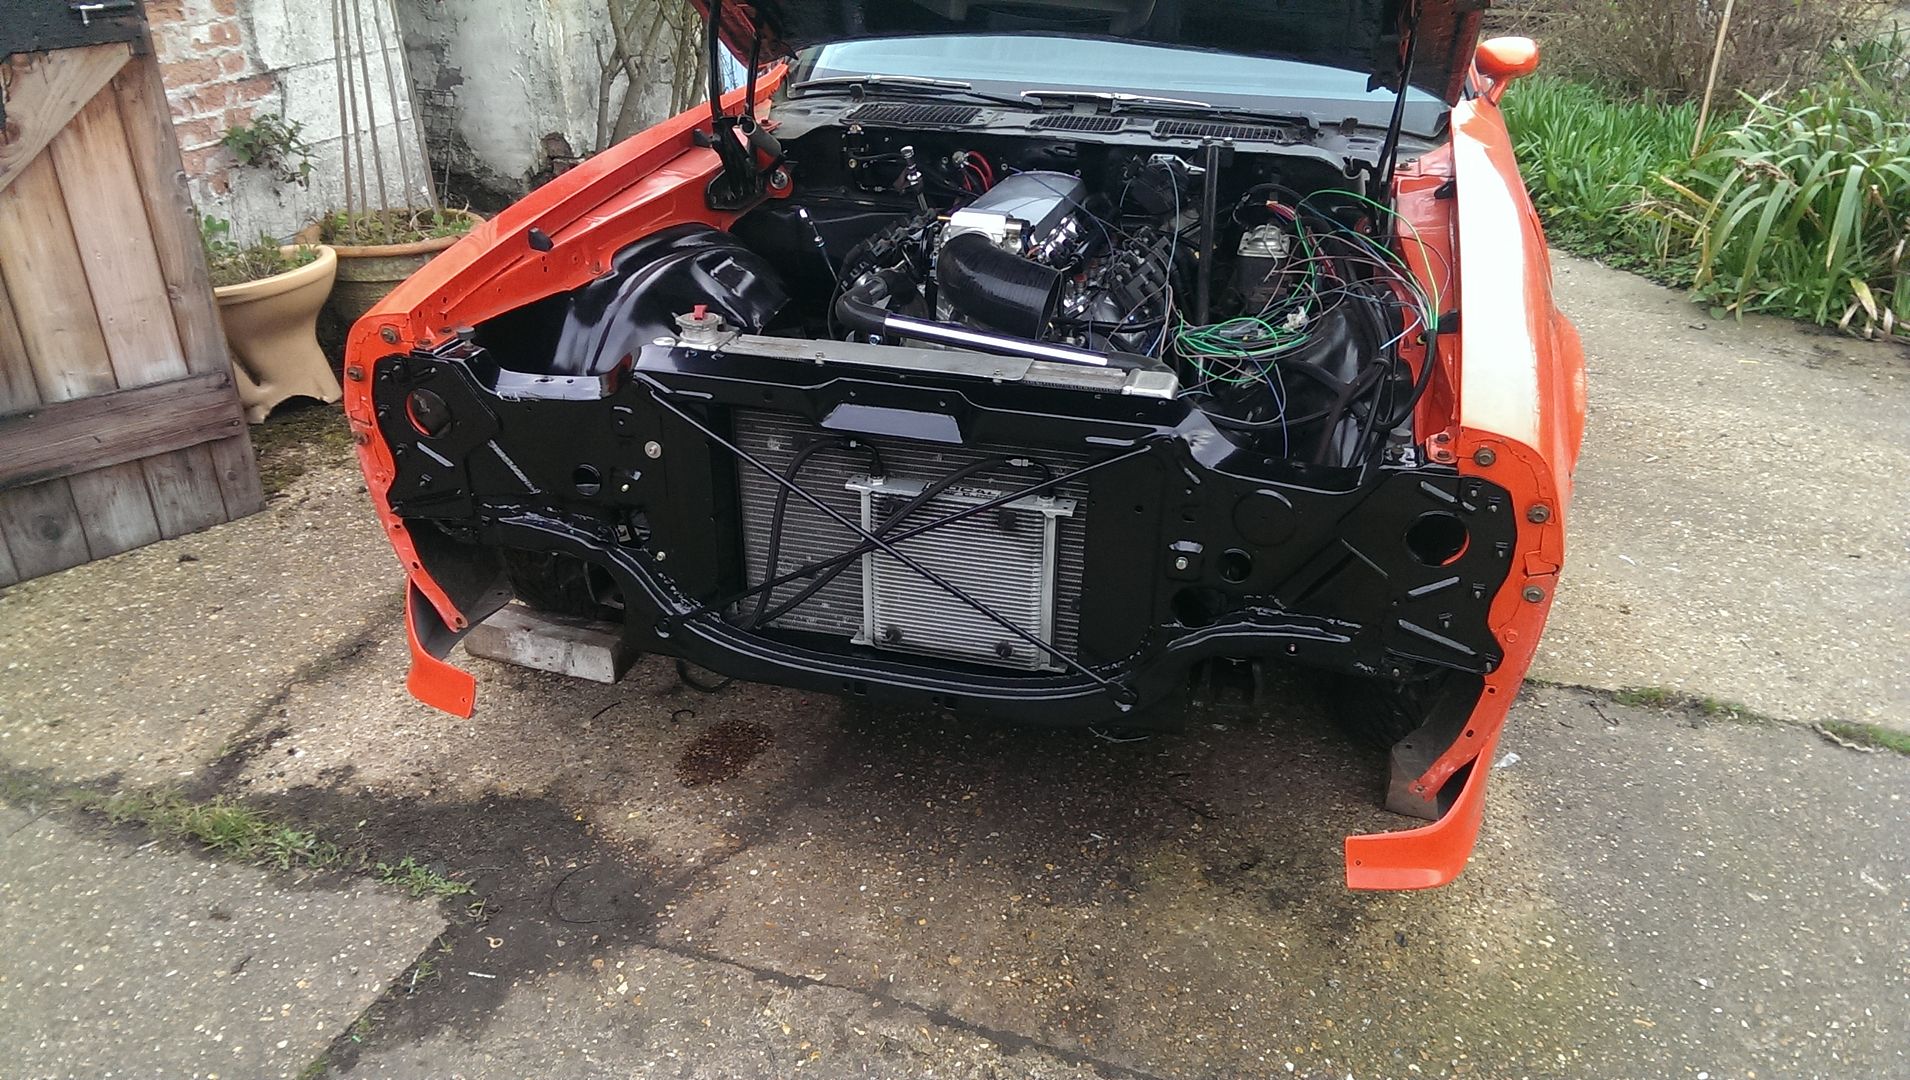
Another busy day - got the core support cleaned up and painted this morning - 2k epoxy primer and then satin black top coat. Looks much better now. Let it bake in the sun for a few hours and then refitted it.
Dropped the radiator back in and worked out the hoses for it, just need to get some clips, and also add a little bleed point in the top hose. Loads of clearance to the underside of the hood and it all worked out quite neat.
Not got a huge amount of big jobs left to do, mainly small jobs that take ages. Waiting on some headers from the USA too.

I'm in the UK... not many of these cars over here - and even less built by a girl, lol
Another busy day - got the core support cleaned up and painted this morning - 2k epoxy primer and then satin black top coat. Looks much better now. Let it bake in the sun for a few hours and then refitted it.
Dropped the radiator back in and worked out the hoses for it, just need to get some clips, and also add a little bleed point in the top hose. Loads of clearance to the underside of the hood and it all worked out quite neat.
Not got a huge amount of big jobs left to do, mainly small jobs that take ages. Waiting on some headers from the USA too.
sorry, Ma`am that looks awesome!dude, that looks awesome! keep the pics comming. where you at? overseas i assume?
Lookin good, really coming along nicely Sera.
Sera
Active Member
All of you are too lovely x
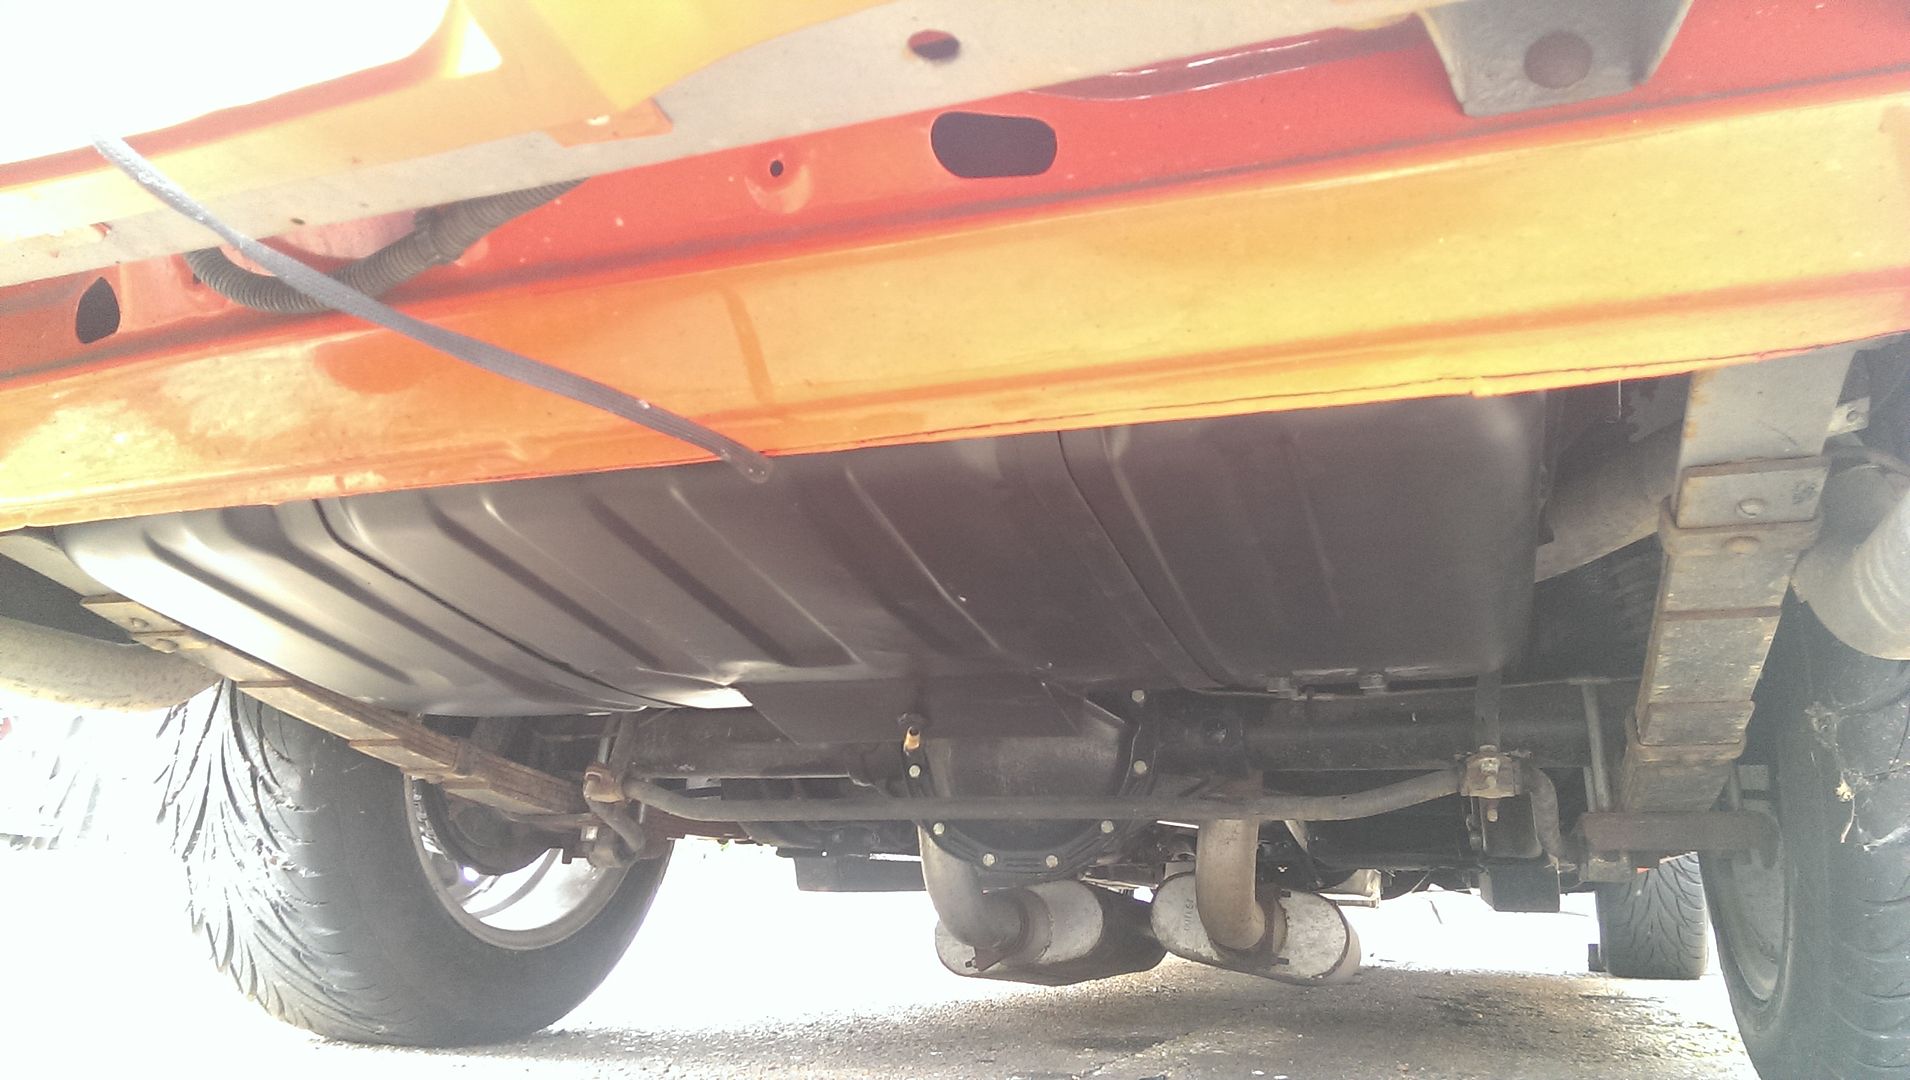
Quick job for the evening - mounting the new fuel pump. I thought an upgrade would be beneficial with the new engine. The new one being an AEM 340lph/100gph (@43psi) pump. Enough to support my HP goals with some to spare...
Cut a stainless plate which bolted to the mounts I'd previously welded to my tank when I fitted my original pump, fitted a decent sized pre-filter, just need to finish the fuel lines off and I can stick some fuel in it and see if it leaks...
Ignore the low hanging mufflers, nothing connected the other side just yet...
