62 409 4 Speed

nomad59NZ

Well Known Member
Supporting Member 2
Well cleaning and sandblasting has taken a fair bit of time but also saved a fair amount of coin by sandblasting stuff myself and real satisfying to.
A week ago with a HUGE hand from Steve (LMBRJQ60) :bow we got stuck in to replacing the rear floor pans and now working on the front.
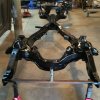
upload_2015-3-9_21-33-28.jpeg
upload_2015-3-9_21-32-33.jpeg
upload_2015-3-9_21-33-0.jpeg

Someone truly butchered the trans tunnel at some stage so a new section will need to be to make this look a little better than what it is now.
upload_2015-3-9_21-33-59.jpeg

Thanks for the help Steve.

Gav
 

1961BelAir427

Well Known Member
Supporting Member 3
Looks like a great "blank canvas" to start on. Were you as surprised as I at how light the bare frames are?
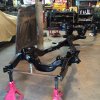
 

nomad59NZ

Well Known Member
Supporting Member 2
Have been chipping away at the car. Over the past times i have seen numerous people asking about installing coil springs. Cecil had mentioned on numerous occasions about using threaded rod and I had used this method before in the past as well and it works good.
Today i installed the RH spring and and thought i would share with you the process. I used 5/8 dia rod, which meant having to drill out the upper shock mount hole. That's fine as the rubbers on the shocks are way bigger in OD.

Made up a plate to bolt on under side of lower A arm, used nylon block a bunch of heavy washers and longer nuts to get maximum thread use.
upload_2015-8-15_17-57-18.jpegupload_2015-8-15_17-58-1.jpeg
upload_2015-8-15_18-4-44.jpegupload_2015-8-15_18-5-4.jpeg

As soon as i could i also installed the spindle.
upload_2015-8-15_18-9-27.jpeg

I used longer bolts for the rear holes so that i could take up on these to secure the arm so as to prevent any catastrophes
upload_2015-8-15_18-5-55.jpeg
 

Attachments

  • upload_2015-8-15_18-9-5.jpeg
    upload_2015-8-15_18-9-5.jpeg
    42.1 KB · Views: 11

nomad59NZ

Well Known Member
Supporting Member 2
After everything was all pulled up in to place all proper bolts we installed and threaded rod removed. This was a real breeze especially when you have no weight on the car / chassis where you can use the weight of the car and a floor jack.

upload_2015-8-15_18-10-32.jpeg

Brakes for RH hand side are now all fitted up as well and look good.
NOTE:- Brakes and 2" drop spindles supplied by Mike (58delivery)

upload_2015-8-15_18-11-17.jpegupload_2015-8-15_18-11-31.jpeg

Tomorrow the LH side will be done and then attack the RH front floor pan

Cheers
Gav
 

BSL409

Well Known Member
Supporting Member 6
it is a way but there was no rubber bushing under the factory shocks, Looking good thou
 

yellow wagon

Well Known Member
Supporting Member 2
Hey Gav, I see the fuel line clip there but no fuel line...? That front section of fuel line is easy to install when the upper control arm isn't bolted in place yet.
 

nomad59NZ

Well Known Member
Supporting Member 2
Hey Gav, I see the fuel line clip there but no fuel line...? That front section of fuel line is easy to install when the upper control arm isn't bolted in place yet.
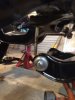
HA HA, yeah. It was one of those ones we i kept on saying to myself "put the fuel line in" Put the fuel line in" and then TOO LATE and it was a Homer Simpson moment "DOH":facepalm.

Gav
 

nomad59NZ

Well Known Member
Supporting Member 2
SECOND REAR UPPER CONTROL ARM FITTING

There has been a number of threads with regards to fitting / installing a second rear upper control arm and the positioning of the bracket on to the diff. I like others have purchased the one from Show Cars and now that I'm at the stage of working on this area you will see in the following photo's on just how far out this is in comparison to where the top arm falls.

No I don't at this stage have the chassis fully set to ride height and the rear springs aren't in yet either, but diff is close to center, yet even with having this fully set-up the bracket is still going to be way out of place. Threads that I have read with the likes that Steve (LMBRJQ60) started http://www.348-409.com/forum/threads/space-between-upper-different-arms.28998/ and what Dan (tripower) had posted when he built his 61 and just how much these brackets were out by.

I will be looking at making a new bracket so as to align the second arm properly on to the diff. I also have the equal amount of shims in the second arm as to what is in the passenger side.
If one really wanted to, this bracket could be used but it would certainly put a lot of stress on the bushes and would wear out in no time i would image and possible even cause binding to a degree.
So this can be used for future information purposes for those who are also installing a second upper arm.
UPDATED NOTE- bracket is currently held in place by the threaded rod and is not welded, no major issue.

upload_2015-8-29_20-20-36.jpeg
upload_2015-8-29_20-20-57.jpegupload_2015-8-29_20-21-24.jpeg

Gav
 
Last edited:
Top